
Frequently Asked Mortgage Questions
Do you have questions? We can help! You will find the answers to several frequently asked mortgage questions below.
How do I register to pay my loan online, if Direct Mortgage/Carrington is the servicer?
To pay your monthly payment online via Carrington you can visit their website here. If you have your loan number you can sign up right away, if not then there is also have a tool for you to find it or you can give us a call at (801) 924-2300. When your loan has transferred to Carrington, your Welcome Letter should show an effective date of the transfer. After this date, you can start sending your payments to them. Below are the few steps needed in order to create your account.
Follow the steps below to create an online account:
- Visit their User Registration page
- If you have your CMS loan number, click on “Register my Loan”
- If you need to look up your CMS loan number, click on “Get my Loan Number”. Enter your prior servicer (Direct Mortgage) and your Direct Mortgage Loan Number
- Agree to the website terms and conditions
- Confirm your identity using your 10-digit CMS loan number and your Social Security number
- Enter your email address, establish a username and password, and set up security questions
- A link will be sent to you via email. Click the link in the email to complete the account creation process
End of Explanation
This post was last updated on 1/25/2022.
How do I obtain a mortgage payoff, if Direct Mortgage/CENLAR is the servicer?
Phone: (877) 772-9633. Use this phone number when requesting loan payoffs from Direct Mortgage, Corp. Simply call the number, and enter either the loan number or the SSN (Social Security Number) to obtain the payoff amounts and instructions (faxed to the requestor).
End of Explanation
This post was last updated on 2/8/2021.
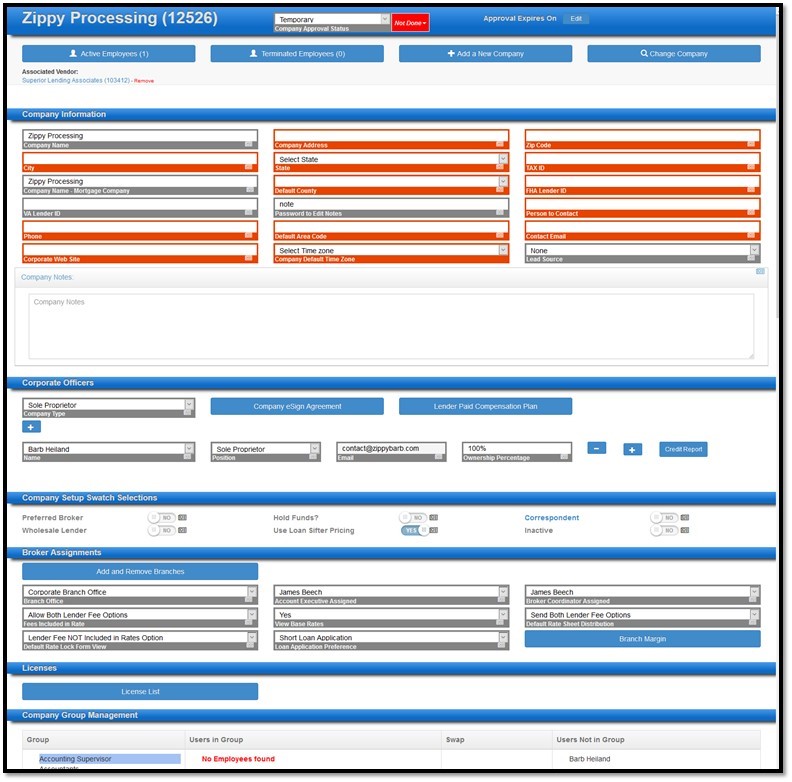
What is the difference between pre-approval and pre-qualification? How do I print a Approval Letter? And Describe the Landing Page and Workflow Queues.
The pre-approval process is more complete than pre-qualification. For pre-qualification, the loan officer asks you a few questions and provides you with a pre-qual letter. Pre-approval includes all the steps of a full approval, except for the appraisal and title search. Pre-approval can put you in a better negotiating position, much like a cash buyer.
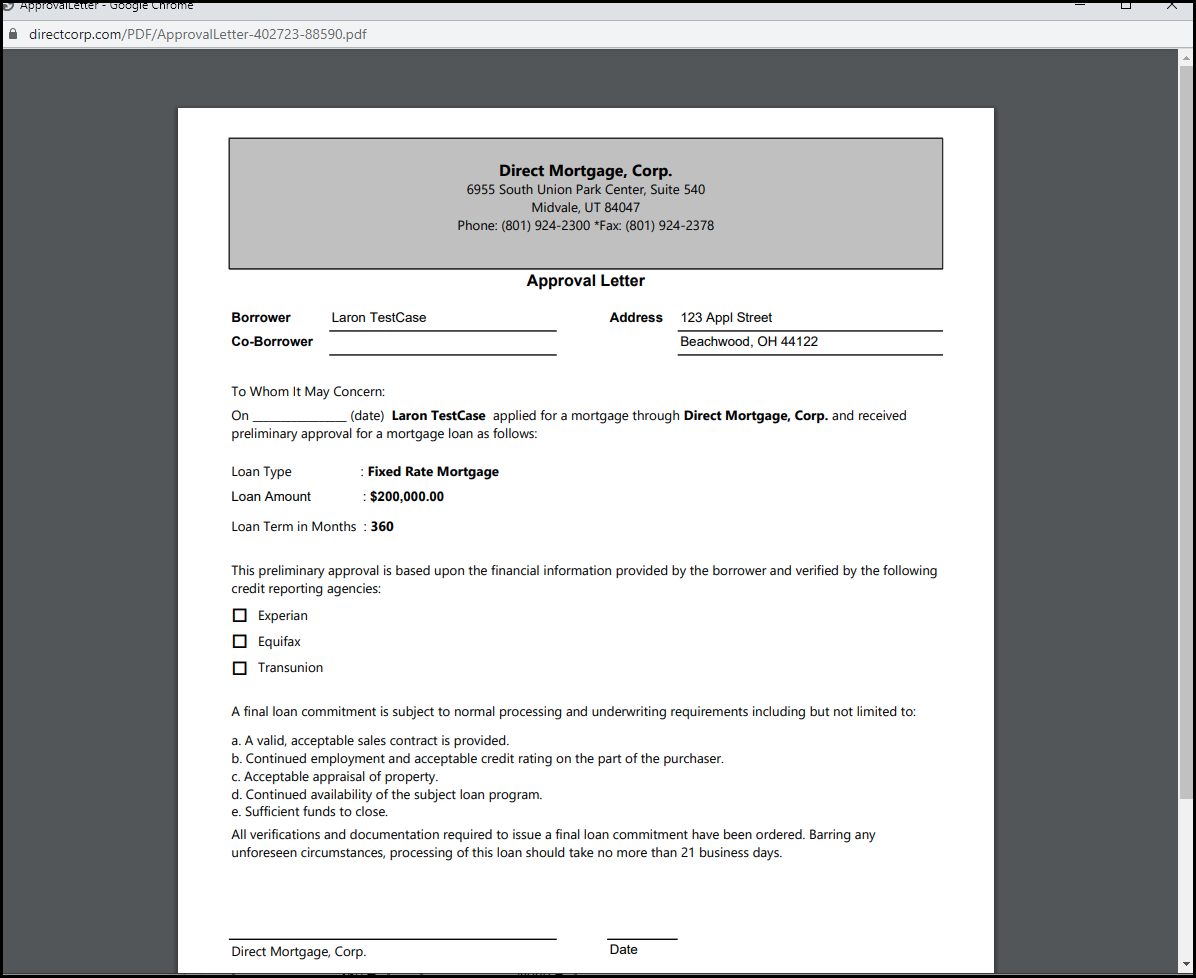
How do I print a Approval Letter? Direct Mortgage, Corp. assists with pre-approval utilizing its own DirectWare® software solution.
1. First, complete the pages to change the Incomplete Red X Check Marks to the Completed Green Check Marks on the loan application left side navigation links – from the Loan Summary page down through and including the Identity Verification page. Notice the “Not Done” function in the loan application header area. Click that to see what needs attention.
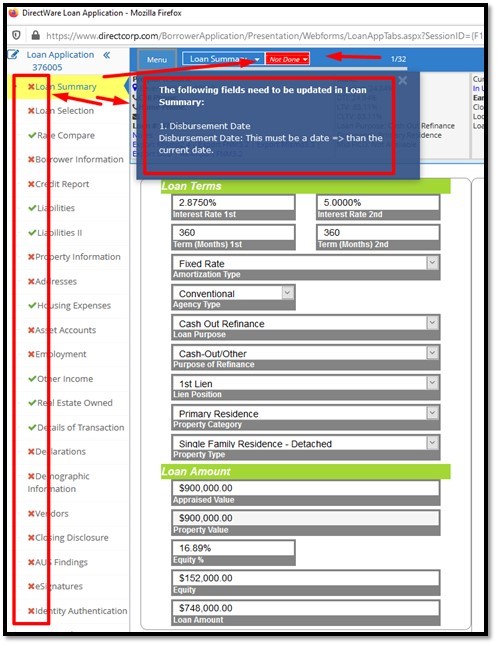
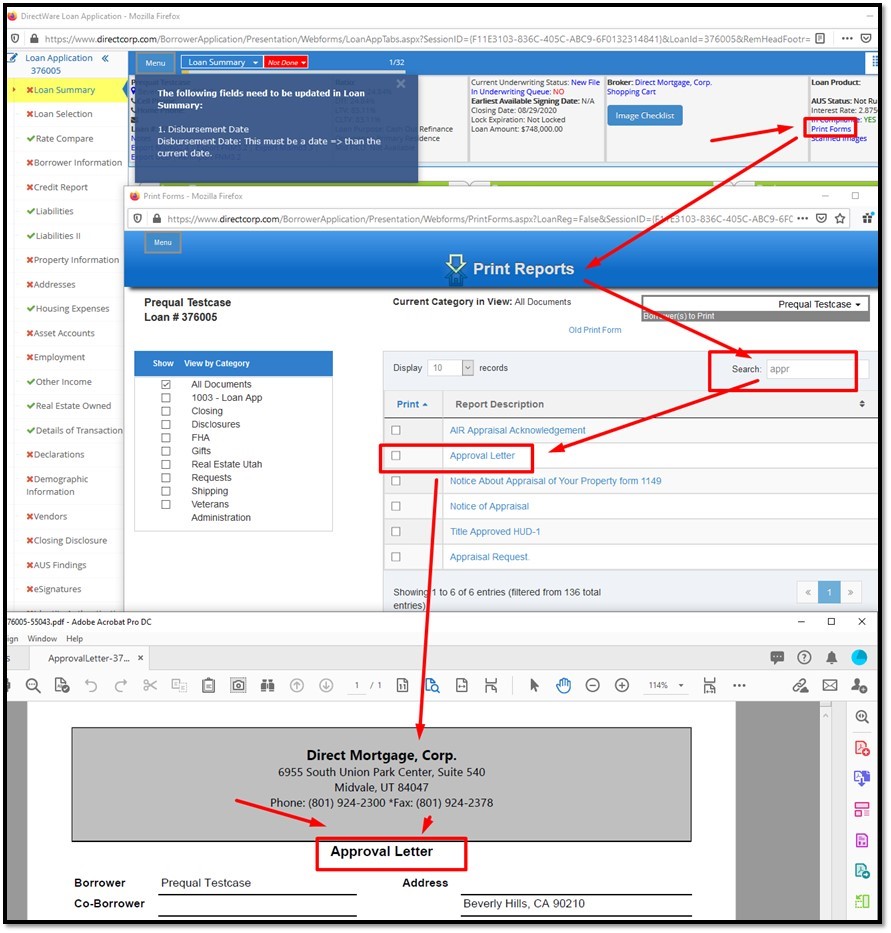
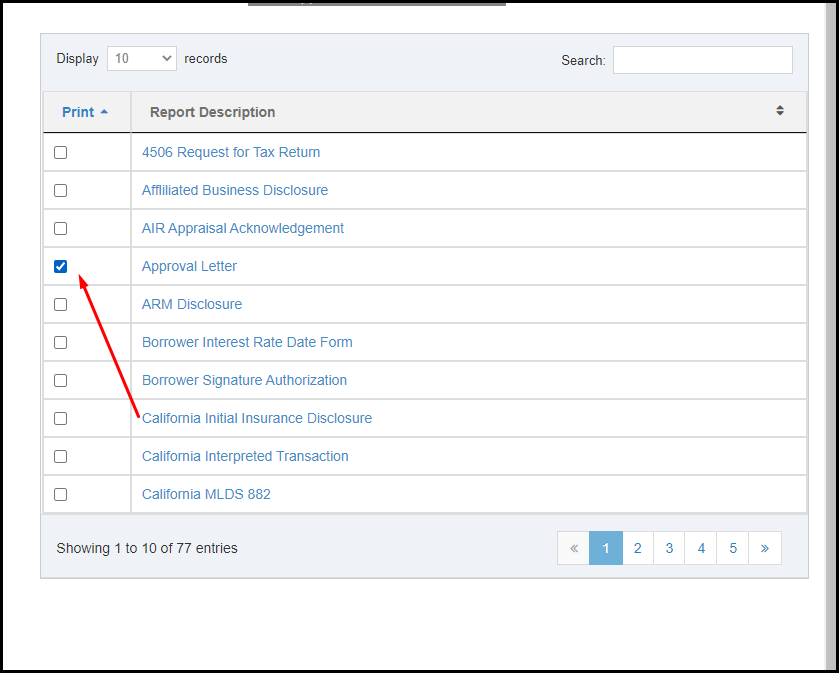
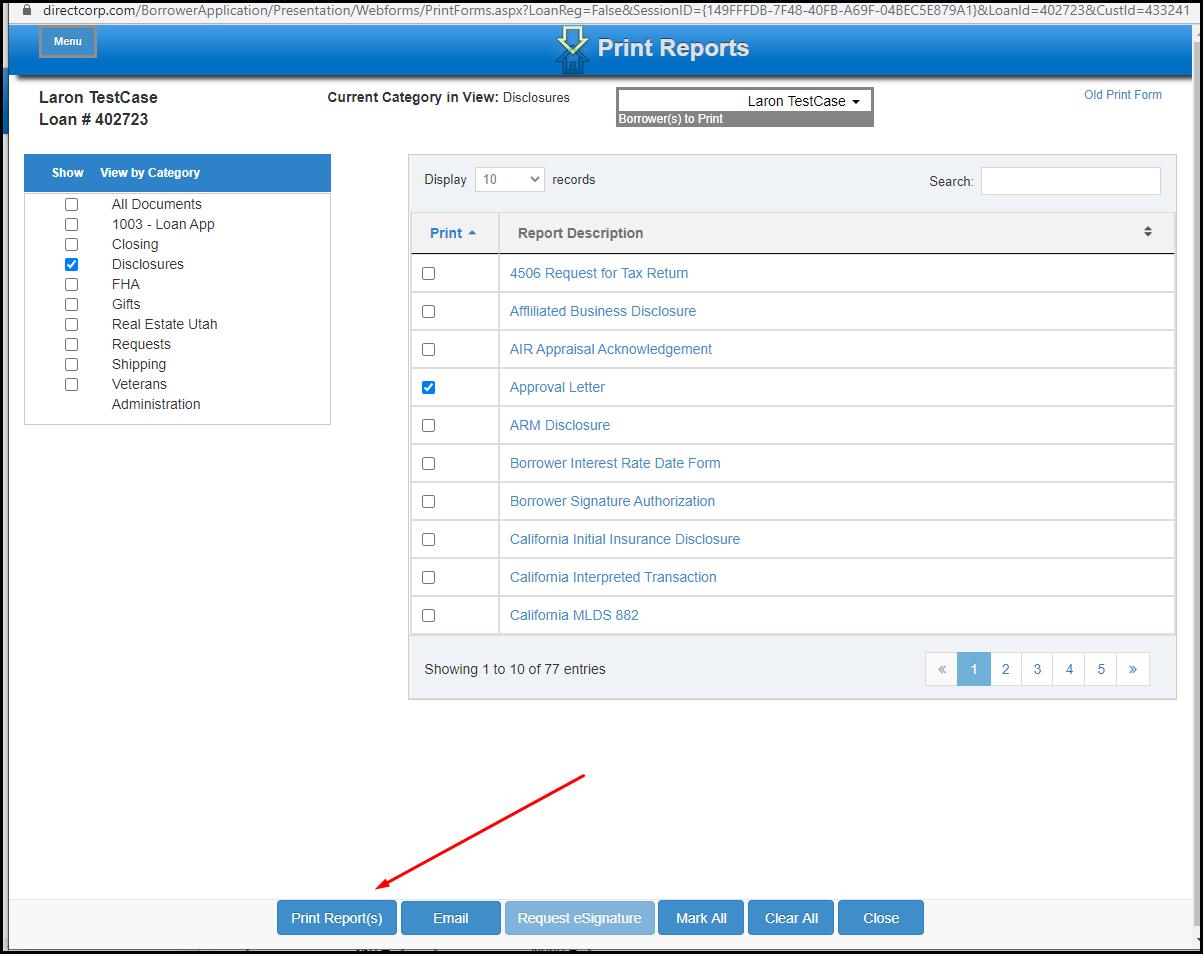
2. Next print the Approval Letter. This can be printed before completing the loan application steps, but be careful to not mislead the borrower with incomplete information. See the screenshot below for how to follow this click path:
Loan Application —> Loan Pulse Header Area —> Print Forms —> Search Box (type in a partial word search) —> click the Approval Letter report —> Save or print the PDF Approval Letter.
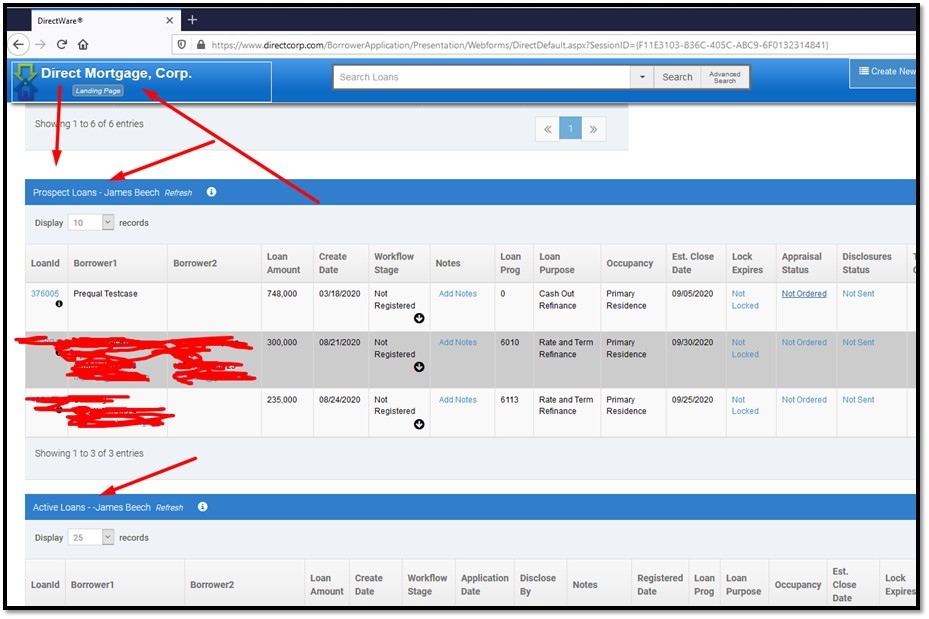
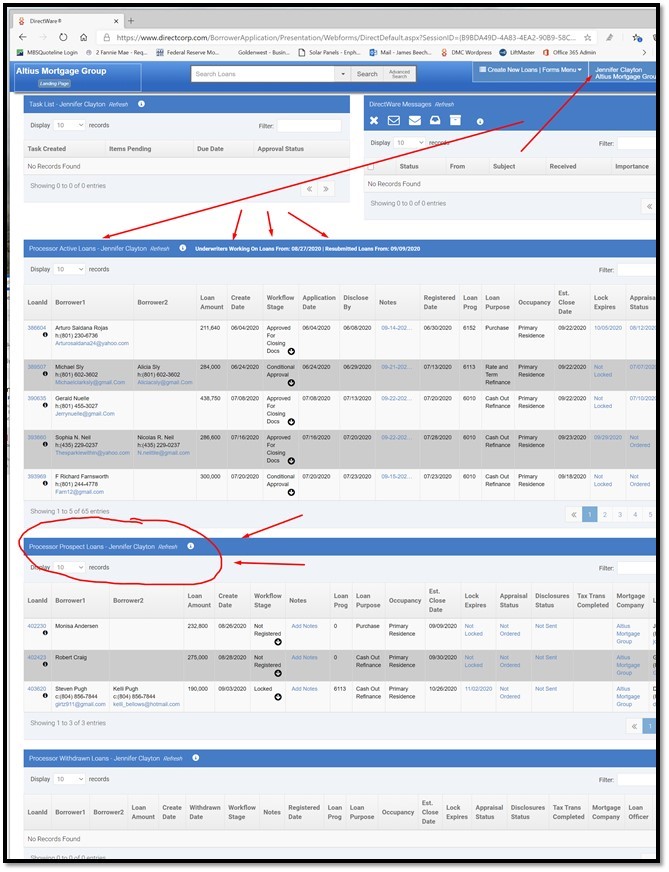
3. Queues for Active Loans; Prospect Loans; used for Prequalification and Pre-Approval.
a. Active loans have the obtained the required 6 data fields:
i. Borrower Names.
ii. Borrower Income.
iii. Borrower Social Security Numbers.
iv. Subject Property Address.
v. Property Value.
vi. Loan Amount.b. All Loans that obtain the required 6 data fields must be disclosed within 3 days or they will be automatically withdrawn. Loans withdrawn
because they were not disclosed within legal requirements cannot be reinstated (a new loan application must be restarted).
c. Prospect Loans are missing one or all of these required 6 data fields.
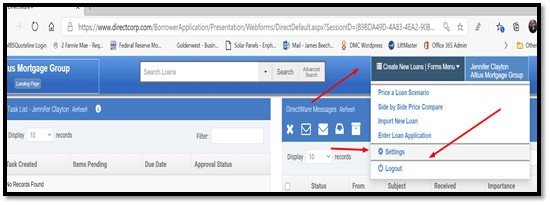
d. Access these queues from the Landing Page – shown in this screenshot.
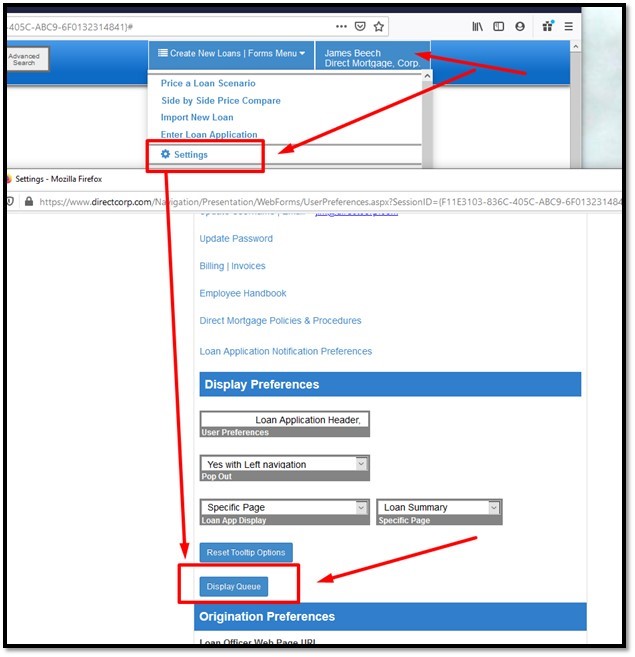
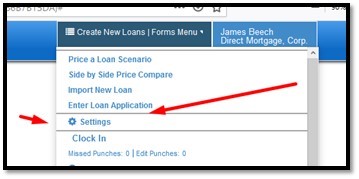
4. You can customize your loan queues through your settings. Here is the screenshot of how to access that.
Landing Page —> Click where your name is displayed in the header area —> Settings —> Display Queue.
This post was last updated on 9/01/2020.
When does it make sense to refinance?
Usually people refinance to save money, either by obtaining a lower interest rate or by reducing the term of the loan. Refinancing is also a way to convert an adjustable loan to a fixed loan or to consolidate debts. The decision to refinance can be difficult, since there are several reasons to refinance. However, if you are looking to save money, try this calculation:
Calculate the total cost of the refinance
Calculate the monthly savings
Divide the total cost of the refinance (#1) by the monthly savings (#2). This is the “break even” time. If you own the house longer than this, you will save money by refinancing.
Since refinancing is a complex topic, consult a mortgage professional.
This post was last updated on 9/01/2020.
What is the difference between a mortgage broker and a lender?
A mortgage broker counsels you on the loans available from different wholesalers, takes your application, and usually processes the loan which involves putting together the complete file of information about your transaction including the credit report, appraisal, verification of your employment and assets, and so on. When the file is complete, but sometimes sooner, the lender “underwrites” the loan, which means deciding whether or not you are an acceptable risk.
This post was last updated on 9/01/2020.
Will I save money going directly to a mortgage lender?
Mortgage brokers perform functions that still need to be done by employees of the lender. Working directly with a lender will create savings when the same tasks are required to be done by both the lender and the broker. Alternately, because mortgage brokers deal with multiple lenders, they can shop for the best terms available. They might also find lenders who specialize in various market niches that many other lenders avoid, such as loans to applicants with poor credit ratings, loans to borrowers who do not intend to occupy the property, or loans with minimal or no down payment. But sometimes these specialized loan products are not available to brokers, which will make more sense to work directly with a lender.
This post was last updated on 9/01/2020.
What is a full documented loan?
Both income and assets are disclosed and verified, and income is used in determining the applicant’s ability to repay the mortgage. Formal verification requires the borrower’s employer to verify employment and the borrower’s bank to verify deposits. Alternative documentation, designed to save time, accepts copies of the borrower’s original bank statements, W-2s and paycheck stubs.
This post was last updated on 9/01/2020.
What is a conforming loan?
A conforming loan is a mortgage that is equal to or less than the dollar amount established by the limit set by the Federal Housing Finance Agency (FHFA) and meets the funding criteria of Freddie Mac and Fannie Mae. For borrowers with excellent credit, conforming loans are advantageous due to lower Mortgage Insurance (MI) rates.
Fannie Mae and Freddie Mac are restricted by law to purchasing single-family mortgages with origination balances below a specific amount, known as the “conforming loan limit.” Loans above this limit are known as jumbo loans. Click the links below to access the current year conforming loan limits.
2020 Conforming Loan Limits
[XLS], [PDF], [MAP], [ADDENDUM]
This post was last updated on 9/01/2020.
What is a jumbo mortgage?
A jumbo loan, also known as a jumbo mortgage, is a type of financing that exceeds the limits set by the Federal Housing Finance Agency (FHFA). Unlike conventional mortgages, a jumbo loan is not eligible to be purchased, guaranteed, or securitized by Fannie Mae or Freddie Mac. Designed to finance luxury properties and homes in highly competitive local real estate markets, jumbo mortgages come with unique underwriting requirements and tax implications. These kinds of mortgages have gained traction home prices increase.
The starting amount of a jumbo mortgage varies by state—and even county. The FHFA sets the conforming loan limit size for different areas traditionally on an annual basis.
This post was last updated on 9/01/2020.
What are points?
Points are an upfront cash payment required by the lender as part of the charge for the interest rate, expressed as a percent of the loan amount; e.g., “2 points” means a charge equal to 2% of the loan balance.
Divide the points cost by the monthly savings to find the “break even” time. If you own the house longer than this, you will save money by paying points upfront.
See below for an example of how points work. In the example below the points represent a 0.25% reduction.
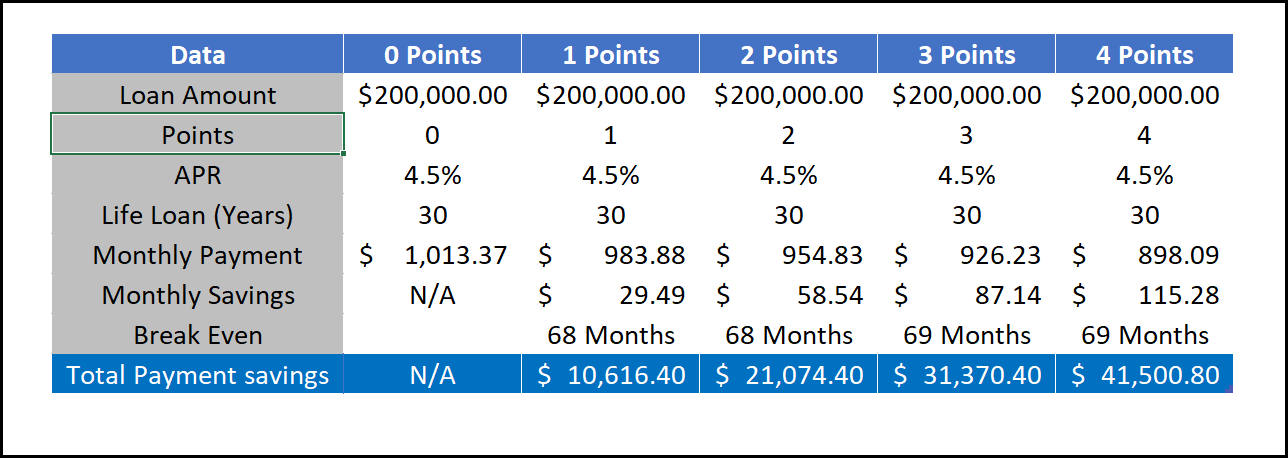
*Sample APRs and points are for educational purposes only and are not an actual quote or commitment to lend. Actual rate buydown per point varies by loan program and market conditions.
This post was last updated on 9/01/2020.
Do you allow FHA paying off a PACE lien as rate and term?
We follow all FHA guidelines. Below is a direct quote from their website as well as a link to their site for more information.
HUD Guidance on “PACE” Lending
![]() On July 19, the U.S. Department of Housing and Urban Development (HUD) released guidance stating the Federal Housing Administration (FHA) will insure mortgages on certain properties with Property Assessed Clean Energy (PACE) assessments. Properties with PACE obligations must meet strict criteria which are outlined below and can be found in the FHA release linked below.
On July 19, the U.S. Department of Housing and Urban Development (HUD) released guidance stating the Federal Housing Administration (FHA) will insure mortgages on certain properties with Property Assessed Clean Energy (PACE) assessments. Properties with PACE obligations must meet strict criteria which are outlined below and can be found in the FHA release linked below.
“While FHA loans represent approximately 20 percent of mortgage loans, the California Credit Union League continues to advocate for additional guidance from the Federal Housing Finance Agency, which continues a policy of not accepting mortgages with a super-priority PACE lien. The League will also continue to support AB 2693 and push for underwriting standards for PACE lenders from the Consumer Financial Protection Bureau,” said Courtney Jensen, League legislative advocate.
PACE loans continue to be unregulated, have no required underwriting standards, high interest rates, prepayment penalties, high administrative costs, no ability to repay standards, and put homeowners at a high risk. AB 2693—if approved by the California Legislature and signed by Governor Brown—would require California PACE lenders to provide a new truth-in-lending disclosure to consumers three days before they sign up for a PACE loan, and also provides for a three-day right to cancel. At the very least this will allow consumers clear information on what they are signing up for and give them time to understand the potential consequences of this type of loan.
- Under the new guidance, to qualify for FHA insurance on mortgages for properties that include PACE assessments, lenders must determine that the following requirements have been met:
- The PACE obligation must be collected (escrowed) and secured by the creditor in the same manner as a special assessment against the property
- The entire amount of the PACE obligation cannot become due in the event of delinquency after endorsement of the FHA-insured mortgage
- Only the delinquent portion of the PACE obligation is superior to the FHA-insured mortgage
- There are no terms or conditions that limit the transfer of the property to a new homeowner
- The existence of a PACE obligation on a property is readily apparent to mortgagees, appraisers, borrowers and other parties to an FHA-insured mortgage transaction, and information on PACE obligations must be readily available for review in public records
- In the event of the sale of the property with outstanding PACE financing, the PACE assessment remains with the property. (HUD Guidance)
For more information, click here.
This post was last updated on 9/01/2020.
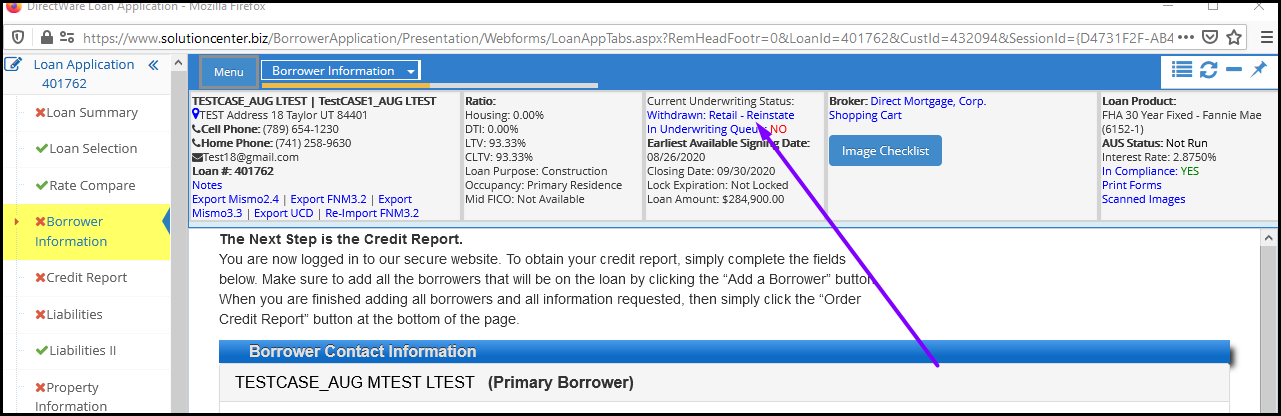
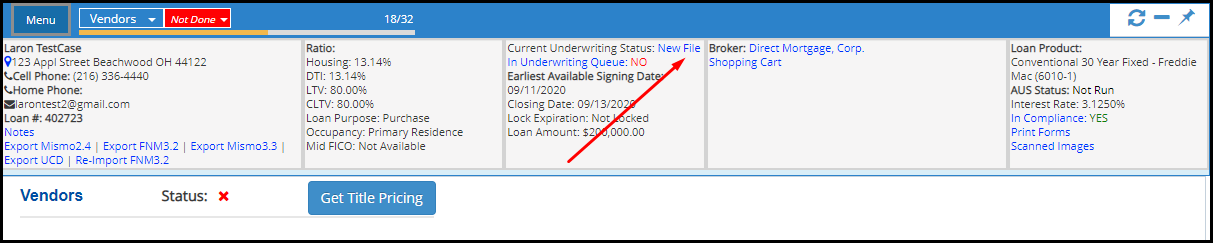
How can I check the Underwriting Status of a Loan?
After logging into DirectWare:
1. Select the loan you wish to work on in the search Loans area of the Landing page header. You can search by loan number, by borrower first or last name (or use both), or use a partial name. There is also an “Advanced Search” option available to the right of the search box.

2. Once in a Loan Locate the Loan Pulse section at the top of the screen.

3. Look for the “Current Underwriting Status” field
This post was last updated on 9/08/2020.
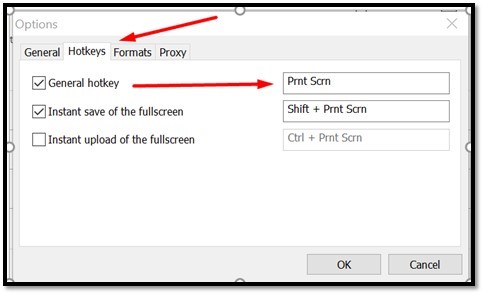
Screenshot Instructions
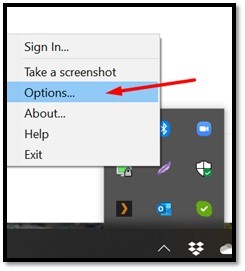
1. Install Lightshot(https://app.prntscr.com/en/index.html), right click on its icon in the system tray, and then choose “Options”.
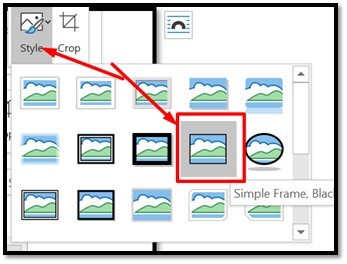
2. When you are done adding arrows and text, and boxes, then Click “CTRL+C” to copy, and then “CTRL+V” to paste it in an email or word document. Then “Right-Click” the image à then select “Style” – then choose the border frame.

3. To select a “Print Screen” Hotkey, see this screen shot. To use a different “hotkey” then place cursor in the text box, and click the key combination that you want to use. Then click “OK”.
This post was last updated on 9/01/2020.
How do I update a borrower's address details?
1. After you’ve logged in and located the loan you want to change the information for click on Borrower’s Information on the left side menu.

2. Once the page loads click on the Edit Borrower’s Contact Information link.
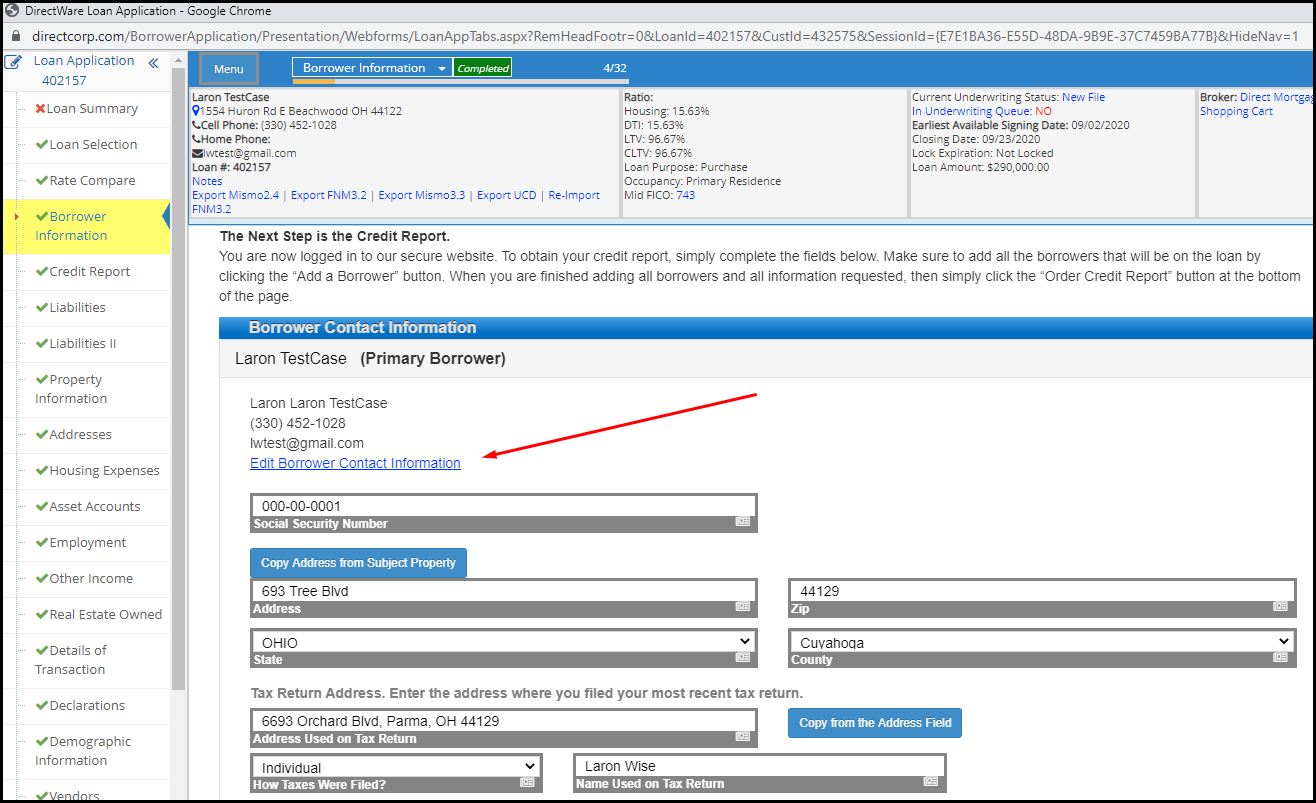
3. There you will be able to edit any information you deem as necessary.
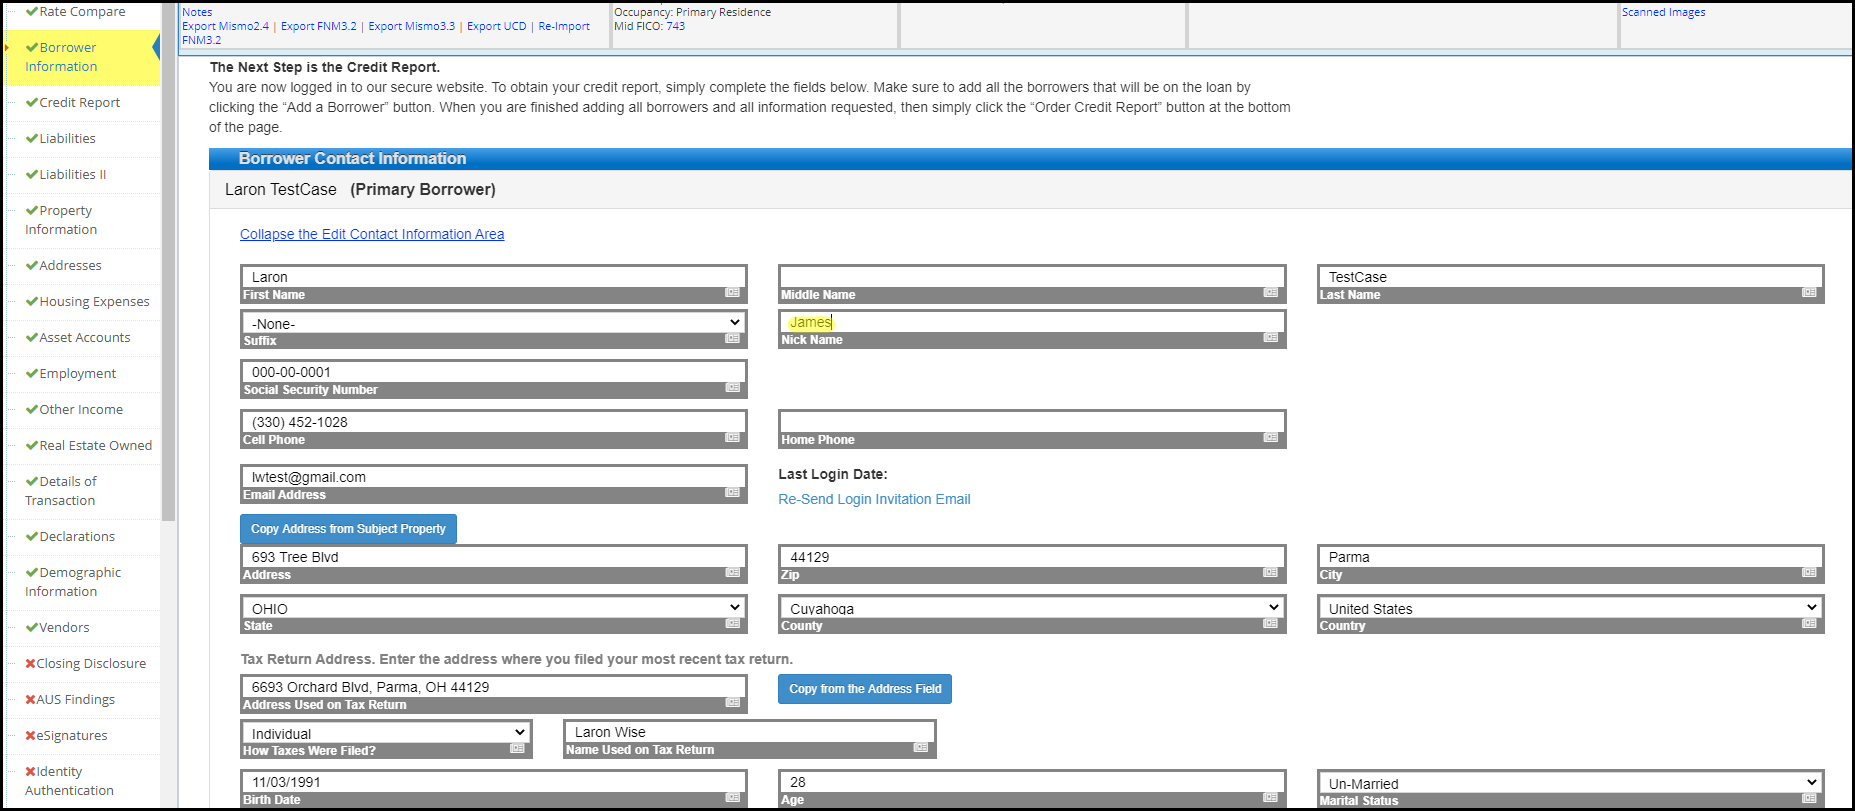
4. Once you’re done please be sure to click the save button at the bottom.
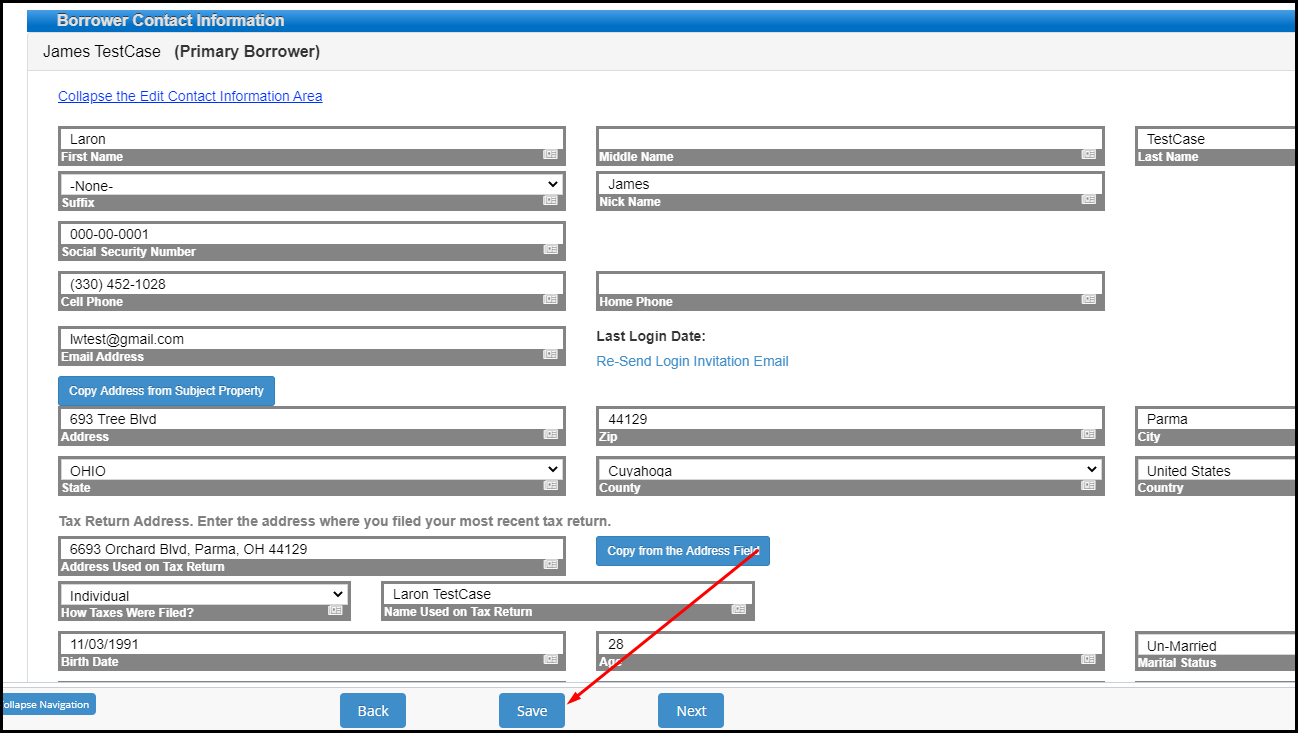
5. You may have to click the refresh button in the top right hand corner inside the header to see updates.

This post was last updated on 9/01/2020.
What if I am having technical difficulties?
Send an email to MakeMeAware@directcorp.com with as much detail as possible, including what you did leading up to the problem. Please include screenshots whenever possible.
This post was last updated on 9/01/2020.
Where can I view Direct Mortgage loan products?
Follow this link for a list of our loan products.
This post was last updated on 9/01/2020.
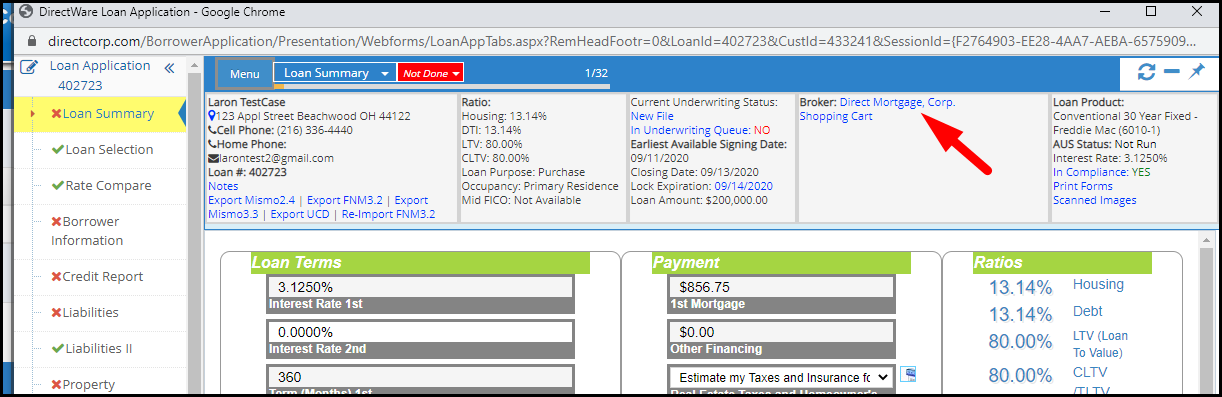
What if I have a question about a loan program?
Your primary resources for information about loan programs are your Account Executive and our broker support team. If for some reason you still need additional clarification after talking with them, send an email to LoanInfo@directcorp.com with as much detail as possible. Below are screenshots on how to find your Account Executive (AE).
- Login and access any loan number then click on the Broker Name from the header area to access your Account Executive’s contact information.
- The following screenshots show an example on how to access your Account Executive’s contact information.
This post was last updated on 9/03/2020.
Can I reissue, re-pull, or import credit reports?
1. Log into DirectWare® at www.DirectCorp.com/Sitelogin/
2. Select the loan you wish to work on in the search Loans area of the Landing page header. You can search by loan number, by borrower first or last name (or use both), or use a partial name. There is also an “Advanced Search” option available to the right of the search box.

3. When the loan opens click on the Credit Report page on the left hand side.
4. From the top dropdown field, choose whether or not you want to order a new credit report or reissue a credit report.
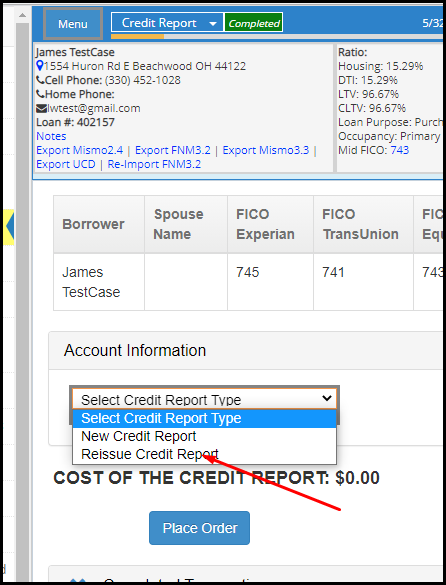
5. Select the reporting agency of the credit report you already have – from the Credit Reporting Agency drop down menu.
Note: Only vendors shown in our drop down are approved agencies. If your credit agency isn’t found, then please order a new credit report from our drop down, or directly from one of our approved credit reporting agencies.
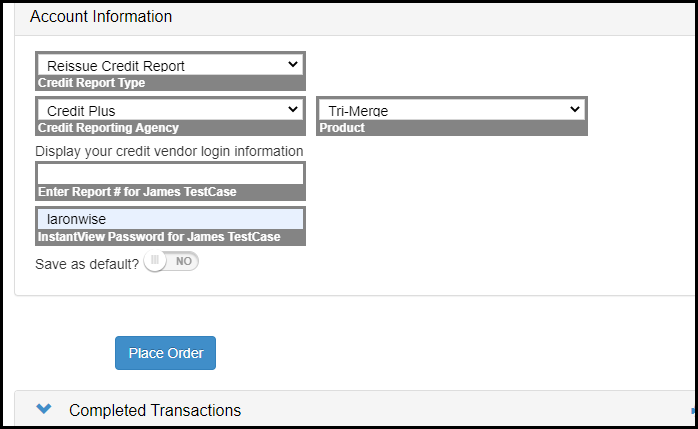
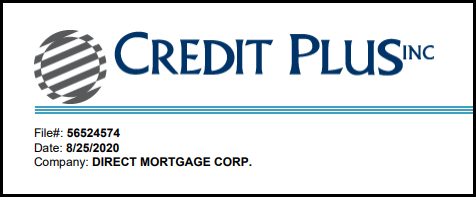
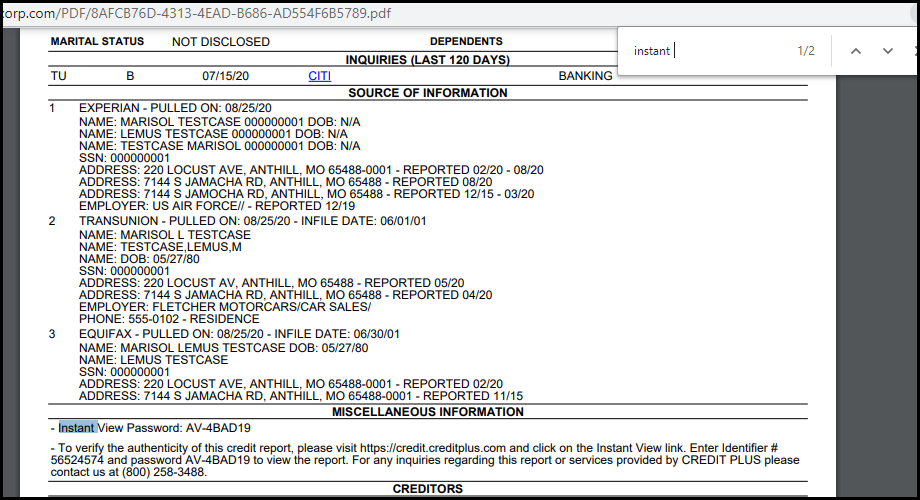
6. Enter your login credentials from your credit reporting agency (do not use your DirectWare login ID). Also, enter the Report #. And any additional information requested – like the InstaView Password. If you mark the check box, text boxes will appear where you can enter you login information. Below is an screenshot example of where to find the Credit Report # and Instant View password from your credit report.
7. The shopping cart (Completed Transactions area) shows “Credit Report – Reissue” for zero dollars. If you want the amount you paid for the credit report to be added to the Closing Disclosure from this screen, then simply check the “Reimburse Broker” swatch.
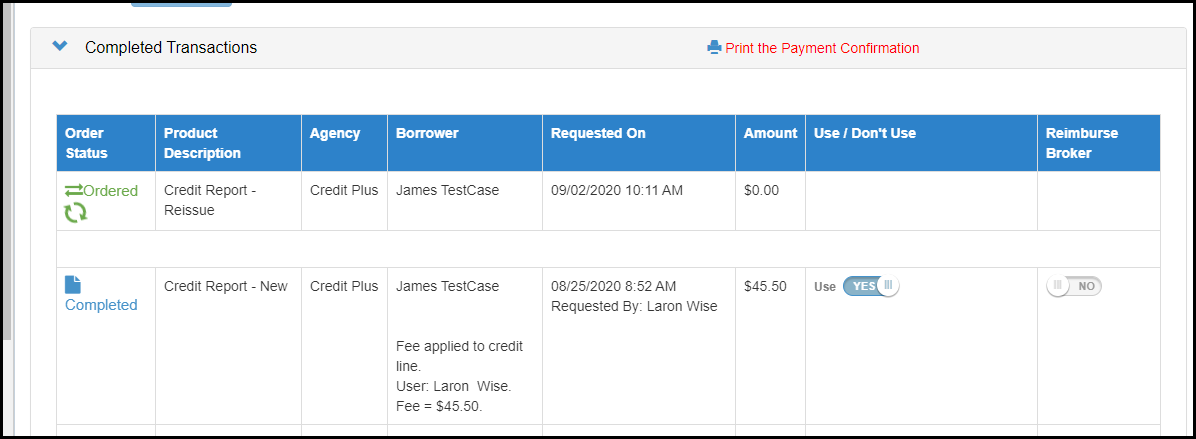
8. The status under the “Order Status” column will change from “Ordered”, to “Completed”. Click on the “Ordered” link to open the “Order Status” screen. Click on the “Completed” link to open the credit report. You can also open the credit report from the loan pulse area at any time by clicking on the Mid FICO score.

9. The credit report data is now successfully imported, and the debt liabilities are ready for review on the Liabilities screen.
This post was last updated on 9/11/2020.
How can I see your rates?
You can request to be added to our daily rates email.
If you are an EXISTING Direct Mortgage user – Login here and then Select the desired Rate Sheets in your Email Subscription Preferences screen.
If you are a NEW user to Direct Mortgage – Click here to Sign up – after creating your login navigate to the Email Subscription Preferences screen.
This post was last updated on 9/02/2020.
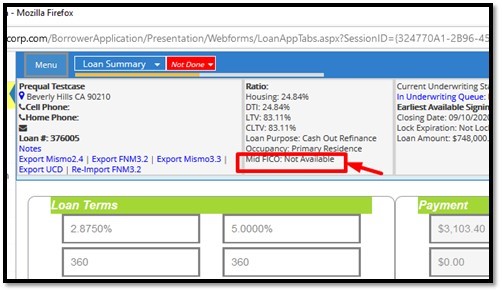
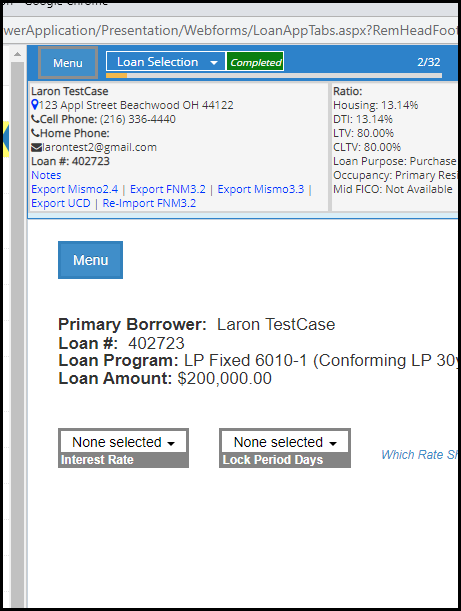
Do you offer rate float downs?
Interest rate float downs are available with most of our mortgage loan products. Simply click the Float Down option found in the Menu button at the top and bottom of the lock confirmation screen.
1. Log in
2. Select the loan you wish to work on in the Search Loans area of the Landing page header. You can search by loan number, by borrower first or last name (or use both), or use a partial name. There is also an “Advanced Search” option available to the right of the search box
3. You will be taken to “Loan Selection” >> Click “Menu” >> click the “Float Down” button
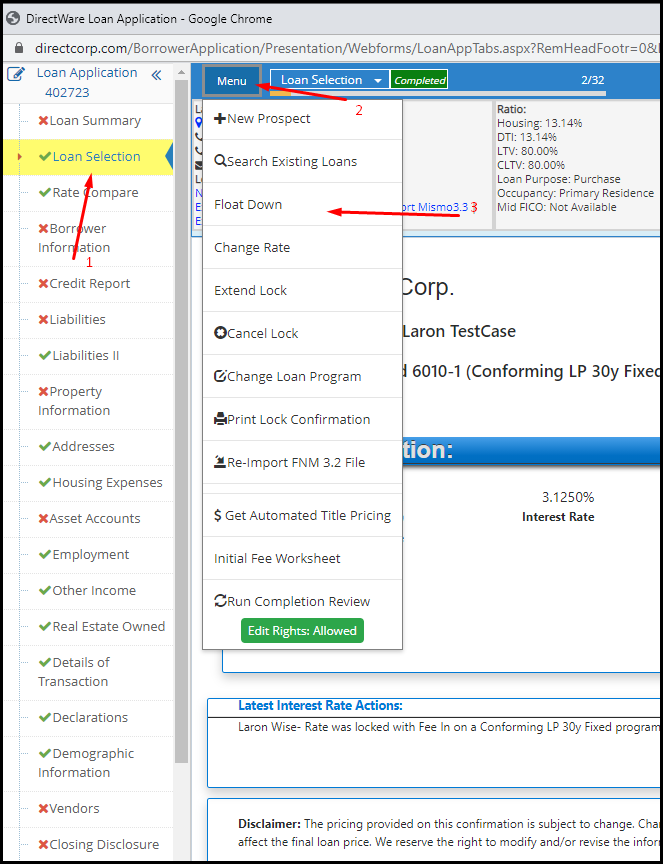
4. Select your new rate and Lock Period >> click “Save”
.
Rate Float Down Policy
A one-time float down option may be available for locks in which the price has improved, and are subject to the following conditions:
- Float Down must be done before the loan receives final underwriting approval and the loan is approved for docs.
- Loan must be within 10 days of funding. (If the lock expiration is not within 10 days, a float down may be granted if the lock expiration is moved to 10 days from the date of the float down.)
- Loan must close and fund by the original lock expiration date
- Loan program and term must be the same as the original loan program and term at time of lock
- Price will be improved to current market price plus a float down adjustment, for pricing of the same lock period as the original lock period. For example, if the loan was originally locked on a 30 day price, the current 30 day price will be used to determine the price after the float down option has been exercised. The float down adjustment may vary by loan program. If a loan has been previously been extended, the extension cost will be added to the new price.
- Loan Program Changes are allowed after the float down option has been exercised, and the price will be determined by our current policy for changing loan programs*. If a loan has been previously extended, the extension cost and the float down adjustment will be added to the new price.
- Lock Extensions are allowed after the loan has been floated down as long as the loan has not been previously extended. Only one extension per loan is allowed.
Exceptions to the above conditions may be considered by the price desk. Exception requests should be submitted in writing, by the Loan Officer through the Account Executive assigned to your account. (DMC reserves the right to withhold the Float Down programs).
* Requests to change the loan program of a current lock may be granted at the worst of the original lock price or current lock price, when available. As market conditions dictate, an additional market adjustment may be charged.
This post was last updated on 9/02/2020.
Do you do jumbo loans?
Yes. View a complete list of our wholesale mortgage loan products.
This post was last updated on 9/01/2020.
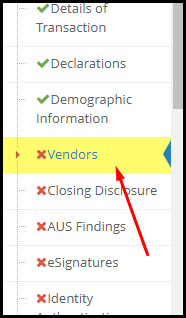
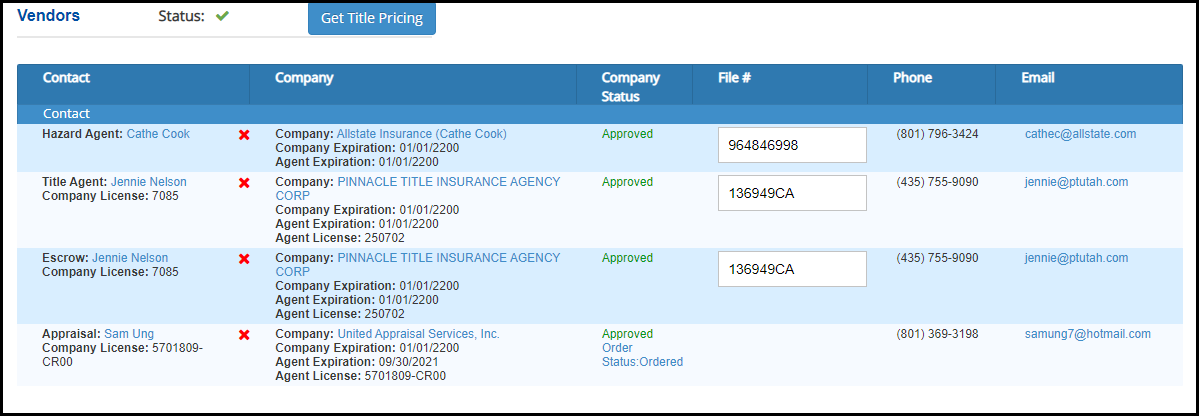
How do I find the Hazard Insurance on a loan?
1. Select the loan you wish to work on in the search Loans area of the Landing page header. You can search by loan number, by borrower first or last name (or use both), or use a partial name. There is also an “Advanced Search” option available to the right of the search box.

2. Once the loan page opens click on vendors from the side menu
3. Check the “Current Underwriting Status” in the header. Please note there will be no insurance premium paid to the vendor until after the loan closes.
4. From the Vendors page you can see who the hazard insurance vendor was “supposed to be”. Verify the information is correct. Don’t change anything, because the loan officer or processor are normally the one that should update the hazard vendor.
This post was last updated on 9/03/2020.
How do I become approved with Direct Mortgage, Corp.?
This is fast and easy. Complete the online signup wizard found here: User Sign Up Wizard.
You can begin locking interest rates and submitting loan files immediately. Broker approval can be processed during your first loan submission, but is often not necessary because the formal approval is typically done well before that.
Also see the FAQ: How do I add loan officers & processors (and other user types)?
This post was last updated on 9/01/2020.
How do I add loan officers & processors (and other user types)?
This is fast and easy. Complete the online user signup wizard found here: User Sign Up Wizard.
If your company has previously been approved with us, make sure your new user searches diligently to Associate With Your Company at the required company step (otherwise they will create a new company and their approval will be delayed). Your own login admin can approve these new user requests in their own task list on their Home Landing Page.
Also see the FAQ: How do I become approved with Direct Mortgage, Corp.?
This post was last updated on 9/01/2020.
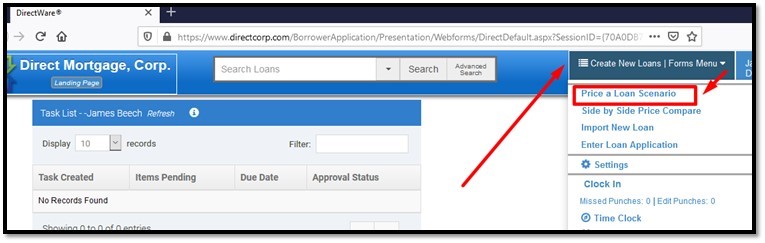
How do I price a loan scenario?
Interest Rates and Loan Product scenarios are priced using our DirectWare® website.
The click path is DirectWare Landing Page —-> Create New Loans | Forms Menu —–> “Price a Loan Scenario”.
This post was last updated on 9/01/2020.
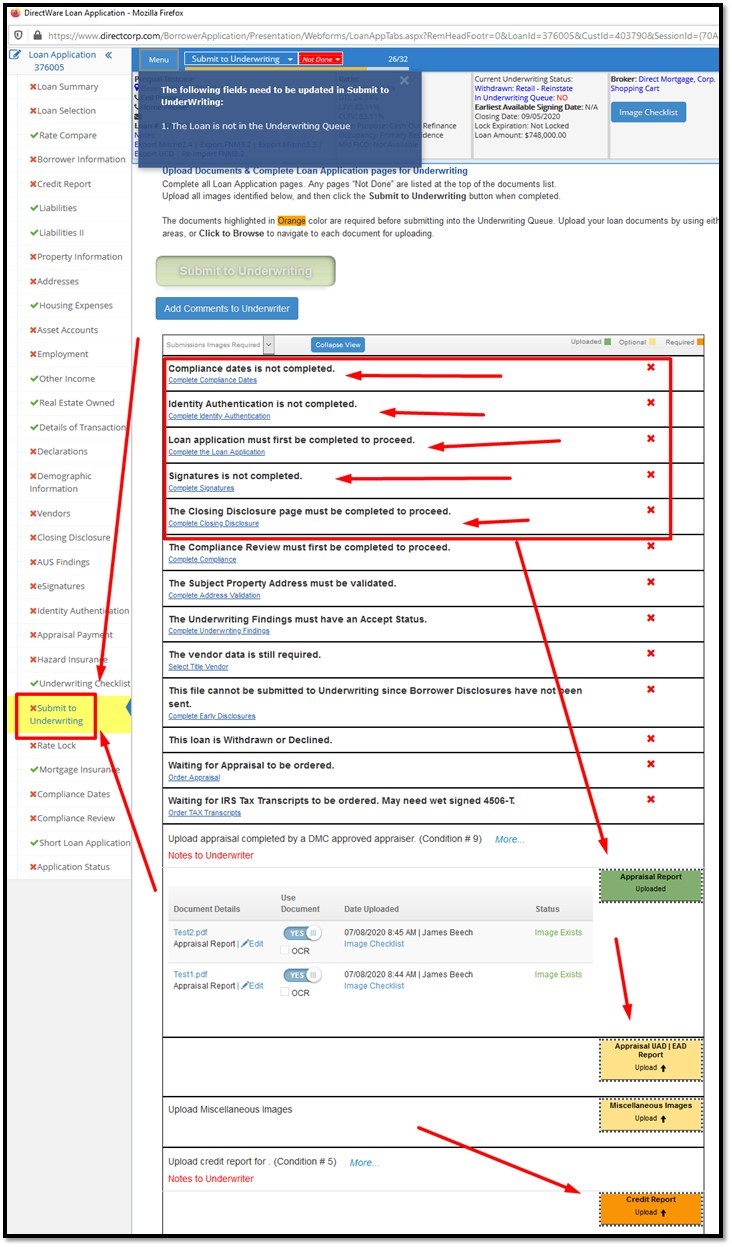
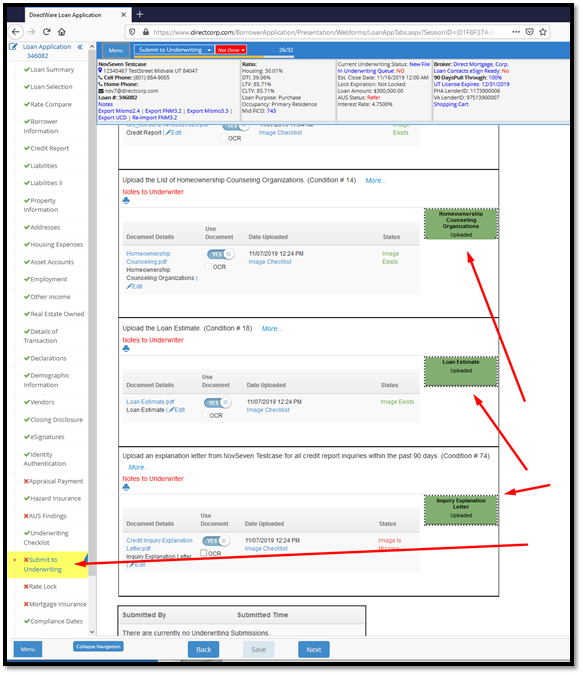
How do I submit loan files to underwriting?
Loan files are uploaded at the Submit to Underwriting step in the loan application (see the screen shot). Best practices are:
1) Follow the Left Hand Navigation. Turn all Red X’s into Green Checkmarks by completing each page.
2) If a page is “Not Done” then click the Red “Not Done” area in the header to see what is incomplete or missing.
3) When viewing the Submit to Underwriting page, simply upload the required documents listed in the Orange background. Other documents have either been uploaded (Green Background), or are optional to complete that current submission step. Optional images are often better to upload sooner rather than later – to experience a faster underwriting turn time.
Here is what the Submit to Underwriting Screen looks like:
This post was last updated on 9/01/2020.
What states are you available to lend in?
Direct Mortgage is able to fund mortgage loans in many states across the country. Click here to view our current list: Direct Mortgage Licensed States.
Here’s the link. (https://www.directcorp.com/licensing/)
This post was last updated on 9/01/2020.
I don’t have a login. How can I get one?
To obtain a login is fast and easy. Complete the online user signup wizard found here: User Sign Up Wizard.
If your company has previously been approved with us, make sure your new user searches diligently to Associate With Your Company at the required company step (otherwise they will create a new company and their approval will be delayed). Your own login admin can approve these new user requests in their own task list on their Home Landing Page.
We’ve included below what the Create an Account screen looks like for your reference.

Also see the FAQ: How do I become approved with Direct Mortgage, Corp.
This post was last updated on 9/03/2020.
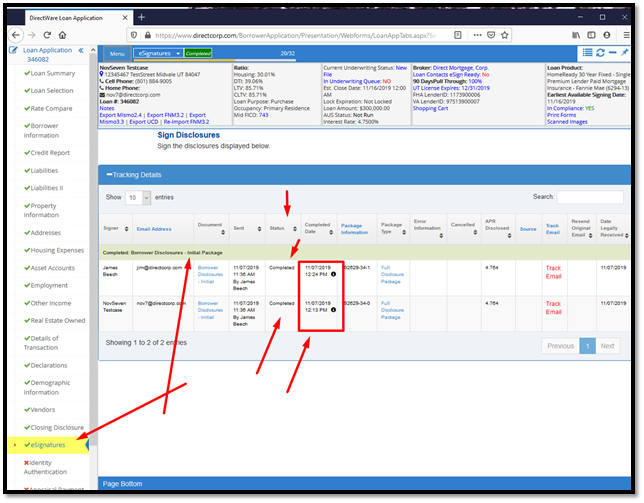
How do I find a Borrower’s Signature Authorization?
You can find a borrower’s signature authorization in two ways. I have included the steps below as well as screenshots to better depict the process.
Method # 1
1. Select the loan you wish to work on in the search Loans area of the Landing page header. You can search by loan number, by borrower first or last name (or use both), or use a partial name. There is also an “Advanced Search” option available to the right of the search box.
2. Once the loan file opens you can look for the “Scanned Images” hyperlink in the upper right hand corner

3. Be sure to change the display to all records

4. The fastest way to find the form is to use the filter and type in “authorization” then click the PDF hyperlink next to the file you are looking for.
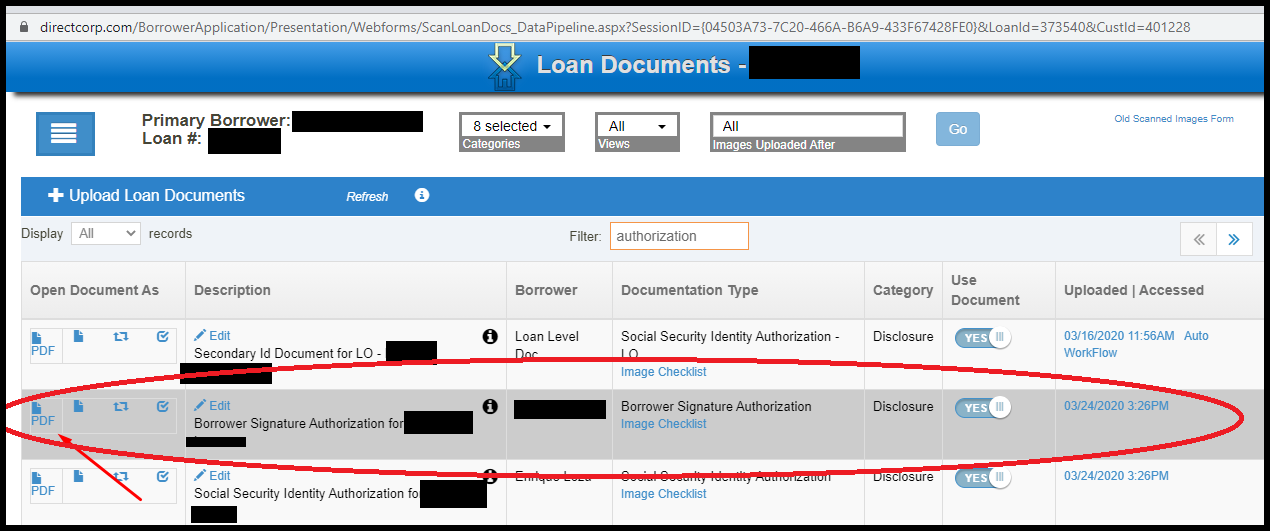
5. After clicking the hyperlink a new window should open to show the form. If the window does not open be sure to have pop ups enable on this page.
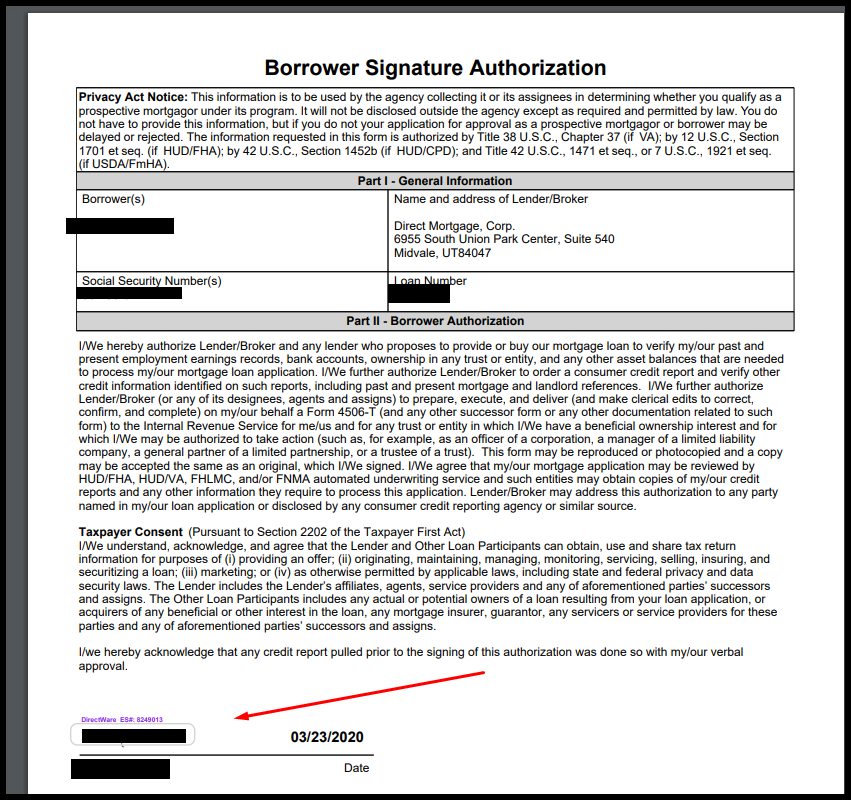
Method # 2
1. Access the Loan Number from the Search or Recent Loans List
2. Once the Loan Page opens you want to click on the ESignatures hyperlink
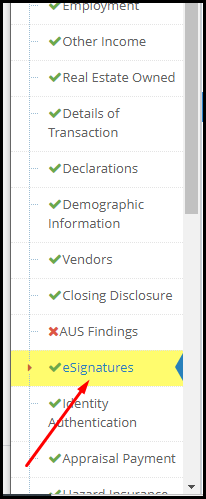
3. From there you need to find the borrower’s disclosures hyperlink. Please note that each color of the bar represent a different document status. (Green = Complete, Orange = “x”, Red = “X”, & Brown = Incomplete)
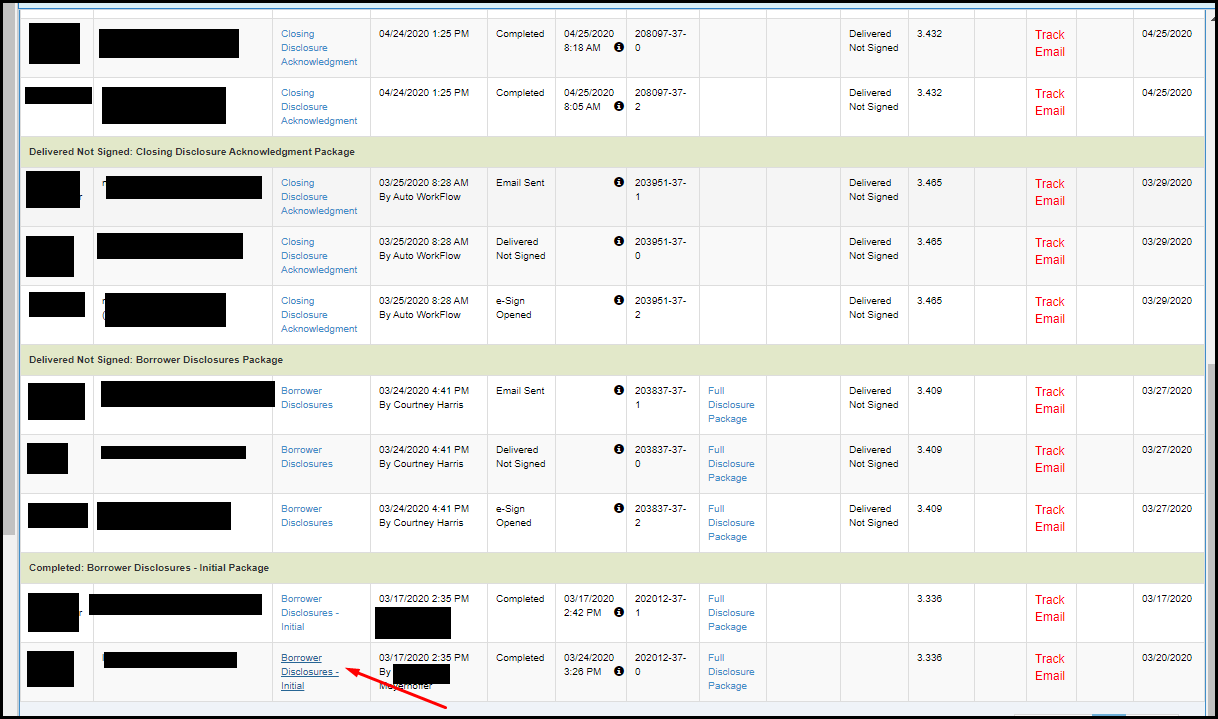
4. After clicking the link a new page should open and you can find the authorization page by using “Ctrl+F” and typing in “authorization” until you find the page (usually around page 10-13).
This post was last updated on 9/08/2020.
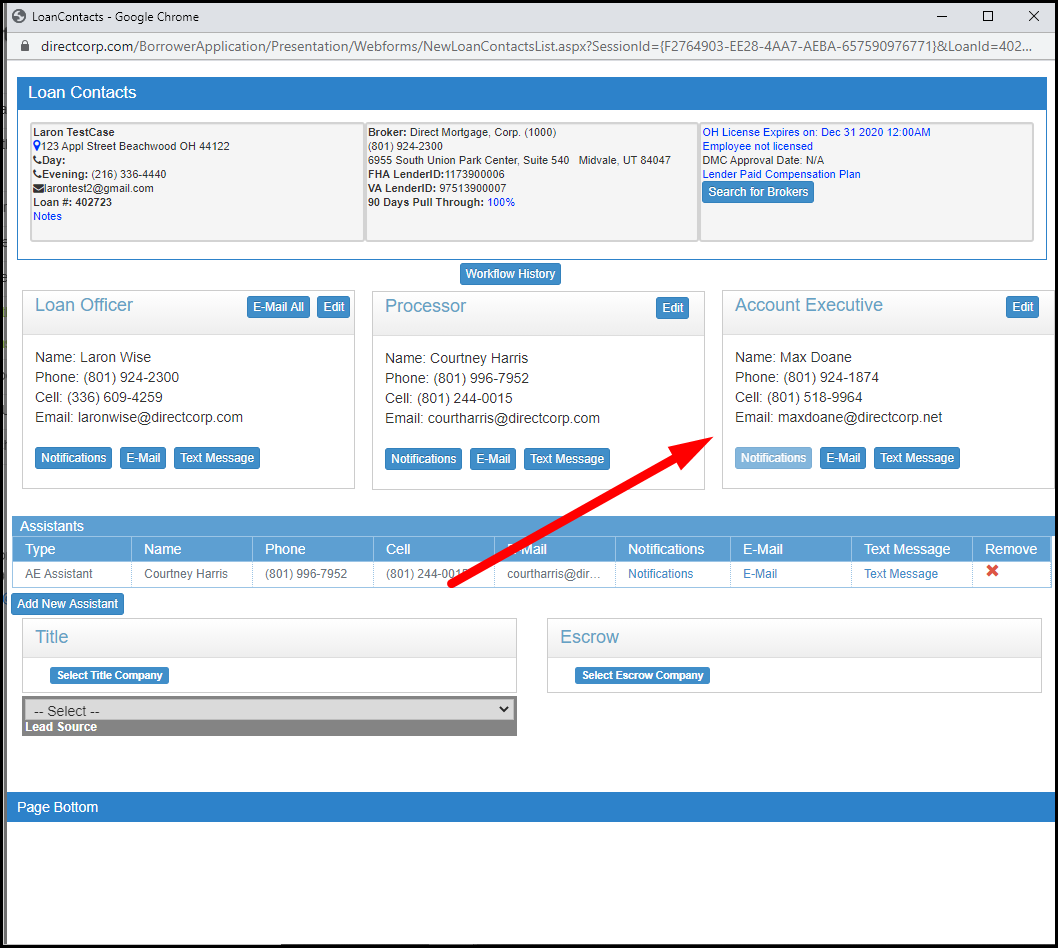
How do I find out who my AE (Account Executive) is?
To find your Account Executive you can find their contact information within any loan file, or contact our support at MakeMeAware@directcorp.com or (801)-924-2300 and ask who your Account Executive (AE) is. Here are the instructions to find the Account Executive (AE) in any loan file.
- Login and access any loan number then click on the Broker Name from the header area to access your Account Executive’s contact information.
- The following screenshots show an example on how to access your Account Executive’s contact information.
This post was last updated on 9/03/2020.
What is a rate lock?
A rate lock is a contractual agreement between the lender and buyer.
There are four components to a rate lock:
- Loan Program
- Interest Rate
- Points
- The length of the lock
You can find information on the rate locks from the side menu once you’ve opened a loan which is depicted in the screenshot below.
This post was last updated on 9/09/2020.
How do I cancel a Lock?
After logging into DirectWare:
1. Select the loan you wish to work on in the search Loans area of the Landing page header. You can search by loan number, by borrower first or last name (or use both), or use a partial name. There is also an “Advanced Search” option available to the right of the search box.
2. After opening the loan look to the side menu and find Lock Confirmation then click it.
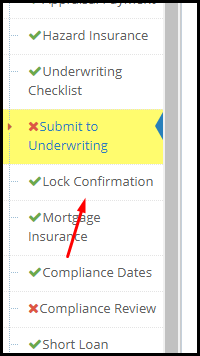
3. Once the page loads locate the thumb menu on the loam page towards the header.

3. Once the menu opens click on Cancel Lock and leave whatever notes are necessary.
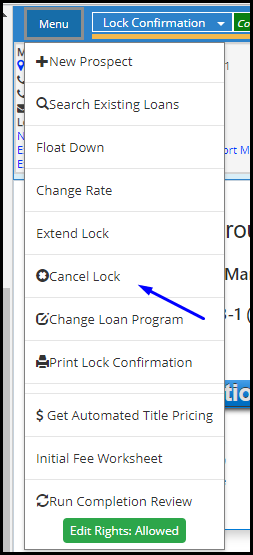
Also follow this link to view our rate lock policies and procedures here.
This post was last updated on 9/09/2020.
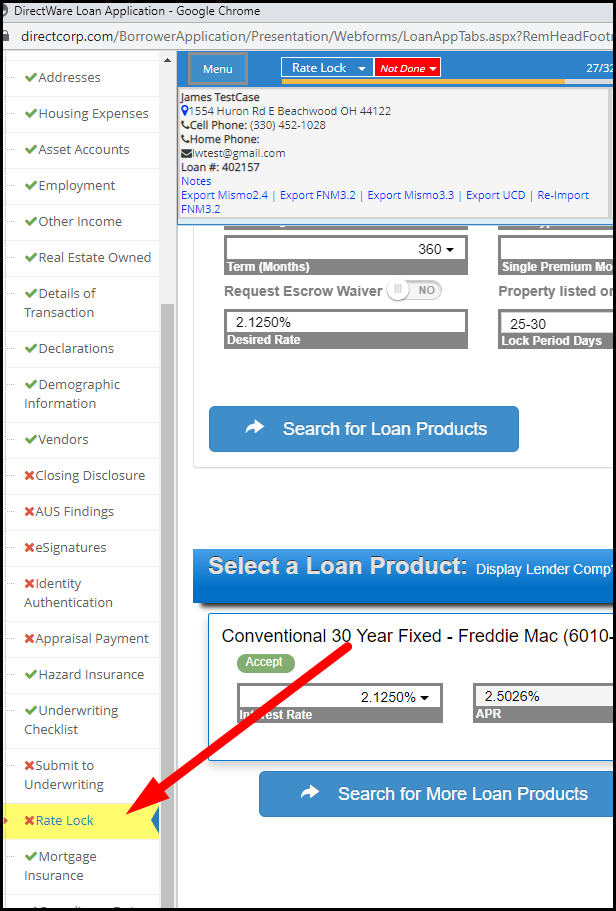
How do I lock a loan?
You can lock a loan fast and easy. We have listed the steps below as well as screenshots in order to better depict the process.
1. Log in to DirectWare
2. Select the loan you wish to work on in the search Loans area of the Landing page header. You can search by loan number, by borrower first or last name (or use both), or use a partial name. There is also an “Advanced Search” option available to the right of the search box.
3. Click on “Loan Selection” from the menu on the left.
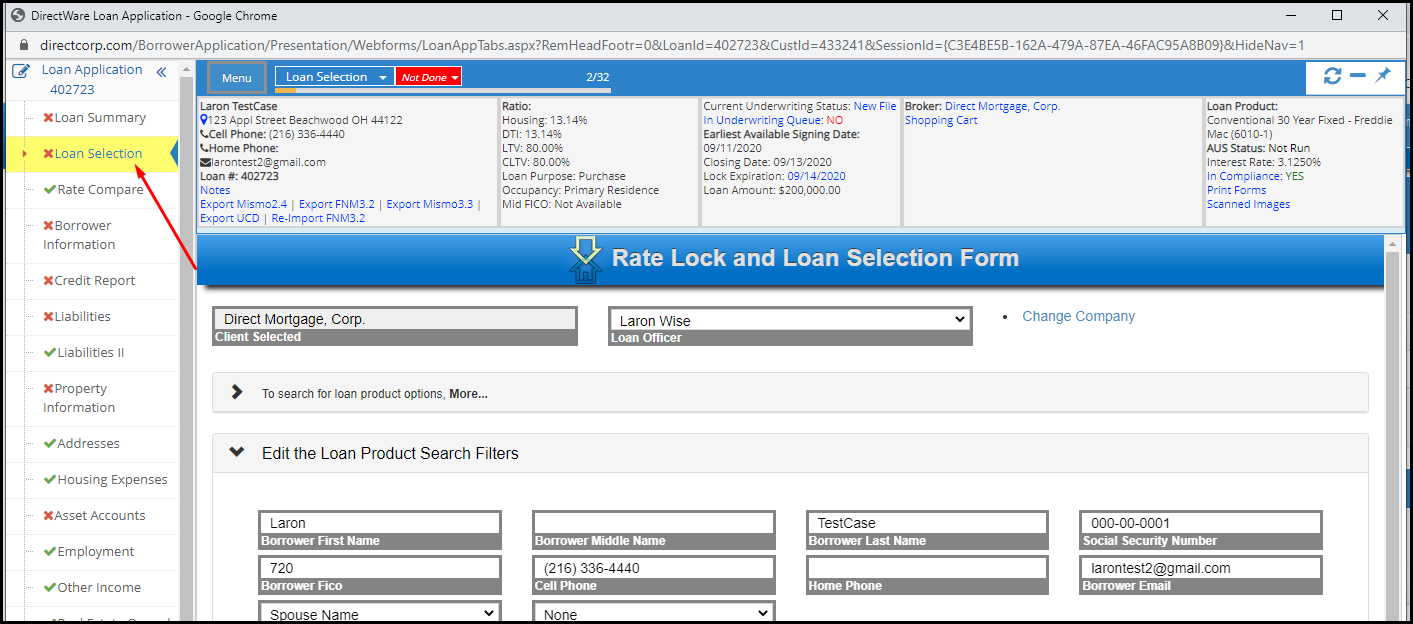
4. Once you’ve filled out all the necessary information click on “Search for Loan Products”.
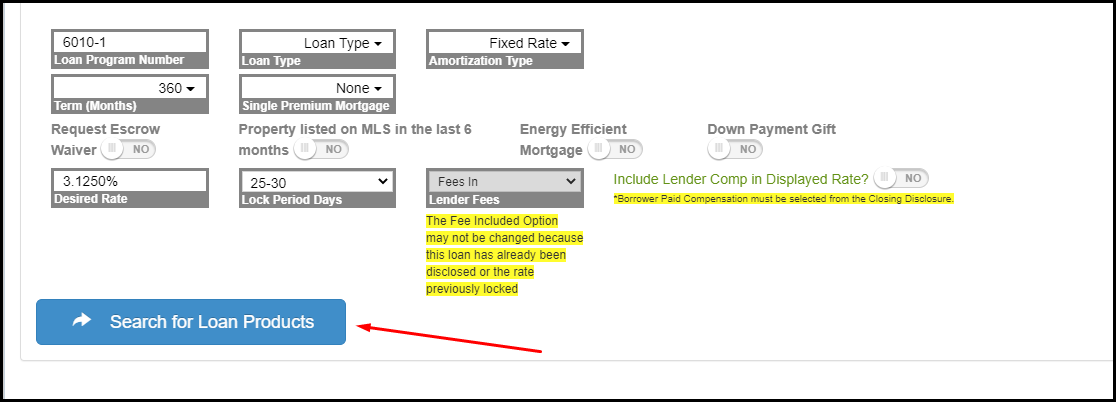
5. Once you’ve found your loan product click on “Select this Product Option”.
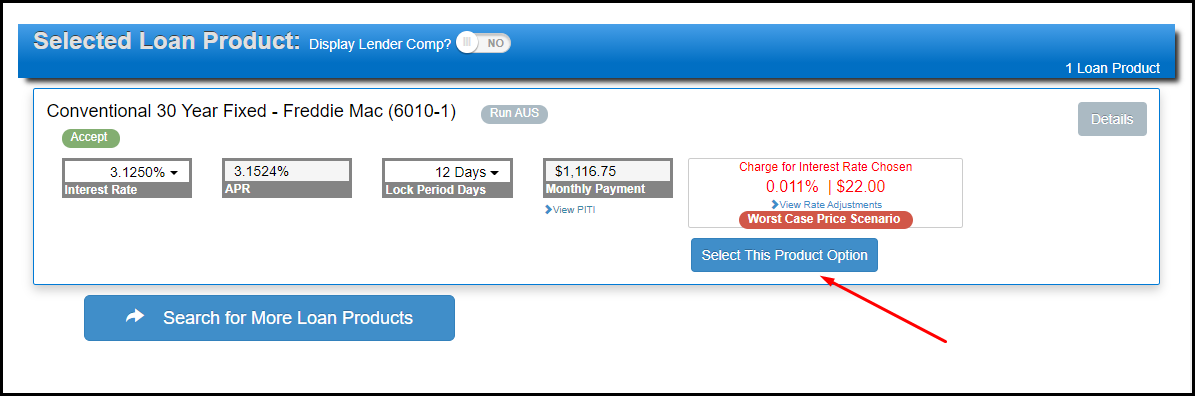
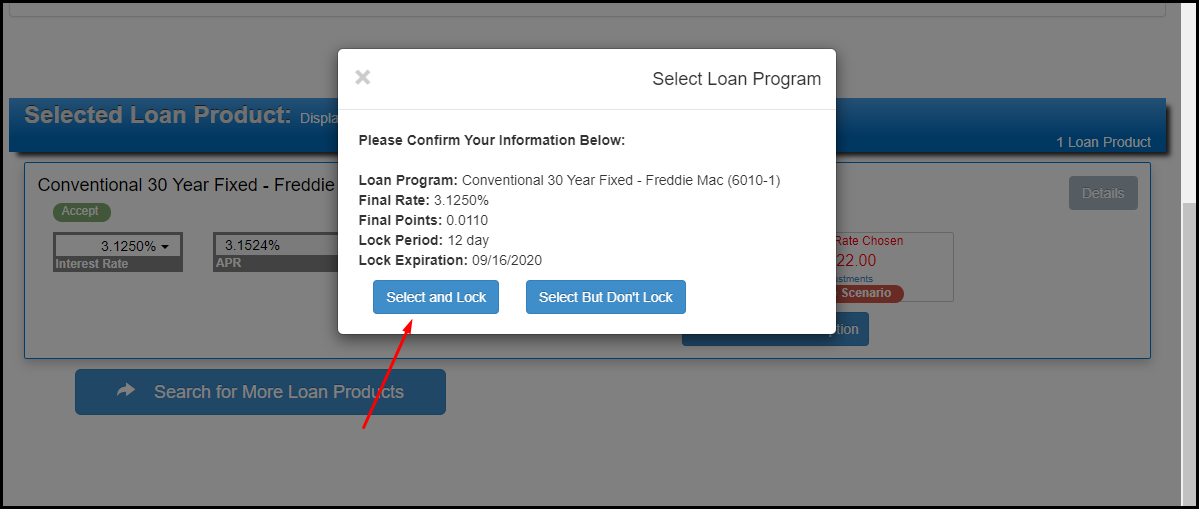
6. If everything looks fine click “Select and Lock”
Also follow this link to view our rate lock policies and procedures here.
This post was last updated on 9/04/2020.
How late can I lock loans?
Loans may be locked in DirectWare® at the current day’s price until 1:00 a.m. Mountain time, the following day unless markets are going through a dramatic change.
Also follow this link to view our rate lock policies and procedures here.
This post was last updated on 9/04/2020.
What are your rate lock periods?
Direct Mortgage Corp. generally provides rate lock periods of 12, 30, and 60 days. However, other rate lock periods may apply for specific loan programs.
Also follow this link to view our rate lock policies and procedures here.
This post was last updated on 9/04/2020.
What is your policy on rate lock expirations?
Loans must be closed and funded by the rate lock expiration date. Loans not closed and funded by the expiration date are subject to re-pricing.
Also follow this link to view our rate lock policies and procedures here.
This post was last updated on 9/04/2020.
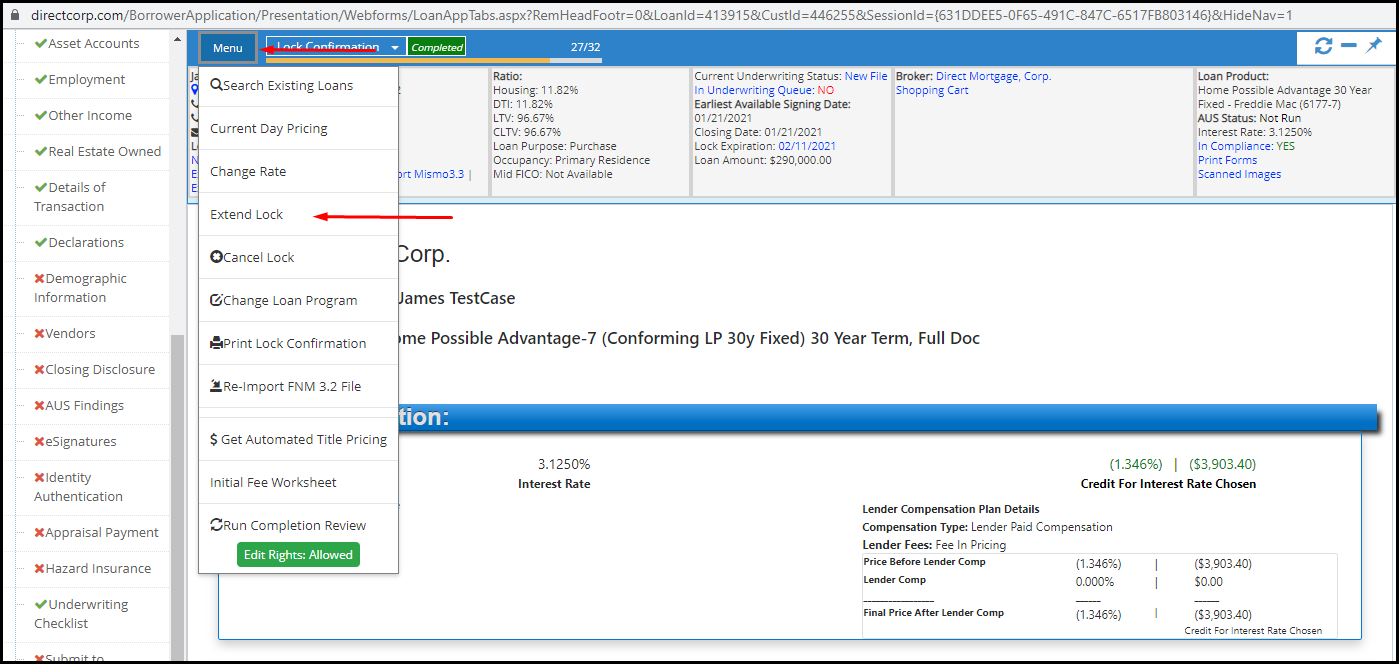
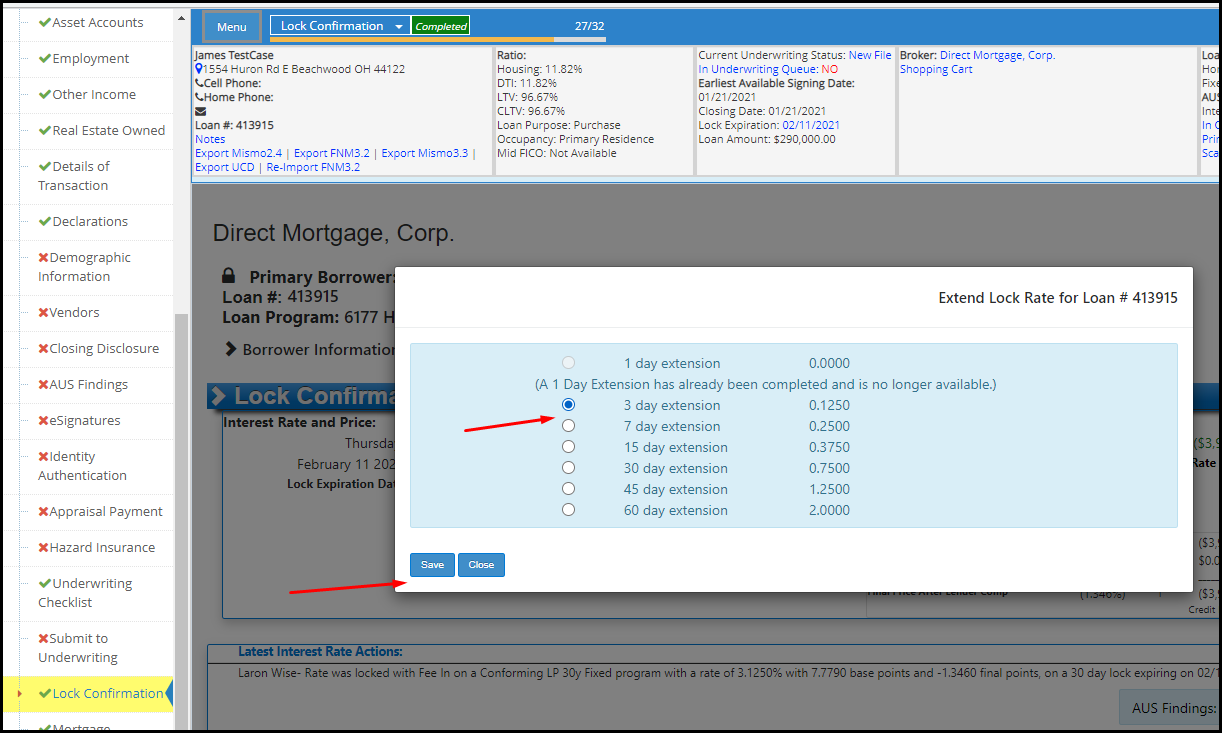
Do you offer rate lock extensions?
Yes, we do offer rate lock extensions. You can do this through the DirectWare platform. We have listed the steps below.
1. Log into DirectWare® at www.DirectCorp.com/Sitelogin/
2. Select the loan you wish to work on in the search Loans area of the Landing page header. You can search by loan number, by borrower first or last name (or use both), or use a partial name. There is also an “Advanced Search” option available to the right of the search box.
3. After opening the loan look to the side menu and find Lock Confirmation then click it.
4. Once the page loads locate the thumb menu on the loam page towards the header.
5. Once the menu opens click on Extend Lock and leave whatever notes are necessary.
6. Select how long you wish to extend the lock (extension prices will be listed) >> click “Save”.
This post was last updated on 9/09/2020.
Can I change the interest rate on an existing lock?
Yes. You can do this through DirectWare using the following clickpath: Log in >> Choose your desired loan by double-clicking the loan in the “Recent Borrowers” column on the left OR by entering the borrower’s name or the loan number into the “Loan Search on the left and clicking “Find”. A list of search results will appear. Choose your loan by double clicking the correct entry >> You will be taken to “Loan Choices” >> click “Locked” located in the row of your desired loan program (alternately, you can click the date next to “Loan Expiration”) >> click the “Change Interest Rate” button at the bottom of the window that opens >> A message will alert you that the lock will be priced as of today’s date. If you wish to proceed, click “OK” >> Click the YSP corresponding to your desired rate >> Review the rate and YSP after all the adjustments (look at the row that says “Total Rate with Adjustments” >> click “Update Lock” button.
Can I change a loan program for an existing lock?
Yes. You can do this through DirectWare using the following clickpath: Log in >> Choose your desired loan by double-clicking the loan in the “Recent Borrowers” column on the left OR by entering the borrower’s name or the loan number into the “Loan Search on the left and clicking “Find”. A list of search results will appear. Choose your loan by double clicking the correct entry >> You will be taken to “Loan Choices” >> Click “A Select a Loan Program” >> The loan program list will appear >> Enter your scenario criteria in the “Loan Search Criteria” portion of the Loan Choices screen if wanted and click “Submit” >> The scenario will run and loan programs will appear >> click “Select” located in the row of your desired loan program >> a message will appear. Choose “Select Loan – I’ll Process Myself” or “Select Loan – Process for Me”>> a message will appear stating that “Your Loan Program Has Been Selected” and ask you if you want to submit your loan to underwriting >> Select “Yes” or “No” >>

The “Loan Program” description in the upper right-hand corner should now be updated with the new loan program information >> Click on “Lock” next to where it says “Accept” (green circle with white check mark) >>

Message will appear asking if you want to change the locked loan program >> Click “Proceed” or “Cancel” >> a message will ask you if you want to submit your loan to underwriting >> select “No” >> The Lock Screen will open behind the Loan Choices screen. Minimize the Loan Choices screen so that you can see the Lock Screen. >> Click the YSP corresponding to your desired rate >> Review the rate and YSP after all the adjustments (look at the row that says “Total Rate with Adjustments” >> click “Update Lock” button.
Can I re-lock my loan after my original lock has expired?
Yes. You can do this through DirectWare using the following clickpath: Log in >> Choose your desired loan by double-clicking the loan in the “Recent Borrowers” column on the left OR by entering the borrower’s name or the loan number into the “Loan Search on the left and clicking “Find”. A list of search results will appear. Choose your loan by double clicking the correct entry >> You will be taken to “Loan Choices” >> If the loan has not been selected yet, select the loan by clicking “Select” in the row of the loan you have locked. If you have already selected the loan, the click on “A Select a Loan Program” at the top of the page >> Click “Locked” in the row of the loan you have locked >>
The “Rate Lock Request” screen will open >> Scroll to the bottom of the page >> Click on the “Re-Lock” button.
A message will appear stating that you will be subject to worse case pricing, meaning that the lock will be priced at either the original day’s lock price or today’s lock price, whichever is higher. If you want to proceed, click “OK” >> From within the “Rate Lock Request” window, click the YSP corresponding to your desired rate >> Review the rate and YSP after all the adjustments (look at the row that says “Total Rate with Adjustments” >> Scroll to the bottom of the page and click the “Update Lock” button >>
A message will appear asking you to confirm that you want to lock the loan at the selected rate. If you have selected the correct amount, then click “OK” >> The loan is now re-locked.
Do you offer contract processing services?
Yes. Contract processing is available through our 1Processing service. Loans processed through 1Processing that are also underwritten by Direct Mortgage will receive priority underwriting. Go to 1Processing.com for more information.
This post was last updated on 9/01/2020.
Is there a way to print out a pre-approval from DirectWare that can be shown to a realtor?
Printing a Pre-Approval is fast and simple. Below are the steps needed in order to do so.
1. Select the loan you wish to work on in the search Loans area of the Landing page header. You can search by loan number, by borrower first or last name (or use both), or use a partial name. There is also an “Advanced Search” option available to the right of the search box.
2. You will be taken to “Loan Summary” page where you then can select the “Print Forms” hyperlink inside of the header”

3. Check the box next to “Disclosures” on the left side of the screen
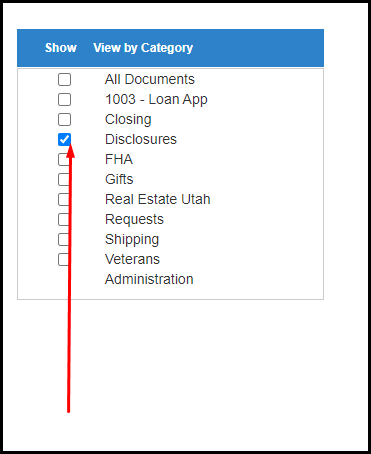
4. Check the box next to “Approval Letter”
5. Lastly on the bottom of the page click on the button that says “Print reports”. This will open a PDF version of the file where you can either save or print.
This post was last updated on 9/10/2020.
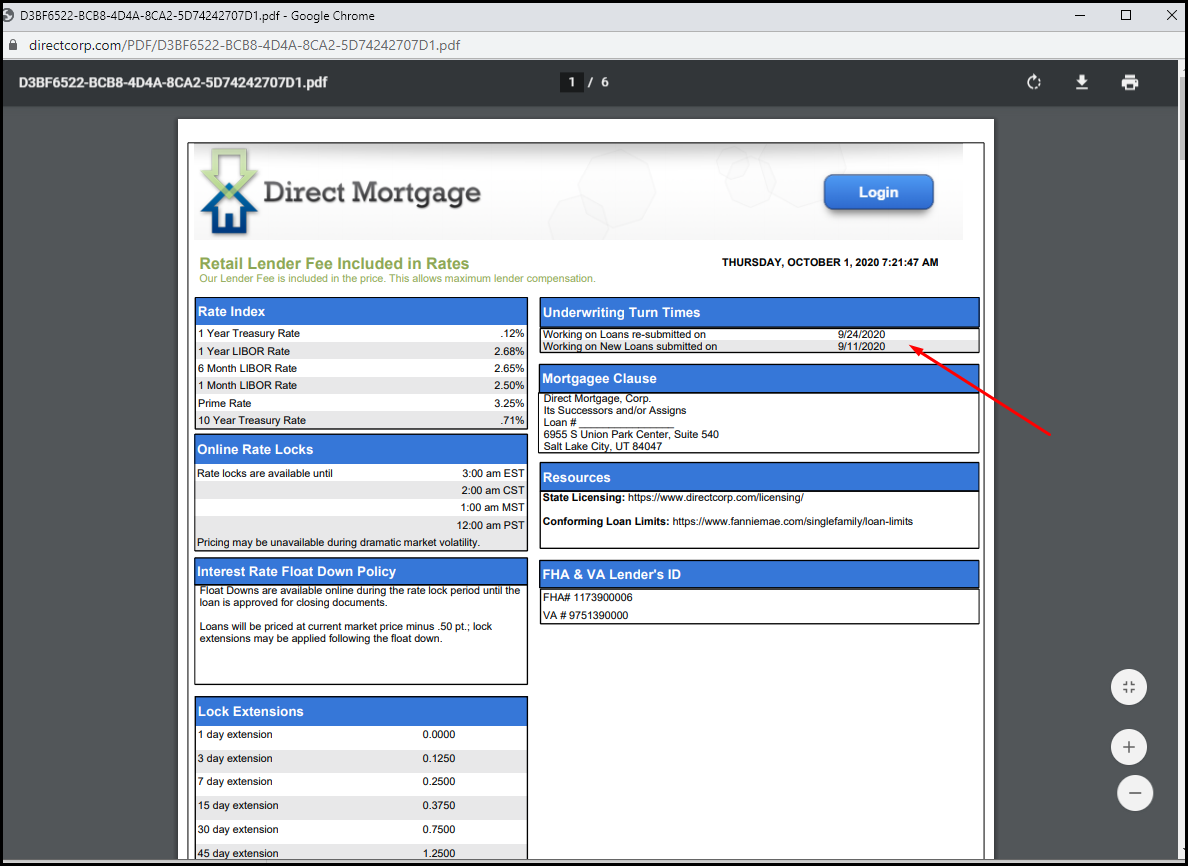
What is the hazard loss payee name and address (Mortgagee Clause)?
Direct Mortgage, Corp.
Its Successors and/or Assigns
Loan #:
12750 Merit Drive, Ste. 815
Dallas, TX 75251
This post was last updated on 9/01/2020.
What is the address for a Closing Protection Letter (CPL)?
Direct Mortgage Corp.
12750 Merit Drive, Ste. 815
Dallas, TX 75251
This post was last updated on 9/01/2020.
What is Direct Mortgage’s FHA Lender ID?
FHA # 1173900006
This post was last updated on 9/01/2020.
What is Direct Mortgage’s VA Lender ID?
VA # 9751390000
This post was last updated on 9/01/2020.
What if my username is not working?
Click here and then insert your email. Your username will be sent to your email if the email exists in our system.
This post was last updated on 9/01/2020.
What if my password is not working?
If you can receive html-formatted emails:
- Click here and then insert your email.
- An email will be sent to you with a link to create a new password.
- Click on the link.
- A browser window will open asking you to enter your new password twice (the second time is for confirmation).
- Click “Create new password”.
- The screen will now say “Please login to DirectWare”. Click on the link (“DirectWare”). Login using your new password.
OR, If you have a text-only (non-html) email account:
- Click here and then insert your email.
- An email will be sent to you with a link to create a new password.
- Return to the browser window where you entered your email address and click the link at the end of the line that states: “Once you have your reset code, you can enter it here.”
- Enter the passcode included in the email and click “Submit”.
- A browser window will open asking you to enter your new password twice (the second time is for confirmation).
- Click “Create new password”.
- The screen will now say “Please login to DirectWare”. Click on the link (“DirectWare”). Login using your new password.
This post was last updated on 9/01/2020.
The forgot password option is not working. Now what?
Send an email to MakeMeAware@directcorp.com or call 801-924-2300 and ask for Tech Support.
This post was last updated on 9/01/2020.
I cannot see where to enter my login name and password.
You probably need to install the IE 7 Internet browser, which can be installed for free.
This post was last updated on 9/01/2020.
How will my borrower know when his or her loan has been transferred?
The borrower will be notified by mail when the transfer of the Mortgage loan is completed. The new Bank/Servicer will have a payment address, toll free number and hours of operation in the body of the letter. A letter will be received from the new Bank/Servicer as well. Any additional questions can be answered here at the Corporate Office of Direct Mortgage, (801) 924-2300. It is very important to include the borrower’s current mailing address during the loan process so that notifications can be delivered in a timely manner.
This post was last updated on 9/01/2020.
What are your best programs?
The best program will depend on the market and your borrower’s scenario. Our Loan Choices™ system will allow you to compare PI and PITI for various loan programs and our Predictive Analytics will suggest options you might not have thought about.
What 1st Mortgage Products require a Verification of Rent/Mortgage?
1. Log into DirectWare® at www.DirectCorp.com/Sitelogin/
2. Select the loan you wish to work on in the search Loans area of the Landing page header. You can search by loan number, by borrower first or last name (or use both), or use a partial name. There is also an “Advanced Search” option available to the right of the search box.
3. Once the page loads click “Underwriting Checklist in the left-hand side menu

4. The “Underwriting Checklist” will open type “Control F” and type “Verification” in the search field then click “Next”.
This post was last updated on 9/11/2020.
What is the payment schedule once the interest-only option has expired?
The outstanding loan value is amortized over the loan period remaining once the interest-only option period has expired. For example, if the loan is a 30-year loan with a 10-year interest-only option, then the outstanding loan value will be amortized over 20 years (30-year loan less the 10-year option period).
This post was last updated on 9/01/2020.
Can you do a 4 unit investment property?
Yes. To see if your specific scenario qualifies, run the loan through DirectWare® Loan Choices™, and choose “4 Unit Investment” for property type.
This post was last updated on 9/01/2020.
Does Direct Mortgage provide commercial loans?
Direct Mortgage does not provide loans on commercial property at this time.
This post was last updated on 9/01/2020.
If my company has branches that have been set up with their own Direct Mortgage ID, can our processors access the multiple branches’ loans?
Yes, processors can be set up to handle multiple offices. Follow these steps:
- Have each office register with Direct Mortgage as a branch by going to: https://www.directcorp.com/signup/
- Send an approval from your corporate office to support@directcorp.com. The approval notice should give the names of processors allowed access to multiple offices’ files, and state to which offices they have access.
This post was last updated on 9/01/2020.
How do I track my pull-through percentages with Direct Mortgage?
Log into DirectWare >> Choose a Client (or go to Department >> Loan Choices) >> In the Loan Pulse Area of the screen you will see the words “90 Days Pull Through”. Under those words is a percentage. Click on the percentage >> A window will open showing pull-through percentages for both the user and the company. Specifically, the report shows percentages for
- Loans With an Accept
- Rate locks
- Submissions
This post was last updated on 9/01/2020.
What Down Payment Assistance (DPA) Programs do you accept?
Direct Mortgage does not currently accept seller-funded DPA loans.
This post was last updated on 9/01/2020.
Do you offer loans on log homes?
Yes. Our loan programs can be used for log homes.
This post was last updated on 9/01/2020.
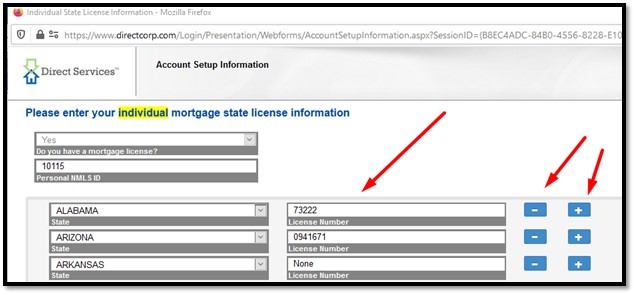
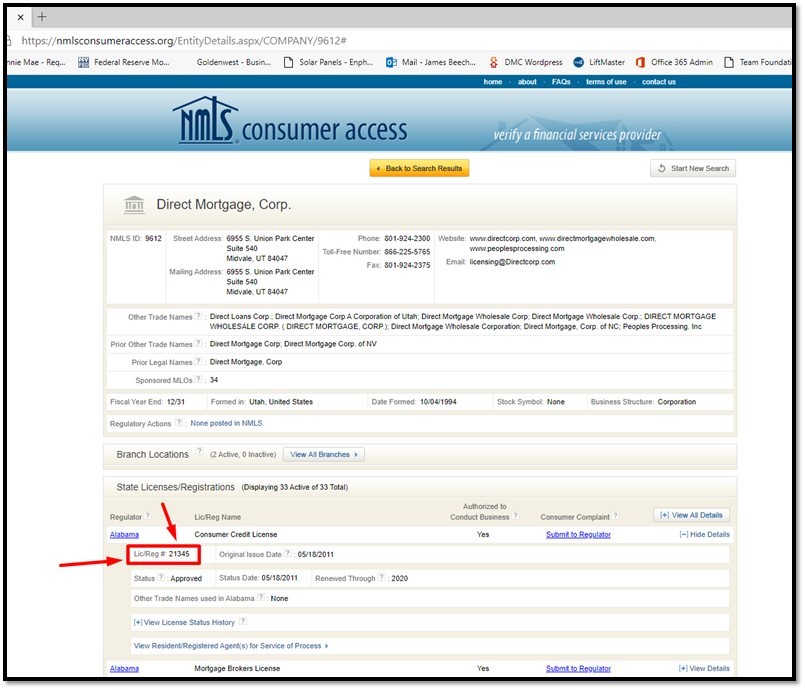
How do I update my state and mortgage licenses?
You can updated your mortgage license by following these steps in DirectWare.
1. Go to settings à Landing Page >> Your Name Area (in the page header) >> Settings.
2. Account Setup Information.
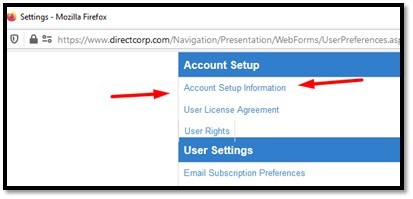
3. Mortgage CompanyState License Information (area) >> Edit.
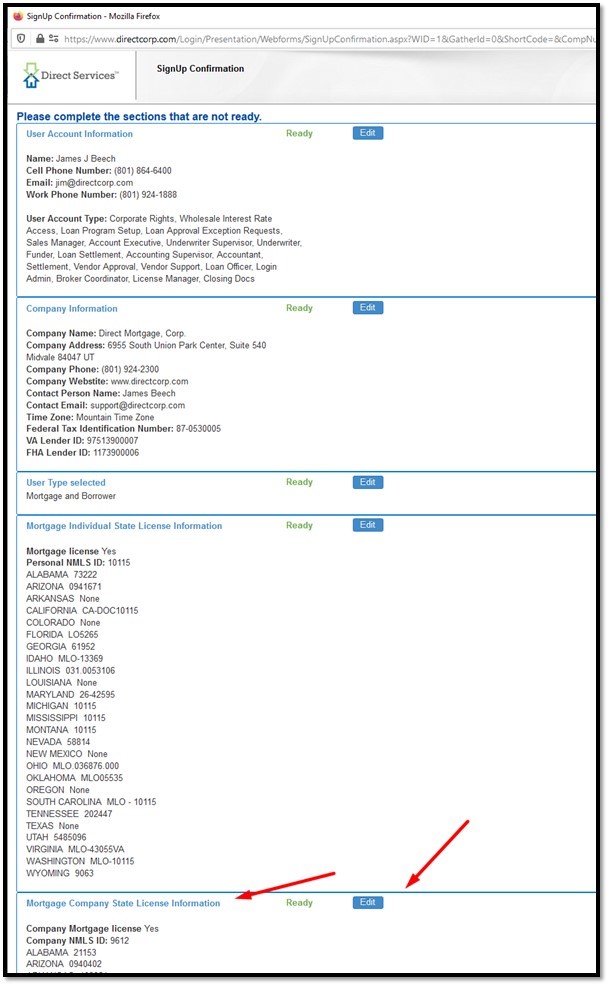
4. Click to add or remove any state license. Make sure to use the state license number used in the NMLS license database, as shown in the following two screenshots. The NMLS license and state license numbers are found at this link: https://nmlsconsumeraccess.org/
This post was last updated on 9/11/2020.
When dealing with FHA loans does the borrower have to provide bank statements?
If cash is required from the borrower to closed the loan then yes. If possible raise the loan amount to remove the cash to close loan requirement.
This post was last updated on 9/11/2020.
Do I have to lock the rate to submit to underwriting?
You do not have to lock the rate in order to submit to underwriting. However it is encouraged to lock the rate before doing so in order to not accrue extra money needed when it comes to cash down.
This post was last updated on 9/17/2020.
I've uploaded documents to DirectWare but the software keeps saying the page is blank, what do I do?
It was populated using comments in Acrobat. You can print it to a new PDF which should fix it. Basically the text is an added layer on the PDF. You need to flatten the image by printing to another PDF. Below are steps you can follow.
This post was last updated on 9/16/2020.
For a FHA loan, how do I view my case #?
In order to view your case number following these steps below.
1. Log in
2. Select the loan you wish to work on in the Search Loans area of the Landing page header. You can search by loan number, by borrower first or last name (or use both), or use a partial name. There is also an “Advanced Search” option available to the right of the search box
3. Click on Mortgage Insurance on the left hand side menu.
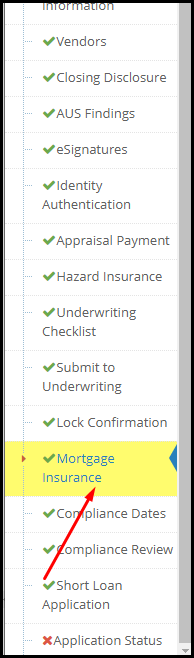
4. Once the page loads you can find the Case # on the page as show below.
This post was last updated on 9/16/2020.
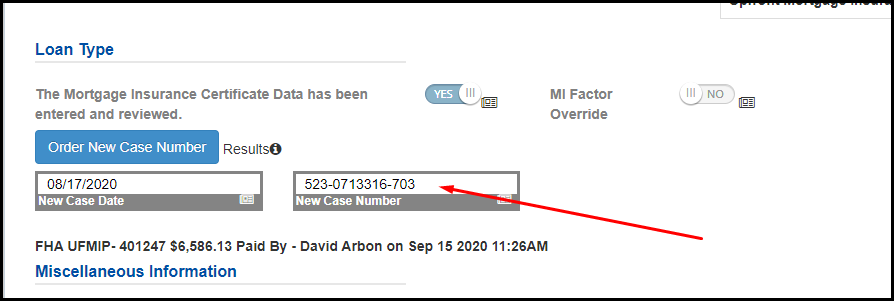
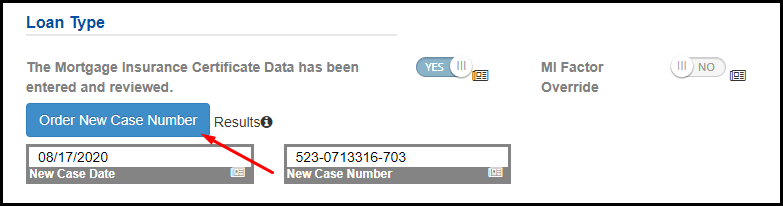
If Directware doesn't assign a case # how do I troubleshoot FHA cases #s?
To troubleshoot follow these steps.
1. Log in
2. Select the loan you wish to work on in the Search Loans area of the Landing page header. You can search by loan number, by borrower first or last name (or use both), or use a partial name. There is also an “Advanced Search” option available to the right of the search box
3. Click on Mortgage Insurance on the left hand side menu.
4. You can tell there is an error by hovering over the results section and the status says “Failed”.
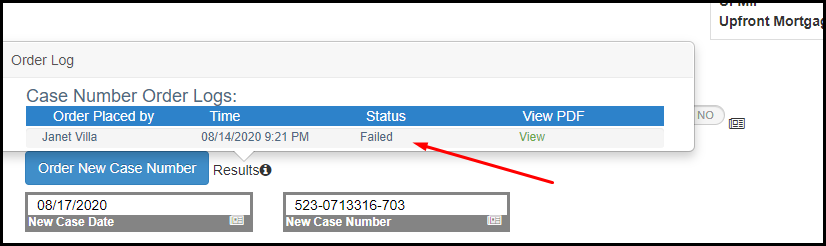
5. Click on the “Order New Case Number ” button.
This post was last updated on 9/16/2020.
For a FHA streamline refinance, how do I calculate my maximum allowed loan amount?
The FHA allows you to borrow up to the lesser of two amounts. One of the amounts to be calculated is a 97.75% of loan-to-value plus the new Upfront Mortgage Insurance Premium, called UFMIP. The other amount to be calculated is your current FHA loan amount minus any UFMIP refund due to you, plus your closing costs and new UFMIP fee.
This post was last updated on 9/16/2020.
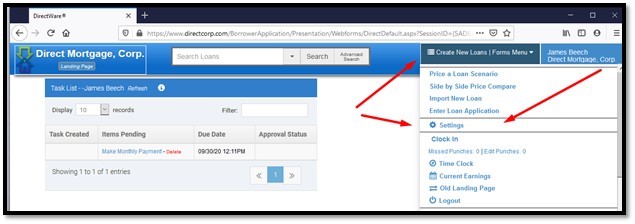
I am missing some queues on my home screen, how do I add them?
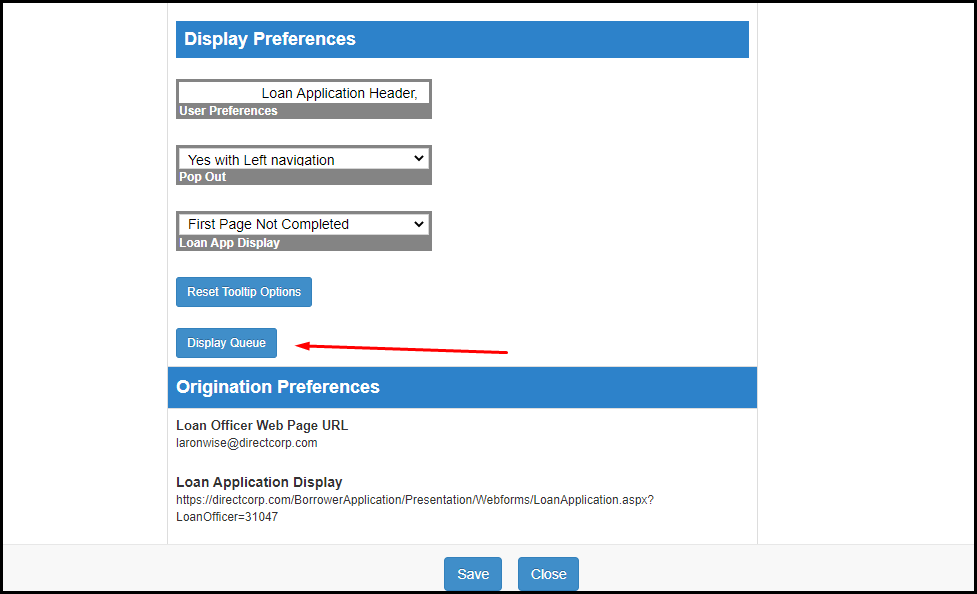
By default some queues are missing from your home screen. Fortunately the home screen can be customized via your settings. Follow the steps below in order to do so.
- Once you’re logged in click on the Forms Menu then click the Settings link.
- From Settings you need to from Display Queue under the Display Preferences section
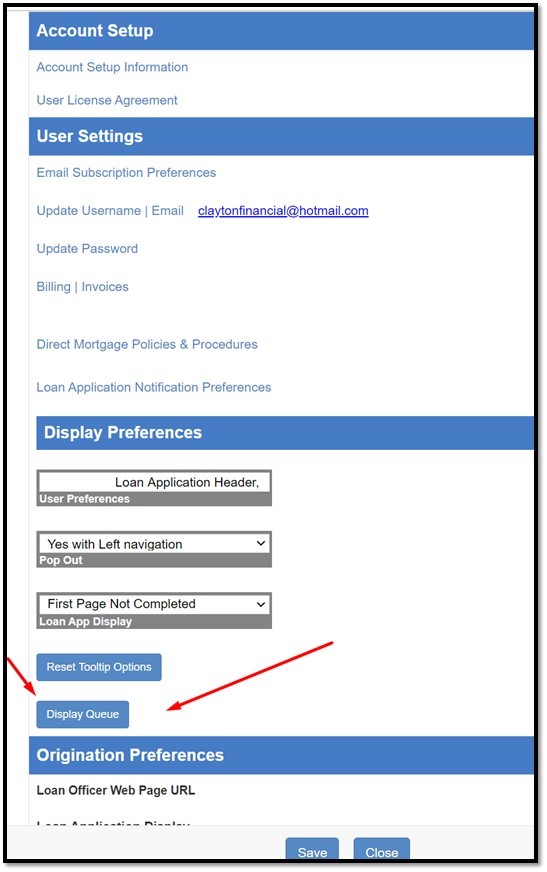
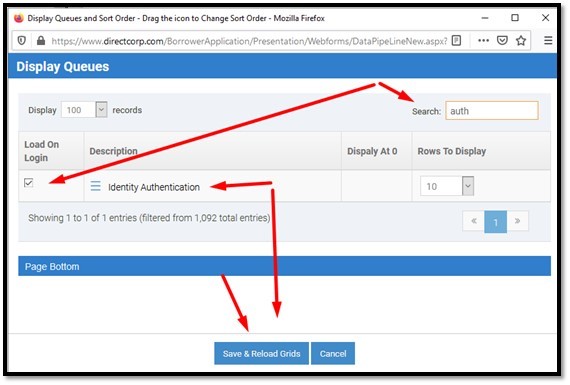
- Here you will see the list of available queues. If you want a certain queue to display make sure they have a checkmark in the Load on Login column. You can also arrange the order of the queues by dragging and dropping them in the order that you wish.
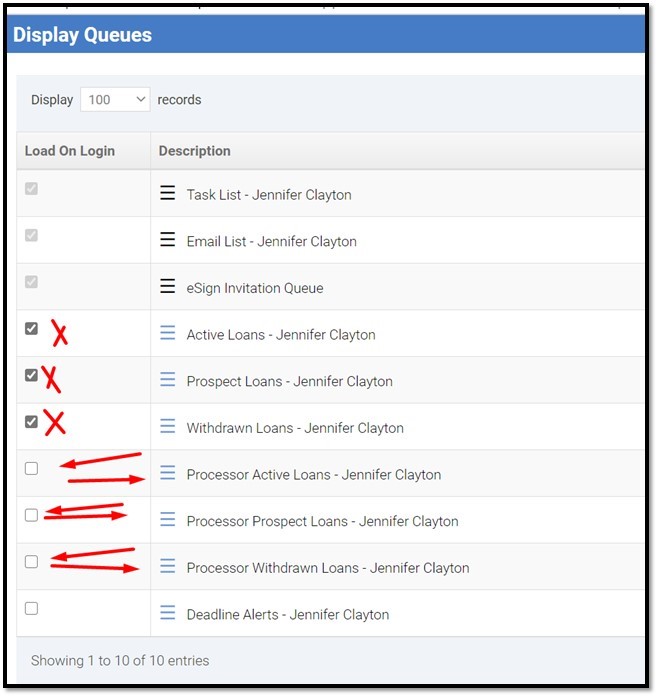
- Once you’re done you can see the new queues on your homescreen.
This post was last updated on 9/23/2020.
How do I finalize the QC Review of a Junior Underwriter, and any file that needs a QC Review or is QC Pending?
Files needing a QC Review to finalize (confirm or reject) a suggested status from a Junior Underwriter will display two buttons at the top – near the normal Current Underwriting Status drop down. After performing the review, the senior underwriter will determine whether or not to accept the newly suggested file status. The two buttons function as follows:
Approve Q
This button will approve and finalize the last status given by the Junior Underwriter. The daily Underwriting Count will add the Junior Underwriter as the original Underwriter. The count will also add the Senior Underwriter as the QC Underwriter.
Reject QC.
This button will reject and return the file to the previous Current Underwriting Status drop down (the status before the Junior Underwriter made their update). The daily Underwriting Count will add the Junior Underwriter as the original Underwriter to the new status given. The count will also add the Senior Underwriter as the QC Underwriter showing the new status updated by the Senior Underwriter.
This post was last updated on 9/23/2020.
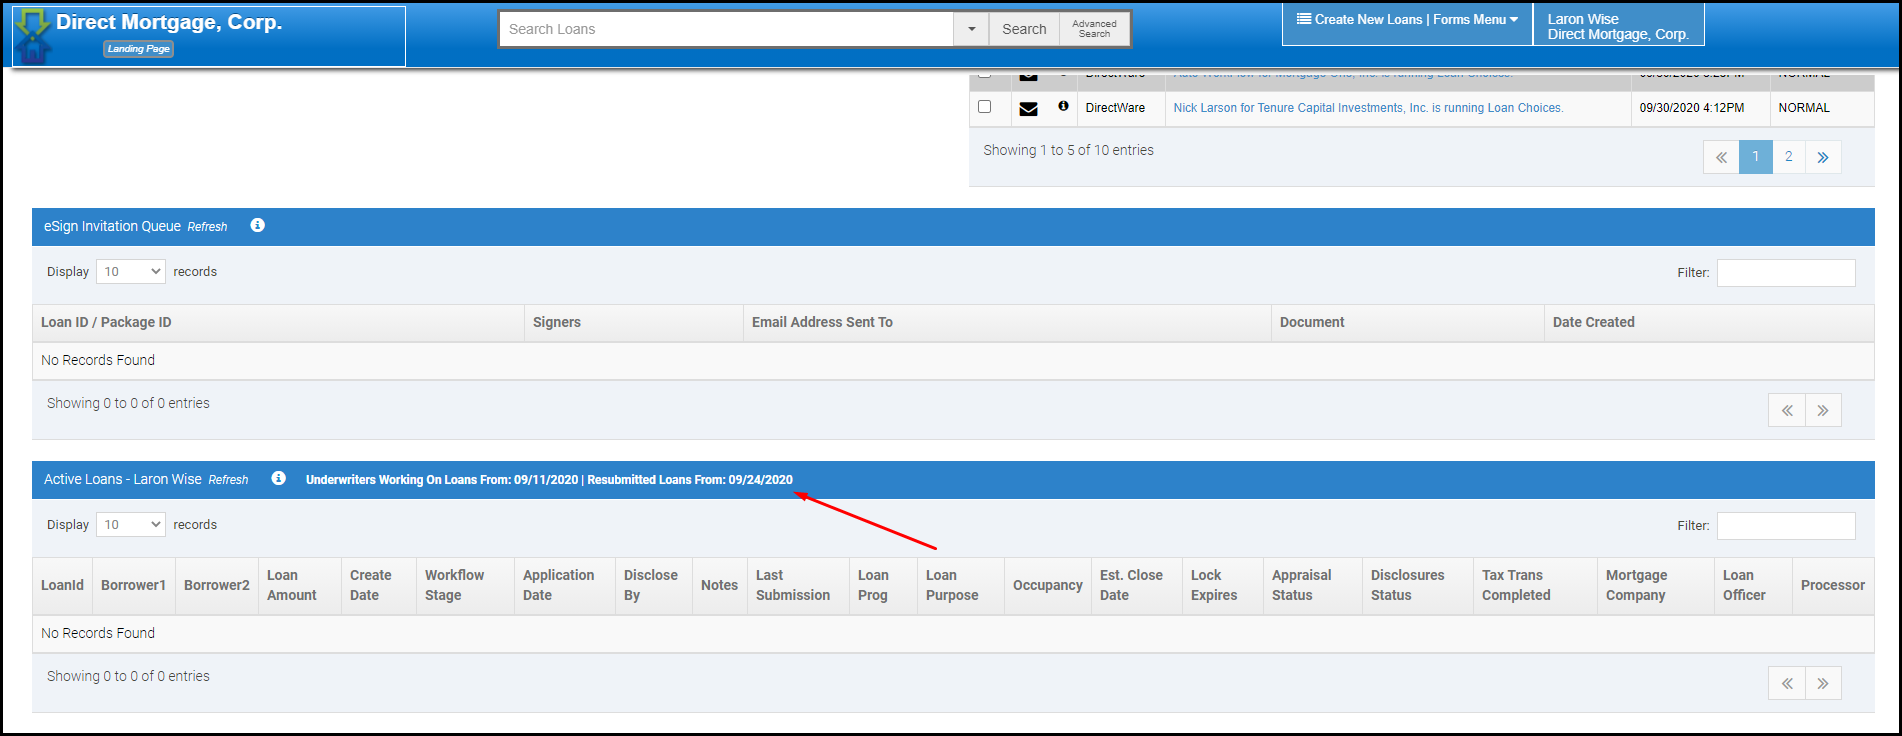
Is there a place to find current turn times?
If you need to find the current turn time there are two different ways to do so. I have included the ways below as well as screenshots.
Rate Sheet:
- From the Rate Sheet email you need to click the Rate Sheets button to open the rates sheets webpage.
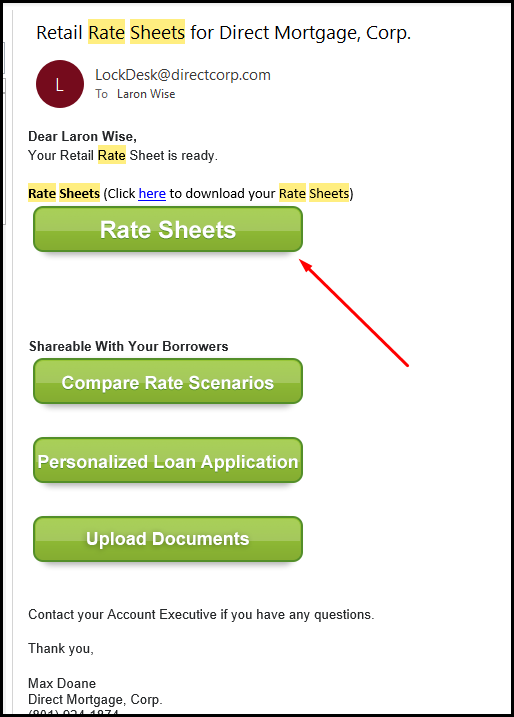
- From there click on either button to open the PDF file.
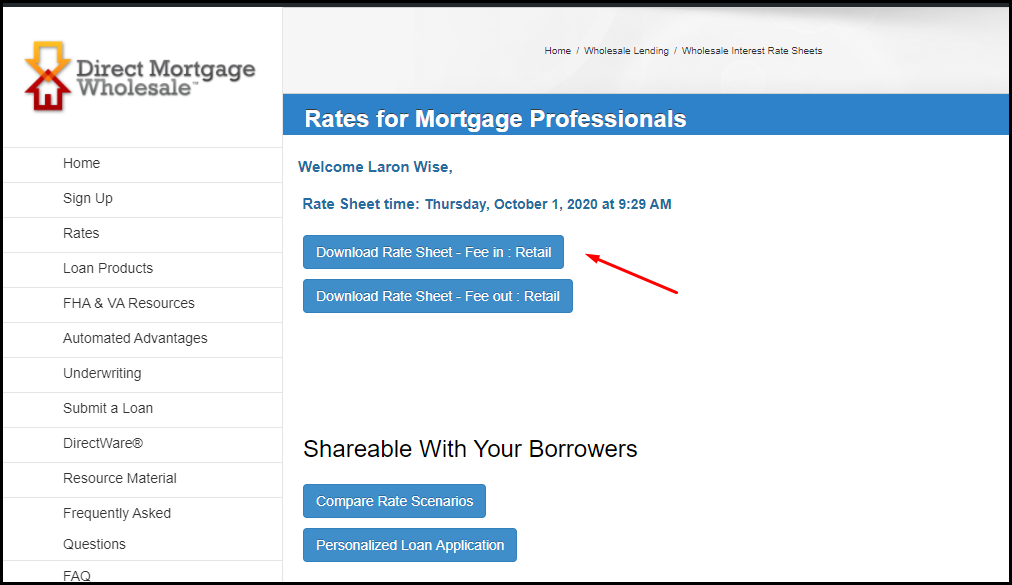
- Once the PDF loads you can see the current run times in the upper right hand corner.
DirectWare:
- Once you’re logged into DirectWare you just need to find your active loan queue. From there you can see the current turn times.
This post was last updated on 10/01/2020.
What do I need to do for the FHA case number, or Case Number authorization to complete FHA Case Number Assignment conditions?
To clear the pending borrower validation you need to order the “update case number assignment” product. Then upload that image into the case number condition.
This will allow the underwriter to not request the borrower FHA validation to be cleared.
If the property type is a condominium, then that image should also show the case as CONDO, and have the correct CONDO ID On the form.
If the loan type is a streamline refinance, or new FHA loan paying off an existing FHA Loan then you will need the FHA Refinance Authorization. The image might be automatically associated with the underwriting condition, but be marked as “Don’t Use”. Simply mark the image as “Use”. If the image isn’t associated with the underwriting condition, then obtain it from the Order link in the Shopping Cart form. Then upload the image.
1. Log in
2. Select the applicable loan number from the Search Loans area of the Landing page. You can search by loan number, by borrower first or last name (or use both), or use a partial name. There is also an “Advanced Search” option available to the right of the search
3. Click on the Shopping Cart link found in Loan Pulse (page header area) of the loan application.

4. In the shopping cart products area use the search filter to find the Update Case Number Assignment product then click the Add Product button. Do the same thing for the Refinance Authorization product.
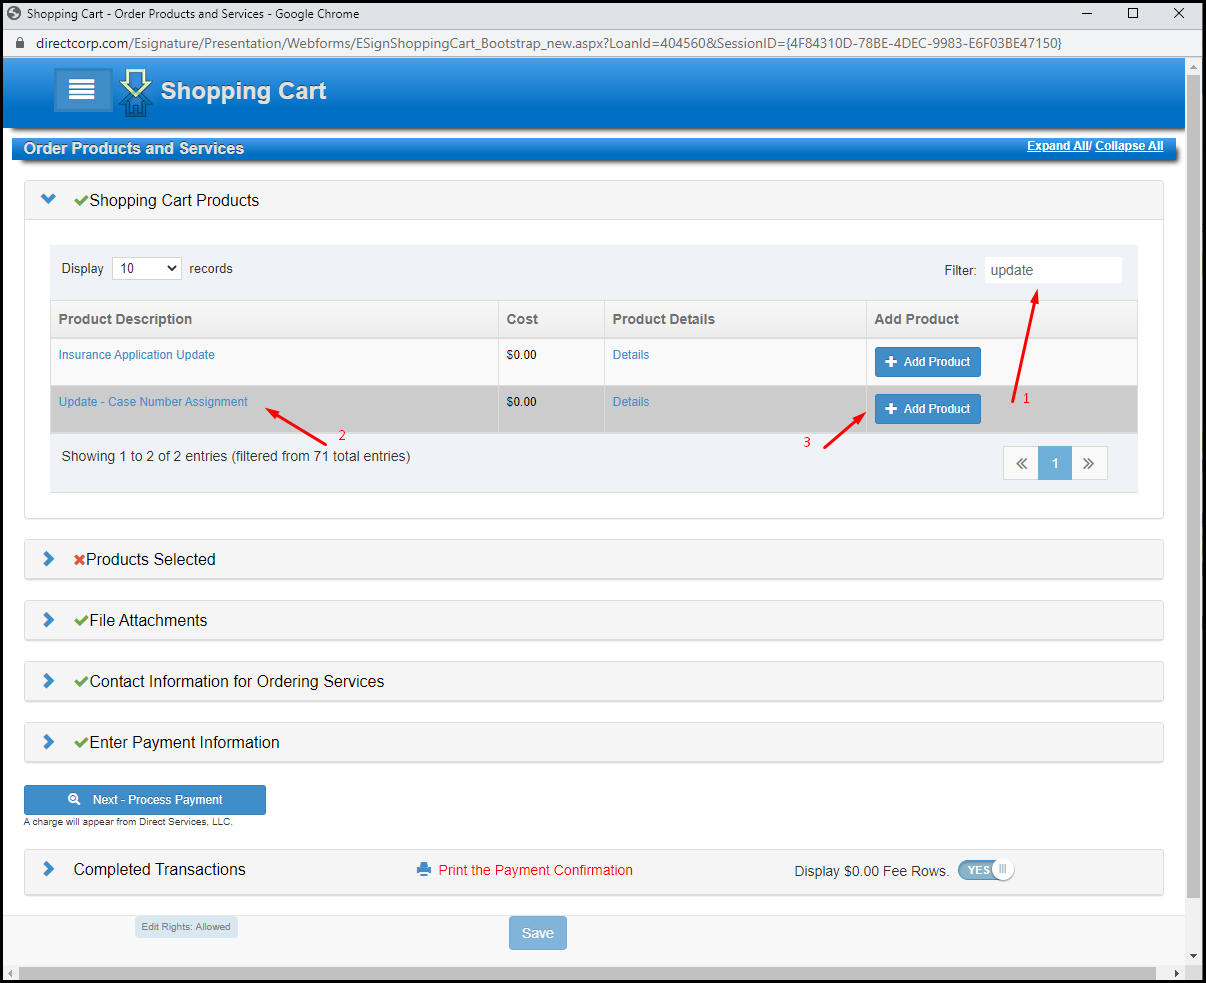
5. You can see that they are $0 dollar products so no payment information is need in order to process this request. However you still need to Select Credit Card and the click the Process Payment button.
This post was last updated on 10/03/2020.
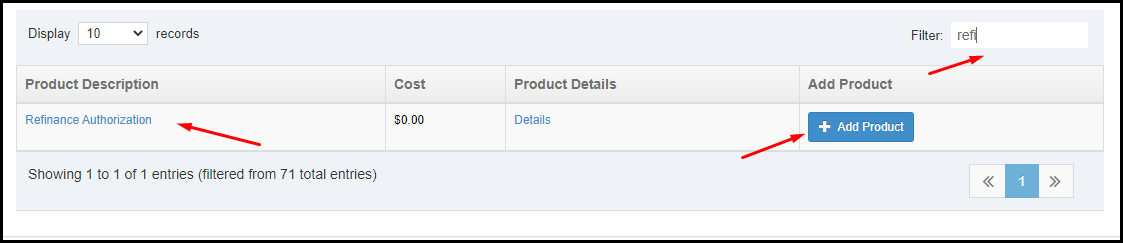
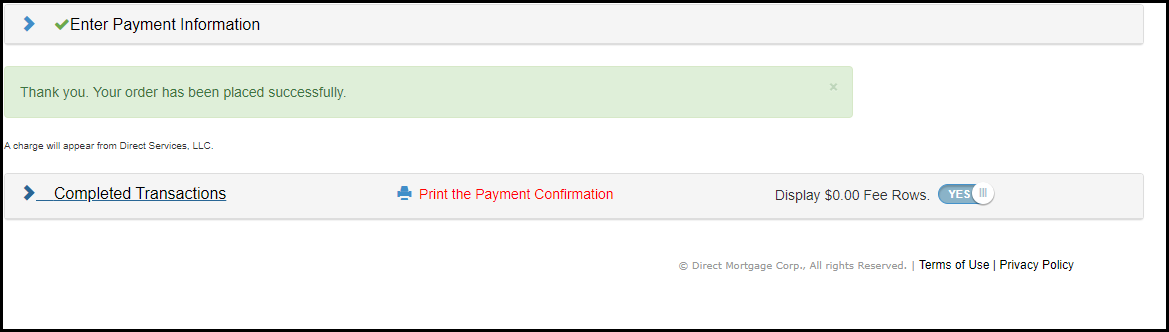
Do you accept transferred appraisals?
We do accept transfer appraisals. I have listed what we need in order for the transfer appraisal to be approved.
- The Transfer letter: It transfers the rights to the Appraisal from the previous Lender to Direct Mortgage. Without it, we don’t have the rights to view the Appraisal report.
- Compliance/AIR Cert: It certifies that the Appraisal report meets all compliance points to pass Fannie/Freddie requirements
- EAD/UAD reports: To be sure the Appraisal that is being transferred previously passed Fannie/Freddie requirements even though once we receive a transferred Appraisal, we run them through the UAD portal so they are in our name.
- An invoice: Showing the amount of 0.00 owed is required for Accounting records to show the Appraisal was previously paid for, and no further payment is needed.
- Evidence the borrower received the Appraisal is required to determine the previous Lender was compliant with delivering the Appraisal to the borrower within three business days.
- Underwriting Disposition Letter.
- Original PDF, and XML File of the Appraisal is needed to upload the Appraisal to the UAD EAD portals to run the reports in our name, and upload the Appraisal to the Appraisal condition in Underwriting.
For your convenience I have included steps on how to upload them below.
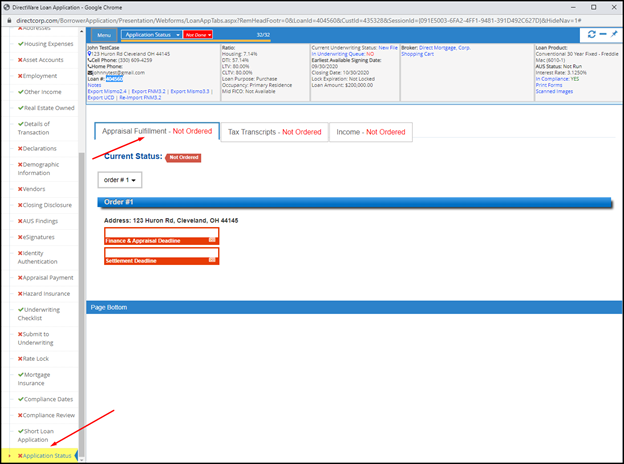
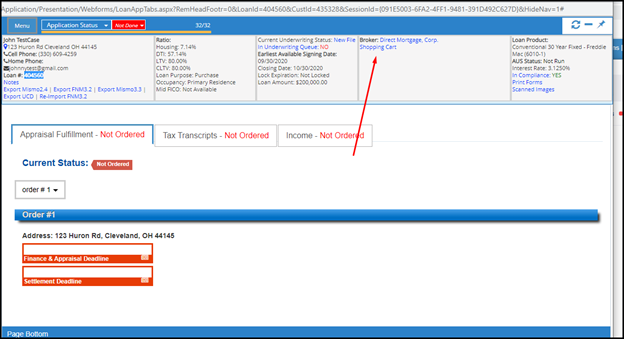
- Once you are logged into the log you want click on Application Status from the Side Menu. You will notice that the Appraisal Fulfillment status is Not Ordered
- From the Header area click on the Shopping Cart hyperlink
- Expand Shopping Cart Products and use the filter search bar to type in “transfer” so that you can see the necessary item to purchase. Please be aware that this is a $0 purchase.
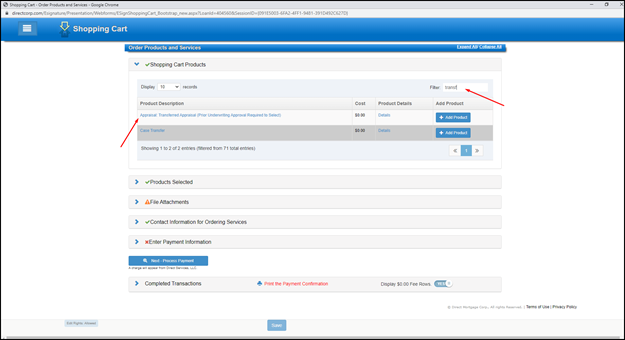
- Once added you can process payment. Since this is a $0 purchase you do not need to input any credit card information to proceed.
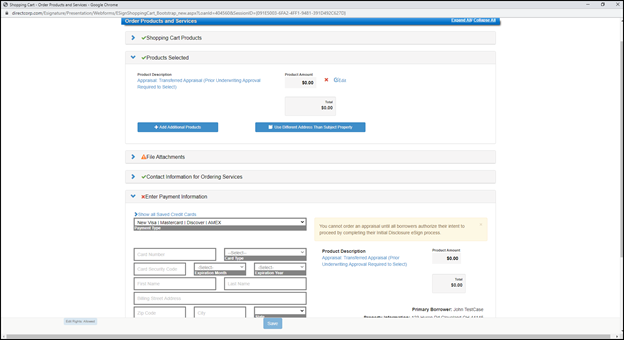
- Once you have made the purchase you will get confirmation that the order was successfully completed.
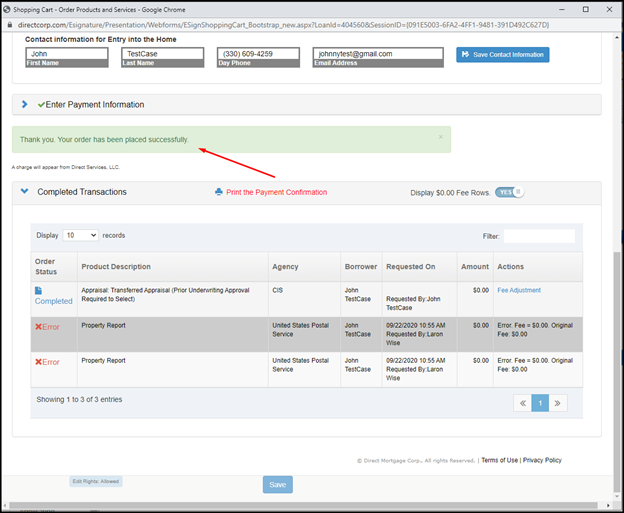
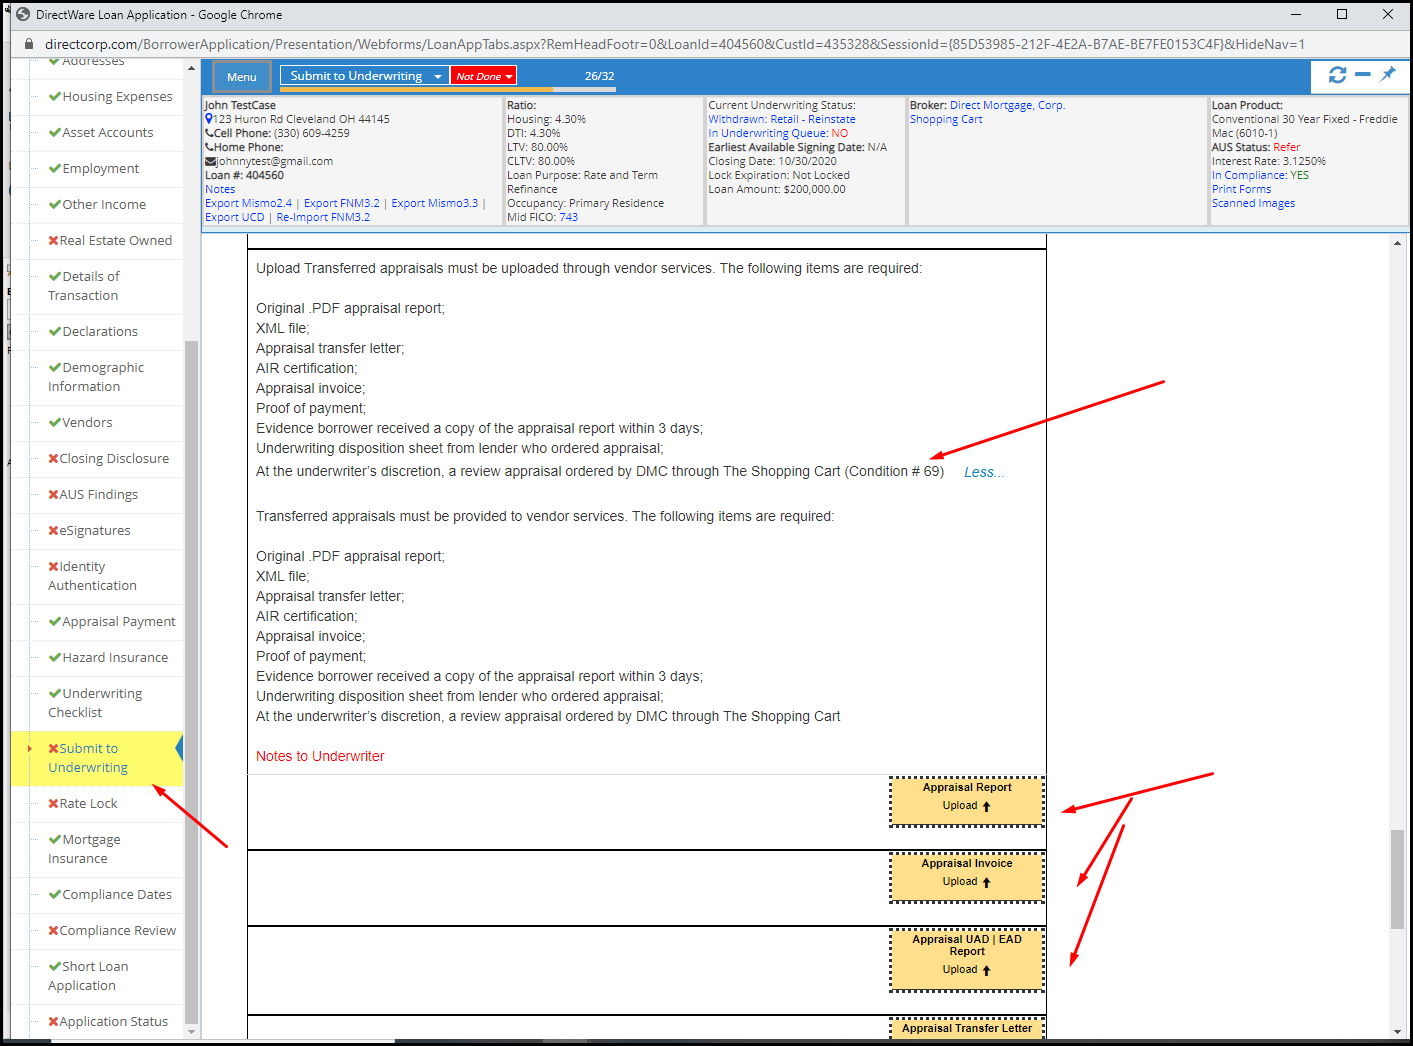
- From the side menu you want to find the Submit to Underwriting hyperlink and click on it. From there you need to find the condition that will have the Upload Transferred appraisals description. You can do this by scrolling down or CTRL+F and begin typing to find it quicker. Once you find the condition you can read the description then begin to upload documents needed.
This post was last updated on 10/06/2020.
How to add a third party processor?
To add a 3rd party processor takes a few steps. There is also an approval process that takes a couple hours. Below are steps on how to add a 3rd part processor then add them to your loan assuming they get approved.
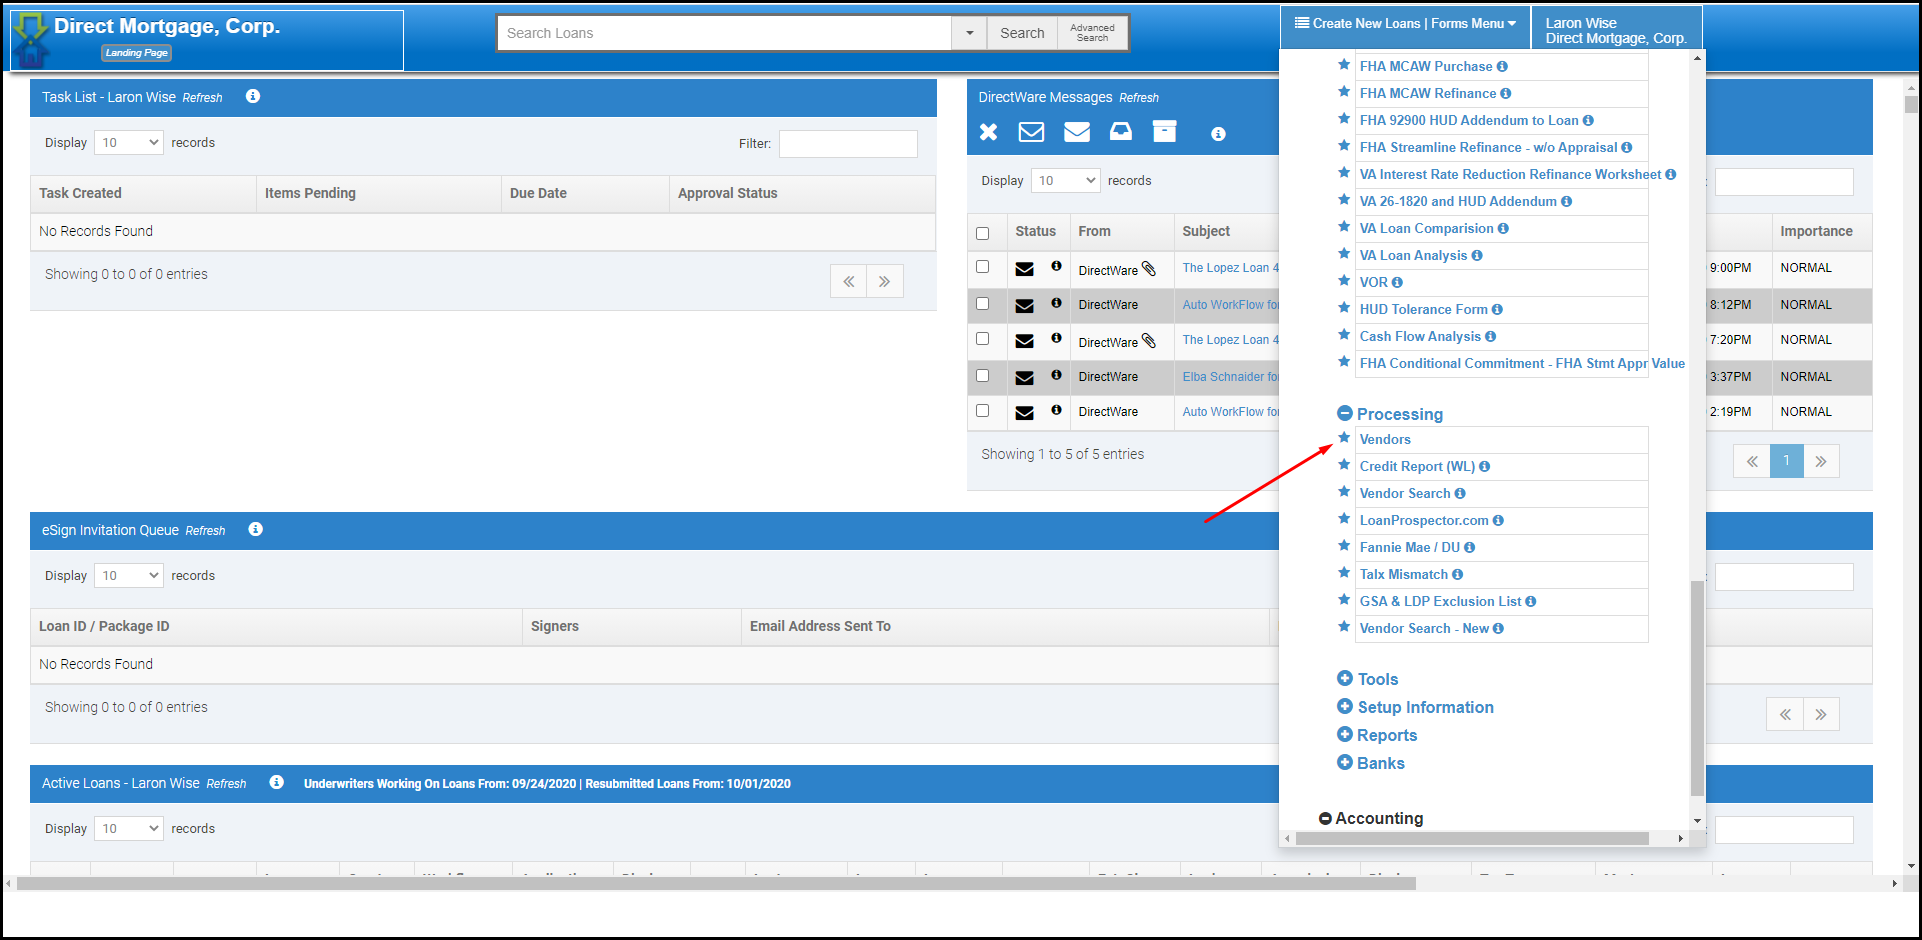
- From the home page click on the Forms Men button then scroll down to Processing then click Vendors
- Once the page loads you want to click on the menu button and make sure the Display All Vendors toggle is set to yes.
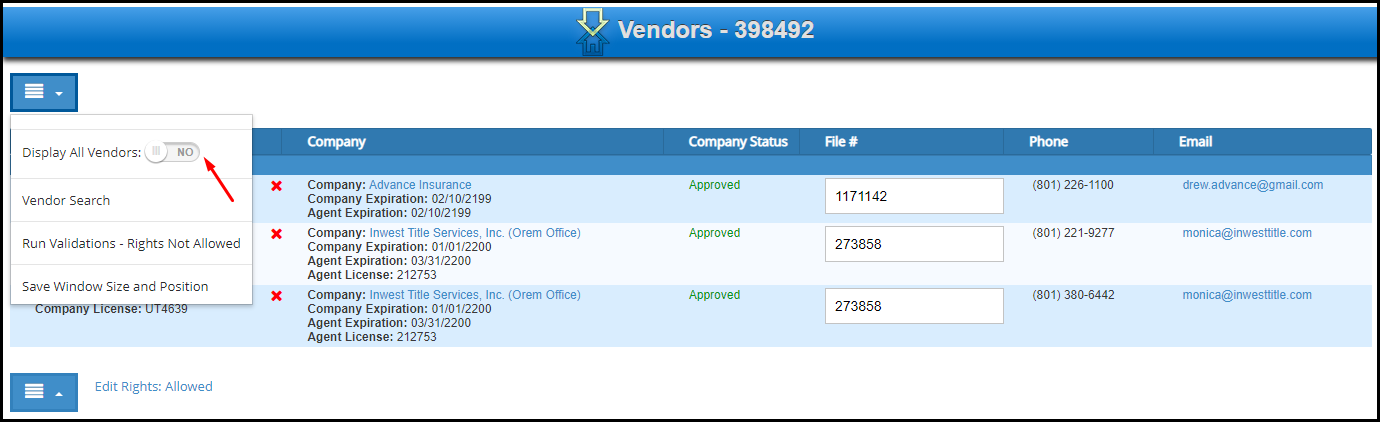
- Look for Search for Contract Processing. In this tutorial we’re going to show you how to add a new Processor. So in this instance click on the + button.
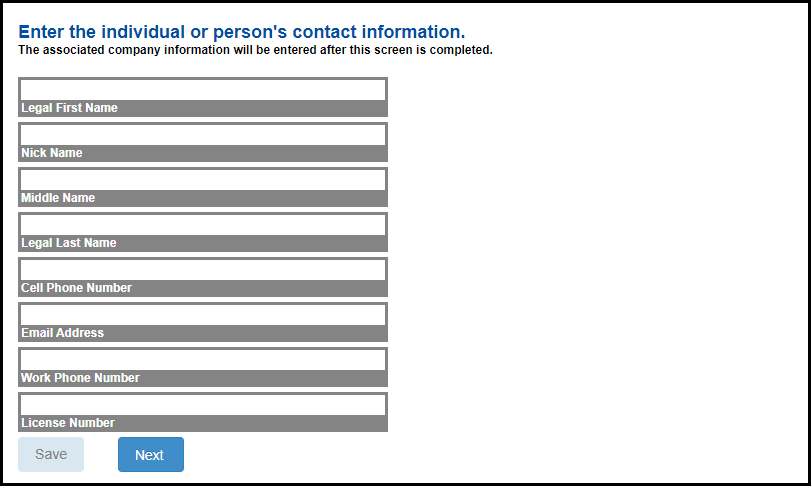
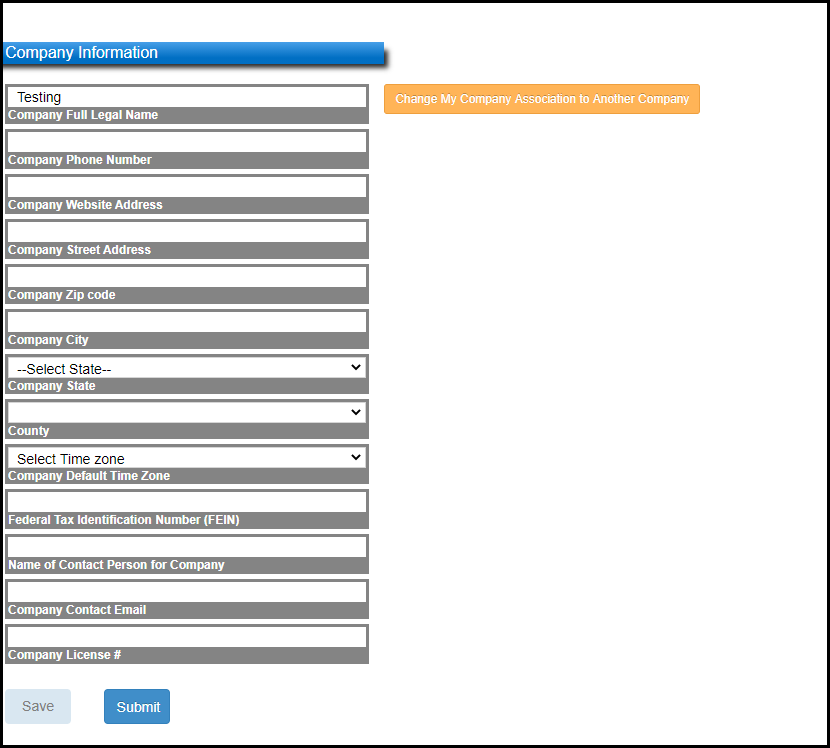
- Fill out the Processor’s information then the company’s information.
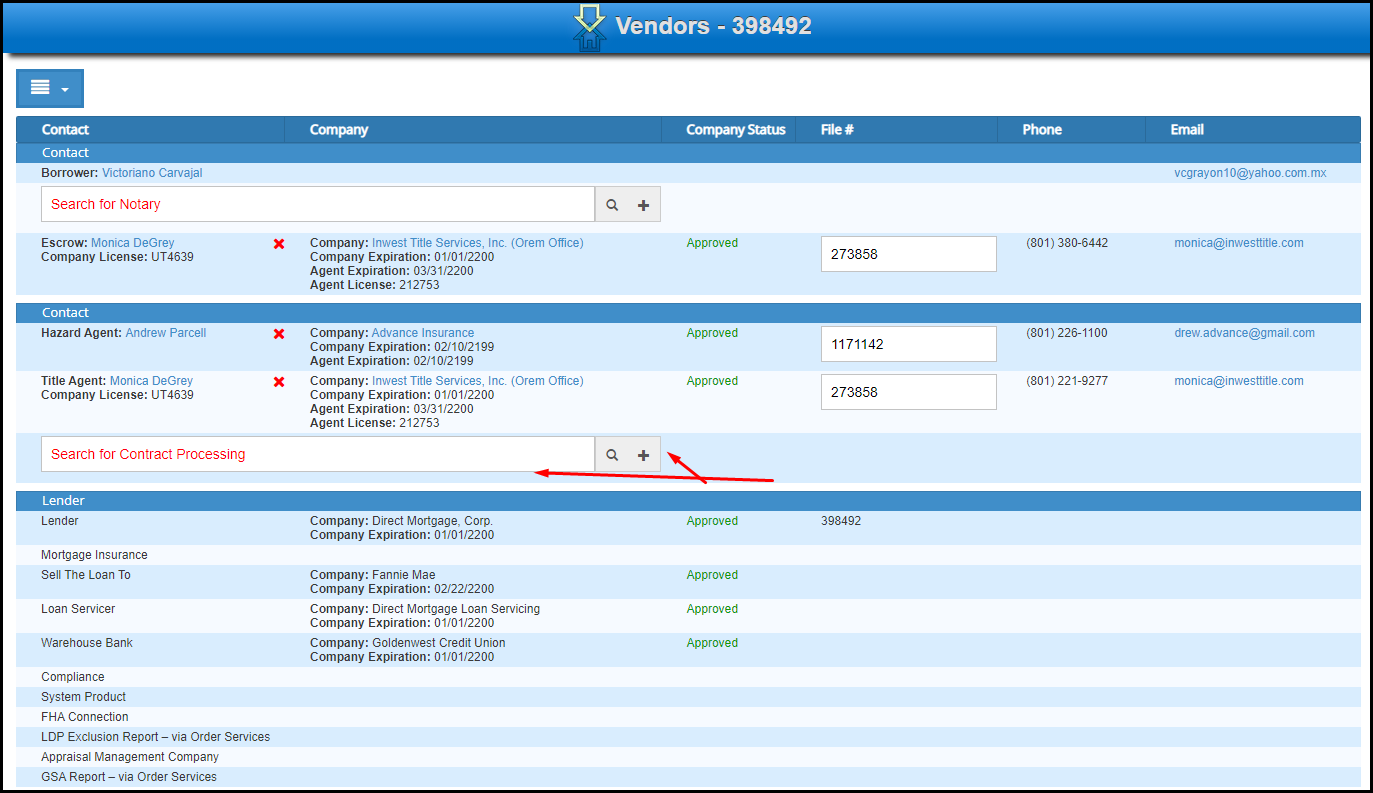
- Next thing you need to do is open the loan that you want to add the processor to. Then click Vendors from the side menu.
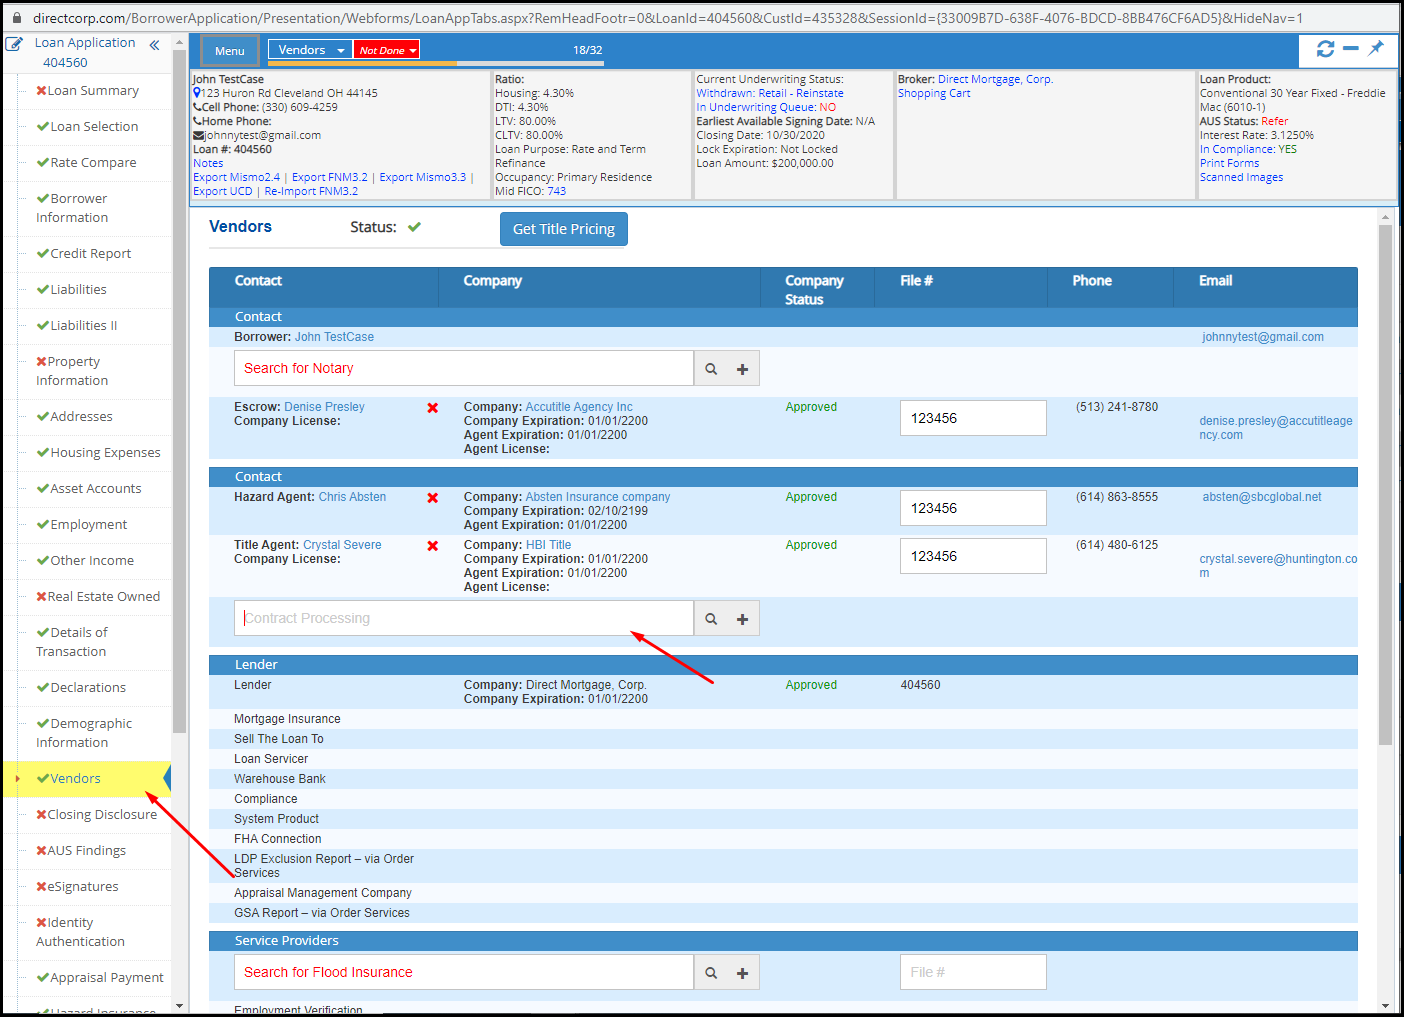
- Type in the person’s name in the Contract Processing search bar. After you add them the screen should look like this.
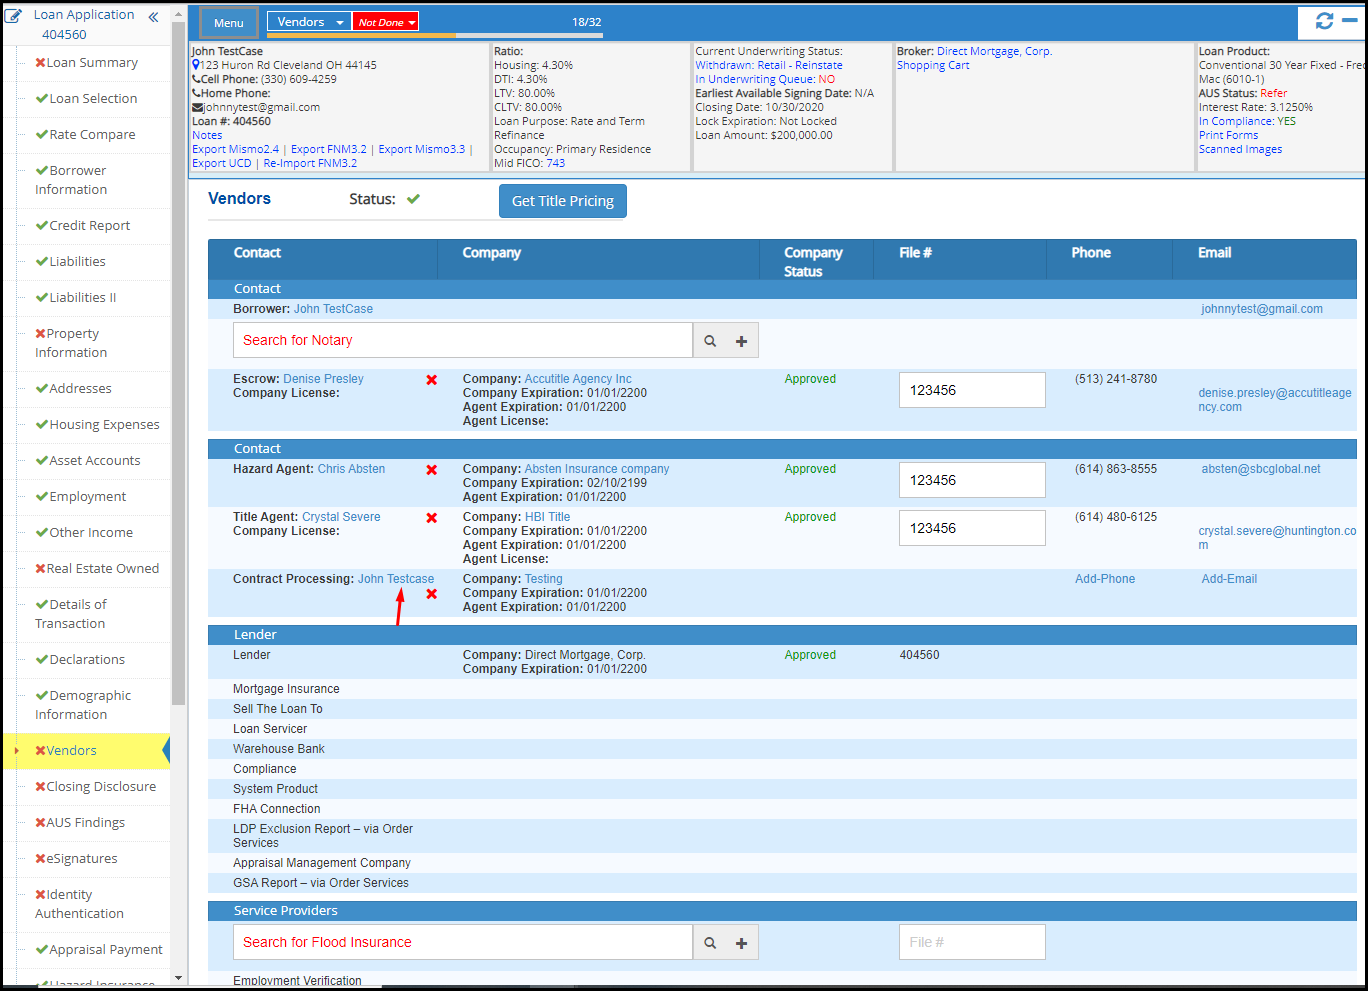
- The last thing you need to do is click on Closing Disclosures from the side menu. Under Closing Cost Details you should see the Processing Fee.
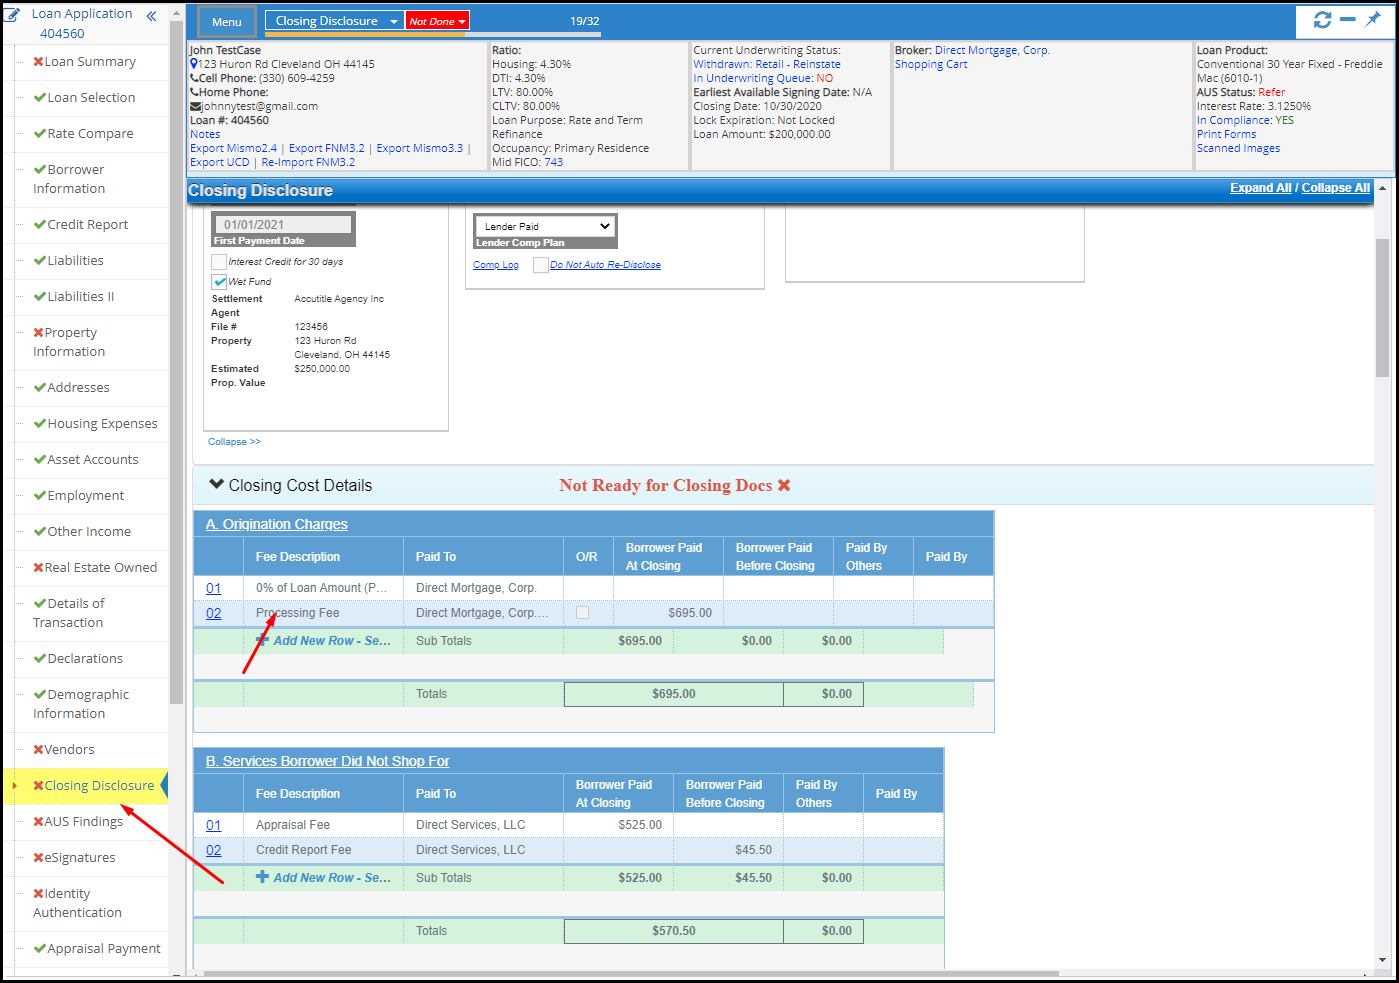
- Under the Paid To column from the dropbox chose the company that you just created.
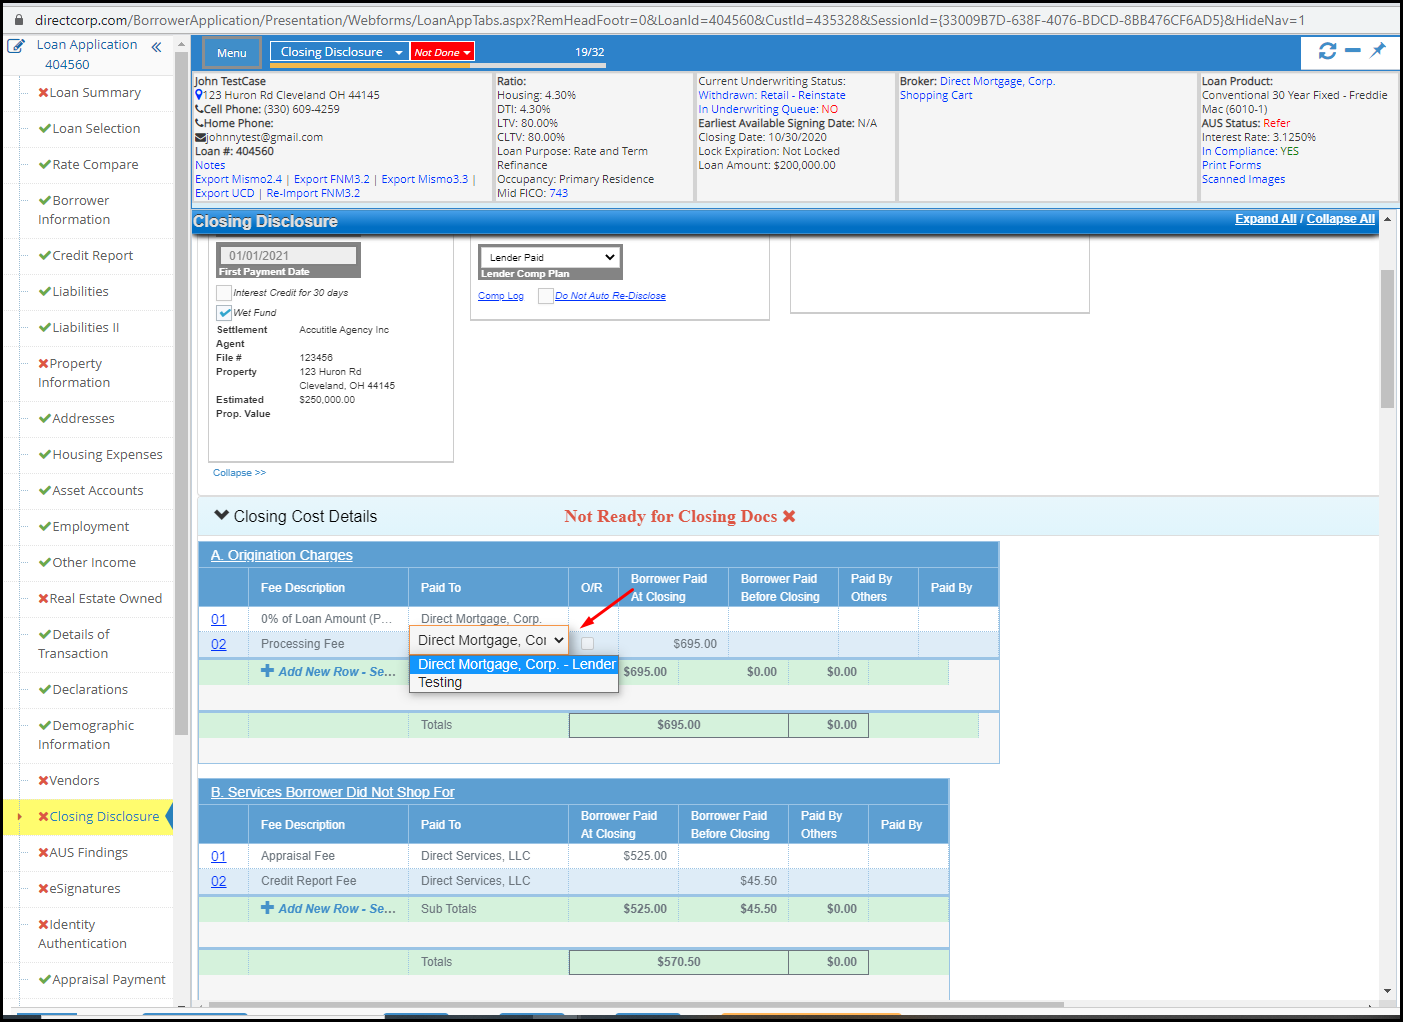
End of Explanation.
This post was last updated on 10/08/2020.
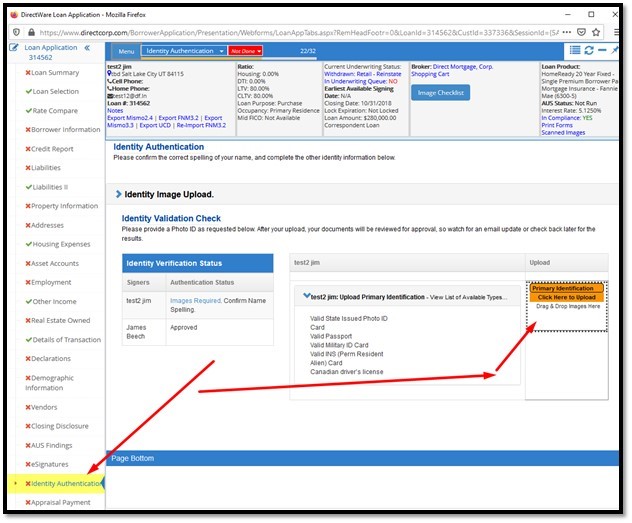
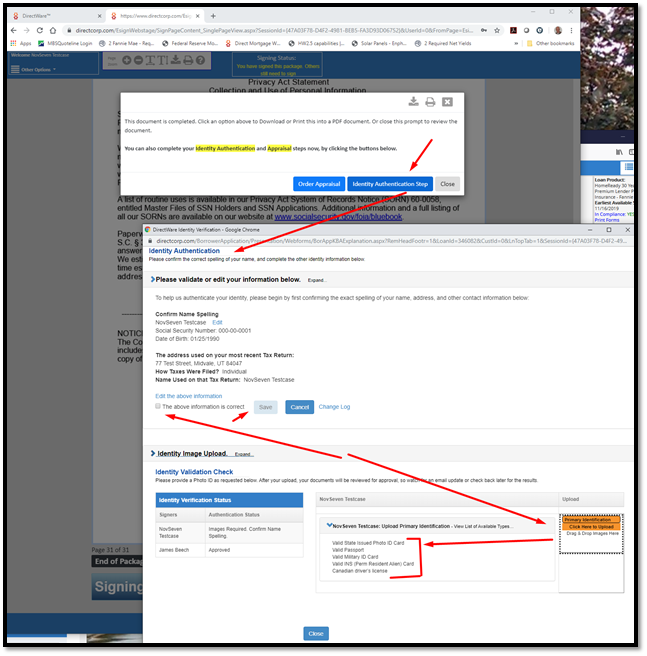
Identity Authentication. How do I upload Photo IDs, and approve IDs that have been uploaded?
Upload a Photo ID.
The Photo ID Upload is found here: DirectWare Home Landing Page -> open Loan Application -> Identity Authentication -> Upload using the functionality of using a “Click to Browse” or a “Drag and Drop” functionality.
After uploading, the image queue will be updated, waiting for somebody to Approve or Reject the Identity Document provided. Look for an email providing the updated status. An email is sent to borrowers, loan officer, and the processor.
If User Rights are Granted to Review and Approve Photo IDs.
To approve IDs you must first add the Identity Authentication Queue to your DirectWare Home Landing Page.
Adding the Identity Authorization queue.
From the DirectWare Home Landing Page click on the Forms Menu click on the Settings link.
Once the page loads click on the Display Queue button.
Add the Identity Authentication Queue by searching for the Identity Authentication Queue in the Display Queues page, then clicking the checkbox to display this queue, and then clicking Save. You must then close the form and refresh the DirectWare Home Landing Page.
Using the Identity Authorization queue.
Once you’ve add the queue scroll down until you find the section. From there click on the Images Uploaded, Pending Approval link.
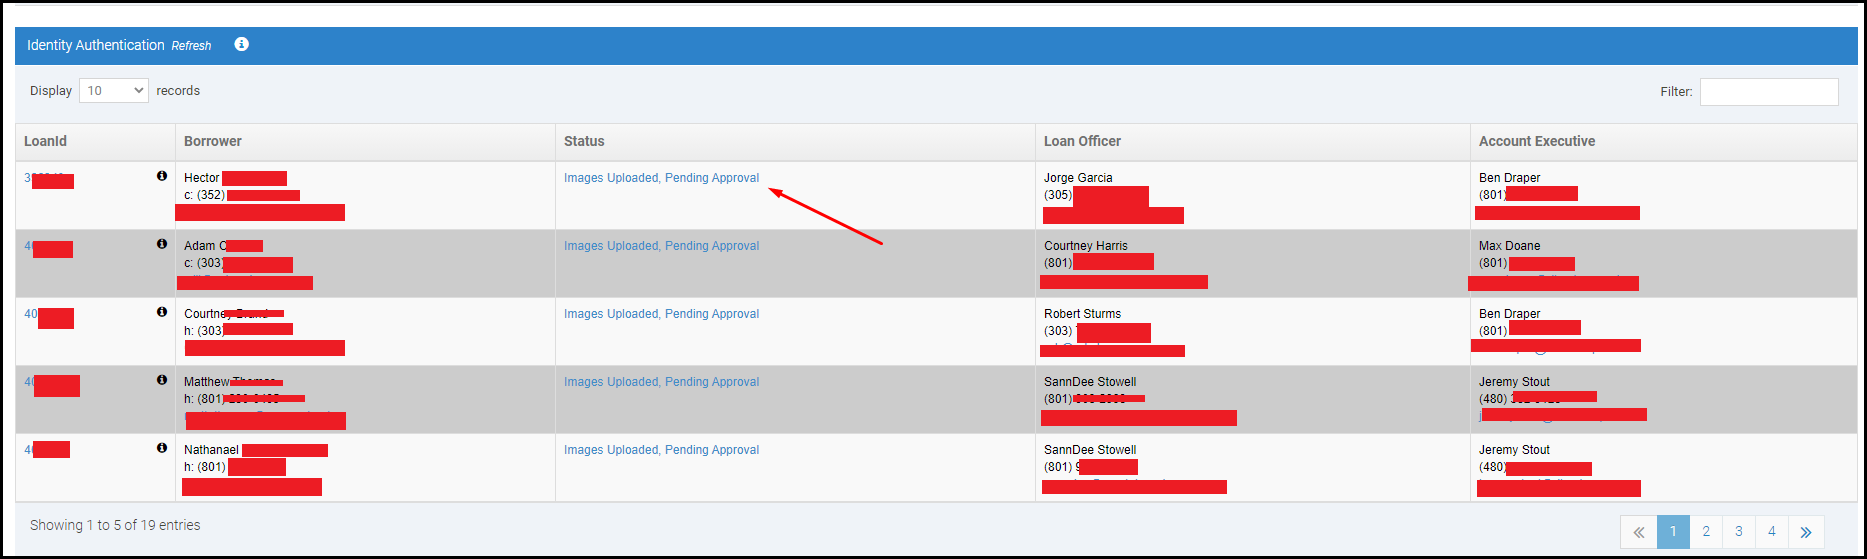
Image Checklist
Loan Application Data.
This data comes from the user input DirectWare system data. These fields are populated. If the document provided demonstrates that the name spelling is misspelled or incorrect then go to the loan application to update this data. Note: click path to the loan application is clicking the Loan Number in the upper left header area.
Middle Name.
The middle name should not be added if the Loan Application Data does not include it (and should be included if it is input). However, the remainder of the first name, last name, and suffix (if any) must be spelled exactly the same before Identity Approval should be granted.
Image Data Column.
This is the data that comes form the Document Image. Enter the fields in these columns by either 1) Manual Input; 2) Clicking the arrow to the right of the Loan Application data field; 3) Copy All of the Loan Application data fields over to the Image Data by clicking the top arrow to the left of the word “Image Data” in the data column heading; 4) use the OCR Document button to recognize the text and automatically input the text (this step is in beta testing).
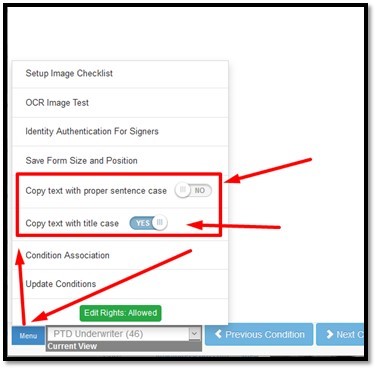
Capitalize the first letter of each word or Sentence.
To default to the proper word capitalization, use the Sentence or Word Case option in the Menu. Or turn it off. This allows the user to quickly fix data that is incorrectly entered in all capitalized letters.
The Primary Identification Word Phrase identifies the document type and…
This Primary Identification Word Phrase in upper left area of the form is not only the currently identified Document Type, but it is also a link to the PDF. This is sometimes used to trouble shoot, when the image to the right side of the form doesn’t display.
Use Document
The Use Document field area in the upper right area of the form is used when an image does NOT meet the criteria. When the image is corrupt, or isn’t what is need to pass the identity validation, then move the swatch to “No” – to not use the image. Changing the status and marking the image as Don’t Use will remove the loan from the queue until after a new image has been uploaded and marked as “Use”.
Run Image Validation Button.
After the Image Data has been entered, you would now use the button to “Run Image Validation”. This will help you determine if the image should pass or fail. If this validation passes, a valid identity image is also uploaded, and everything else matches up – then you can change the Authentication Status from Pending to Approved and click save. Click the Next Image in Queue button to move on to the next image without having to exit out and click the next hyperlink.
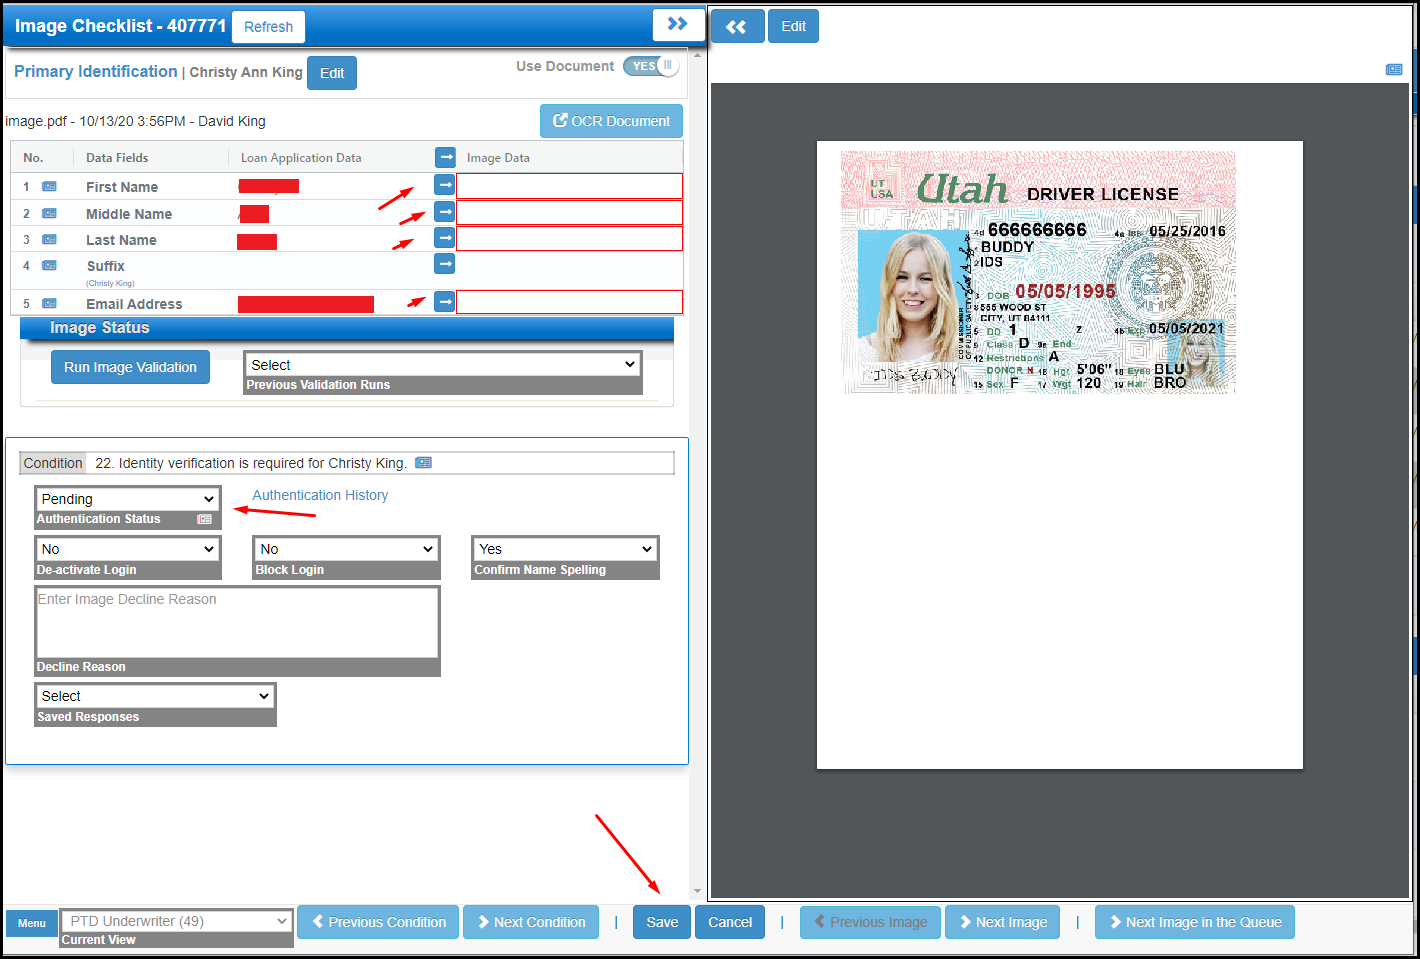
Underwriting Sign Off.
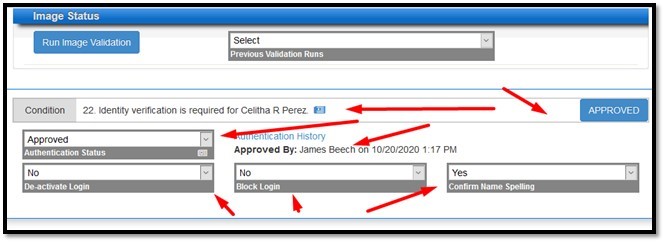
If a user has been granted underwriting rights, then the user can also sign off the Identity Condition in the UW Checklist from this page. If the image passes validation, and the underwriting criteria for identity also passes, then the user can simply click the green “Approve” button.
Note: Notice that other sections automatically move to “Approved” after clicking this button, and the Image Data fields also populate. To undo, simply click the button a 2nd time. To see the underwriting notes, and others who may have sign off the condition, simply click the “Change Log” icon as shown in the screen shot below.
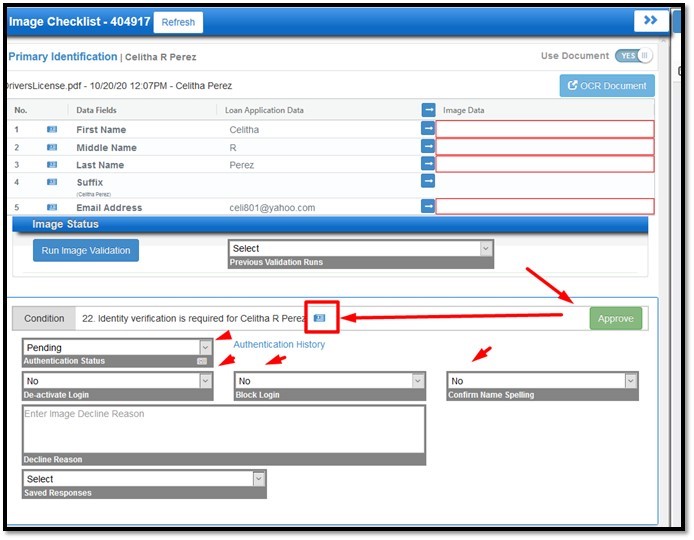
Decline Image, Status Changes, and Saved Responses.
Typically to reject an image, the use should Use the Documents Needed option – and not the “Decline” option. The decline option will terminate the login of the user. If this occurs incorrectly, then simply click change the Deactivate Login and Block Login drop down fields from “Yes” to “No”.
When an image is reviewed that is already in a Documents Needed status, and approval will still not be granted, then a toggle to Pending, then save, and a change back to Documents Needed would be the way to send a new email and apply that updated status.
Saved Responses.
When changing the status to decline an image, the borrower, loan officer, and processor will receive an email. Entering a response will help them correctly upload a corrected image the next time. So, make sure to enter clear and concise instructions. To help you do this, you can use pre-determined responses, and even create some of your own. To do that simply enter the text you desire to email and then click the “Save Text From Your Input Above” button. That will allow you to reuse the response the next time the same response is needed.
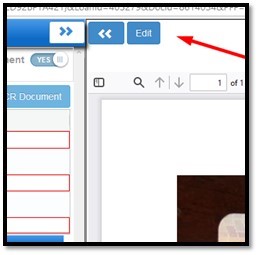
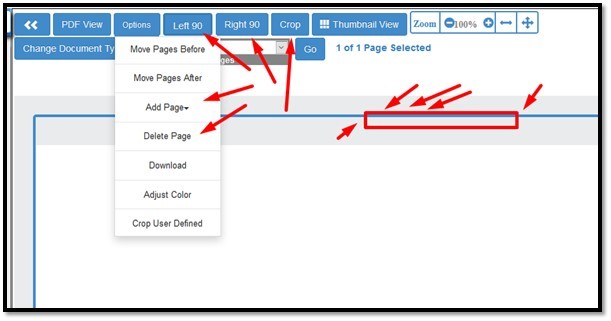
Crop an image. Delete a blank page. And other image functionality.
To crop and cut away the empty areas of an image, simply click the “Edit” Button above the Image. Use the Menu options to delete blank pages. Make sure that the page selected is frame highlighted with a blue border for the image you want to rotate, crop, or delete. Other image manipulation options like adding a document are also available. See the screen shot for more detail.
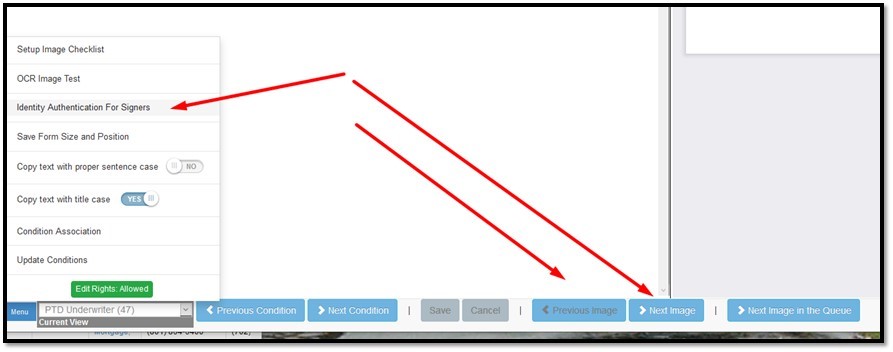
Trouble Shooting.
What should I do if the image or data doesn’t pass?
Use the Previous Image, the Next Image, and the Menu à Identity Authentication For Signers form. These options allow the user to navigate to other images that might allow the identity to pass. Always check these areas if the image doesn’t pass validation.
End of Explanation.
Why can’t I select my company as a Contract Processing Company? I received a login approval…
We require more information for a “dual company”. A vendor company is the type that allows the vendor to be paid on the Closing Disclosure. The mortgage contract processing company type allows the processor access rights to process loans from other companies.
A Corporate Officer and Company Type (like LLC or Corporation) needs to be entered before the wizard will prompt for the company owner to complete their signup portion for the Mortgage Contract Processing Company.
After the corporate officer is entered, have the company owner login, and complete the wizard. While the Vendor company is approved, the mortgage company type is not. Most of their “mortgage company” information is blank, whereas the vendor company is mostly completed. These both have to be completed for them to process loans correctly.
End of Explanation
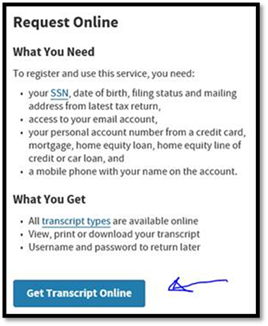
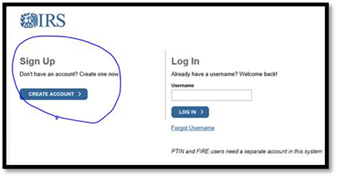
How do I direct the borrower to pull their own tax transcript?
IF your customer wants to try to pull their own transcripts online, here are a few tips on how to do this correctly…
- Use the MOST recent filed tax returns HANDY to look at (2018, or 2017, OR 2019 – whichever he/she filed last)
- USE an account that is directly reporting on their credit to get in to “round two” of authentication.
- Do not use a credit card or debit card – these usually DON’T work to authenticate (the IRS website LIKES AUTO accounts or MORTGAGE accounts best to authenticate)
Here are some instructions on how to try to pull your own transcripts.
The IRS is currently processing tax transcript requests only through their URL, the “individual get tax transcript website” found at https://www.irs.gov/individuals/get-transcript.
What you will need to know:
- Go to https://www.irs.gov/individuals/get-transcript
- Know the address you used on your last filed tax return.
- Know your tax filing status – either filed jointly or as an individual.
- A valid email address.
- Valid cell phone for a code confirmation.
- And a mortgage loan #, an auto loan #, to confirm your identity (see above).
- Download the most recent 3 years of “Record of Account Transcripts” and “Wage & Income Transcripts”
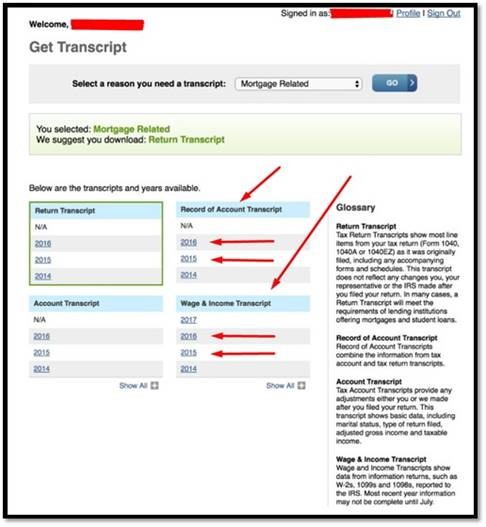
End of Explanation
What happens when a rate lock expires on the weekend or a holiday?
If a lock expires on a weekend or holiday, the expiration should automatically roll to the next business day. There is always the option to use the 1 day free rate lock extension. The steps to do so are below.
Also follow this link to view our rate lock policies and procedures here.
1. Log into DirectWare® at www.DirectCorp.com/Sitelogin/
2. Select the loan you wish to work on in the search Loans area of the Landing page header. You can search by loan number, by borrower first or last name (or use both), or use a partial name. There is also an “Advanced Search” option available to the right of the search box.
3. After opening the loan look to the side menu and find Lock Confirmation then click it.

4. Once the page loads locate the thumb menu on the loam page towards the header.
5. Once the menu opens click on Extend Lock and leave whatever notes are necessary.
6. Select how long you wish to extend the lock (extension prices will be listed) >> click “Save”.
End of Explanation
Last updated 1/12/21
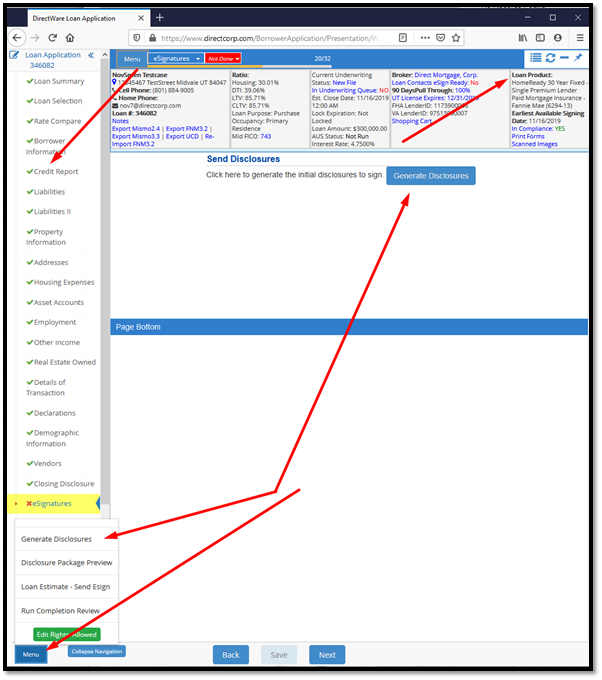
eSign Instructions
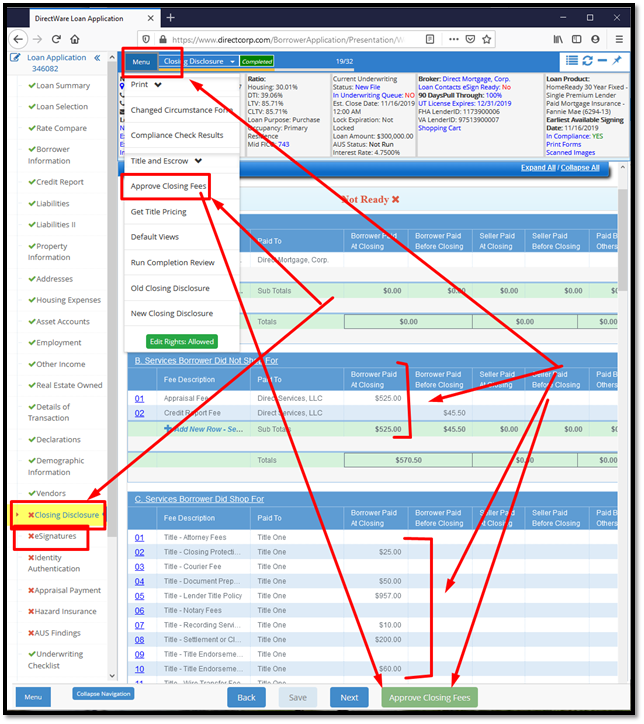
- Approve Closing Fees. Before sending the Initial Disclosures, the Loan Officer must review and approve their closing fees. They do this by reviewing the Closing Disclosure in the DirectWare After their review, they click the “Approve Closing Fees” button on the footer (or in the menu) of the Closing Disclosure.
- For Initial Disclosure purposes, the Closing Disclosure and the Loan Estimate are treated as being the same thing, i.e. the Loan Estimate is the Closing Disclosure.
- Generate eSign Disclosures. After approving their fees, the loan officer navigates to the eSignatures page, and simply clicks the button to generate disclosures. eSign emails and disclosures are generated by clicking this button.
- Best practices. It is always best for the loan officer to pull a full credit report, and select a loan product in DirectWare before sending disclosures. This is not required, but there underwriting requirements that can be added to the eSign process (i.e. credit explanations), and loan specific product information used in underwriting that can be automated if these steps are completed before disclosing. If the loan officer misses this the first time, they can always revisit the eSignatures page after completing the credit report and loan selection steps) and then click to “Generate Disclosures” option again (found in the menu).
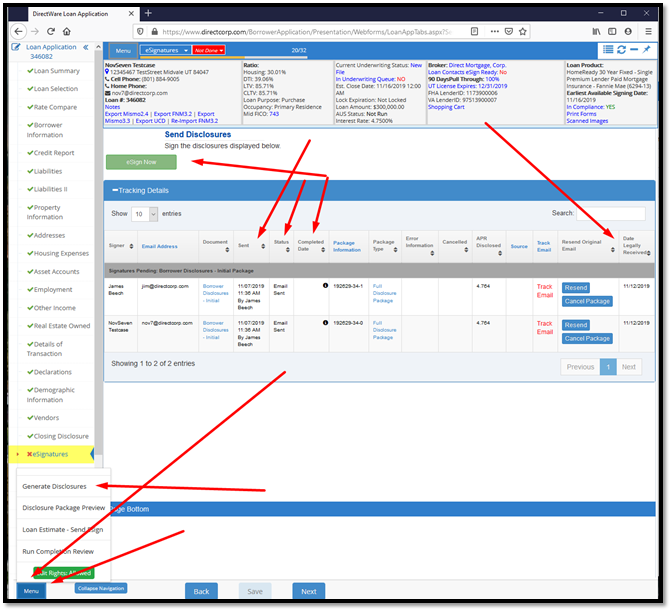
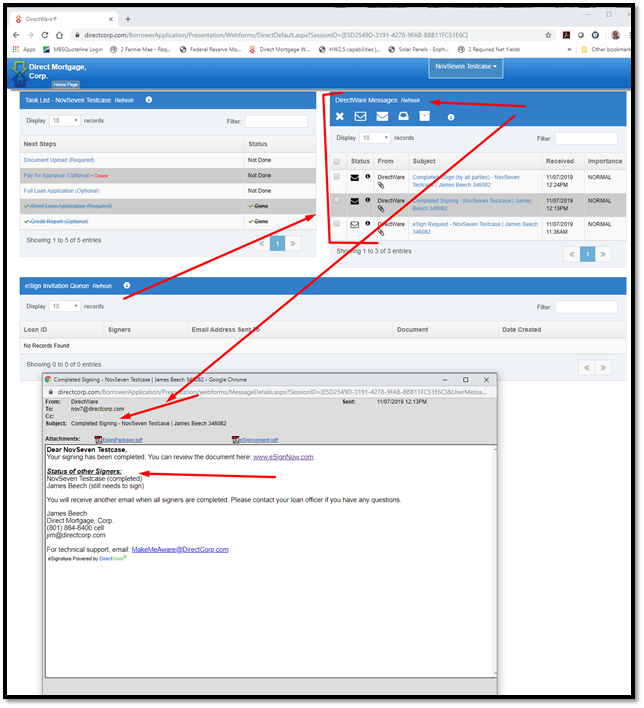
- After disclosures are sent, the loan officer can track the current status of all eSignature Packages right from the eSignatures screen.
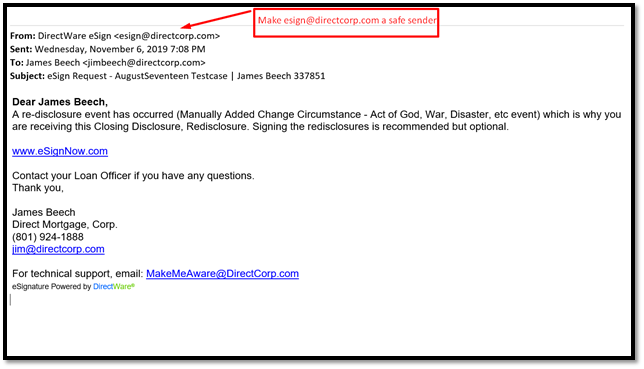
- Safe Sender. eSign Email Sender: esign@directcorp.com.
- Make sure the person receiving the eSign request makes us as a “safe sender” to avoid the email going into the Junk Mail folder.
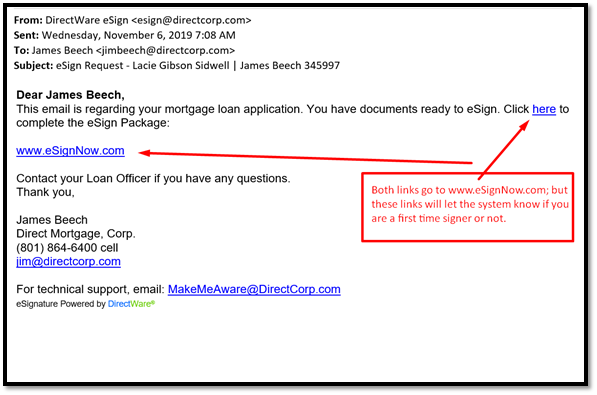
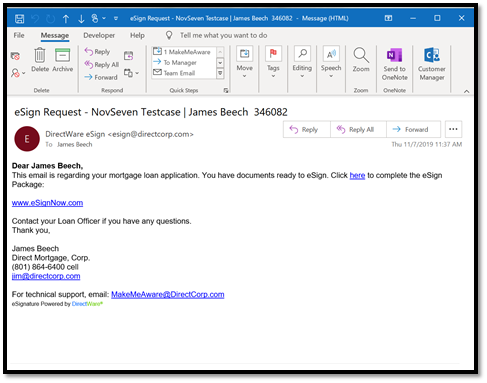
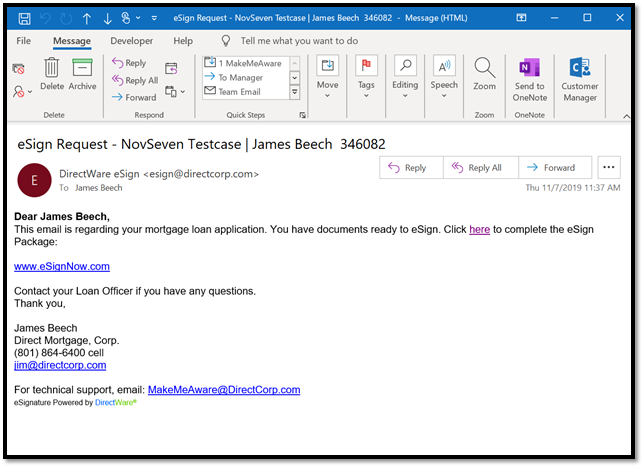
- Email receipt. The Signer (eSign receiver) will receive an email like the one shown in the screen shot below.
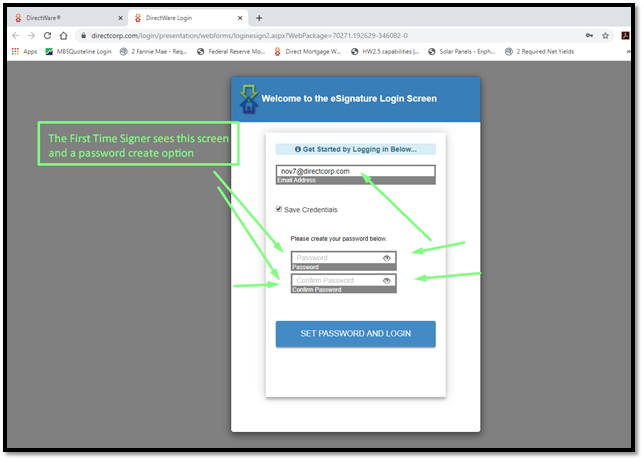
- First Time Signer. Click the link to set your password.
- Returning Signer. Enter your password created previously.
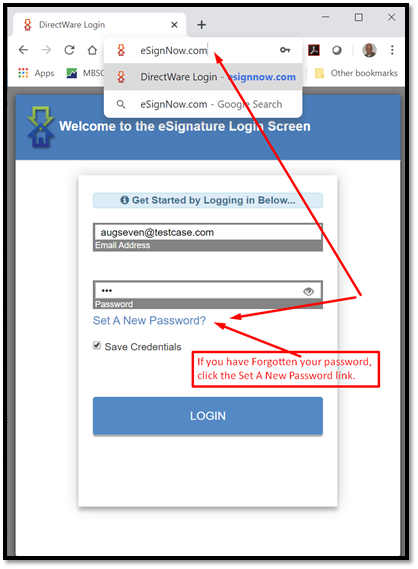
- Forgot Password. Simply click the link to reset the password. Make sure that your loan officer set your cell phone correctly, to add an additional option to email, when resetting your password.
- eSignNow.com. If No Email is Received, simply use this website: www.eSignNow.com.
- There is no requirement to receive an email. But if you are a first-time user, you will need to use the forgot password function (use the Set A New Password link) to create a password.
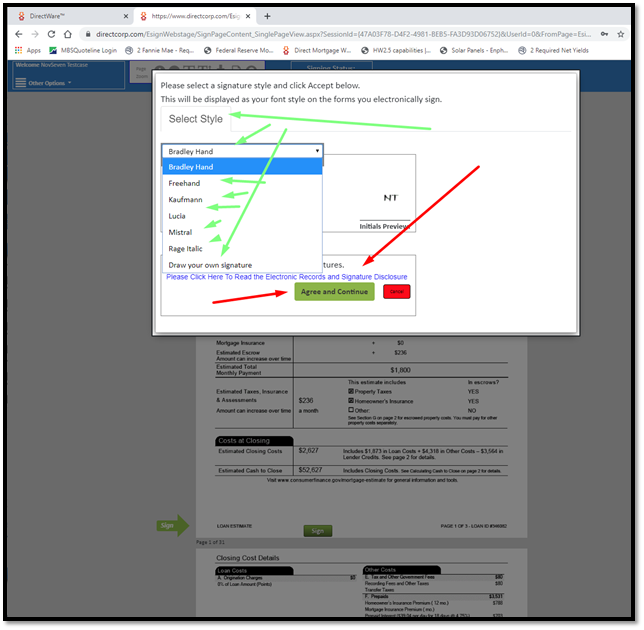
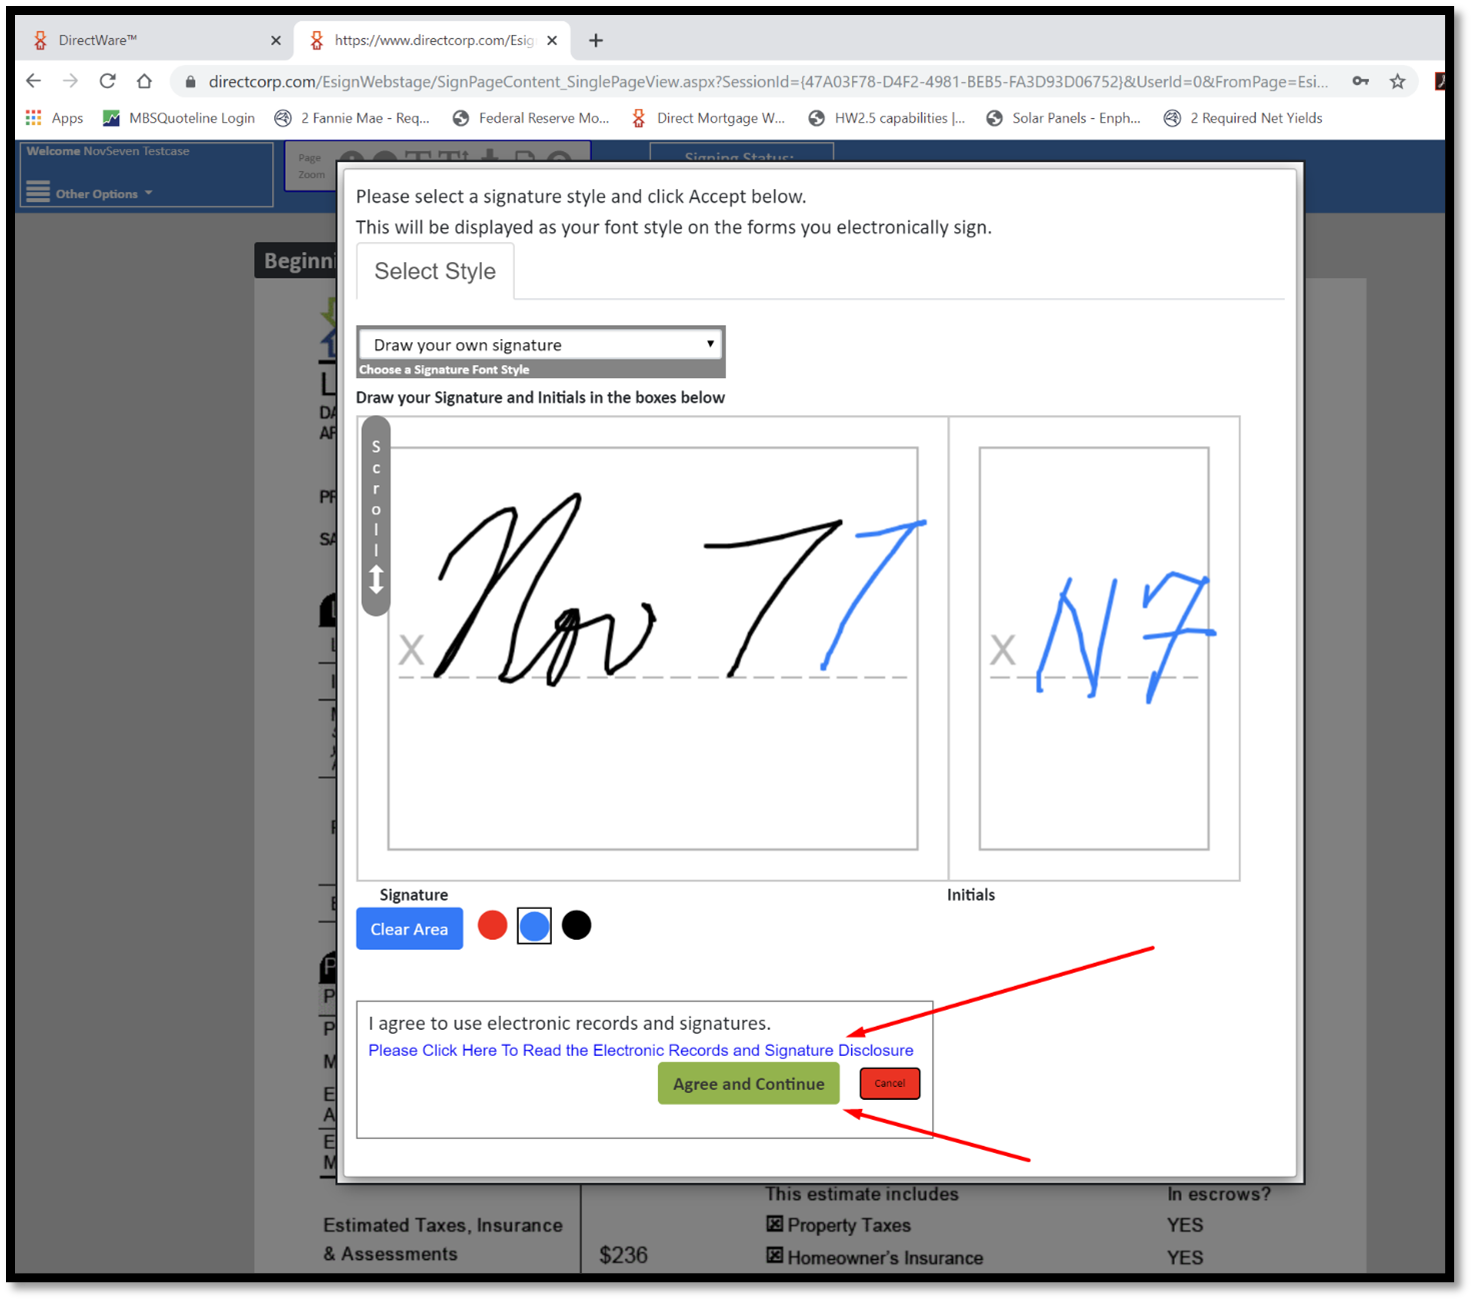
- Select a Signature Style and Agree to eSign Consent. During your first signing, you must first select a signature style to represent your signature. Then you must provide your eSign Consent. This allows you to eSign.
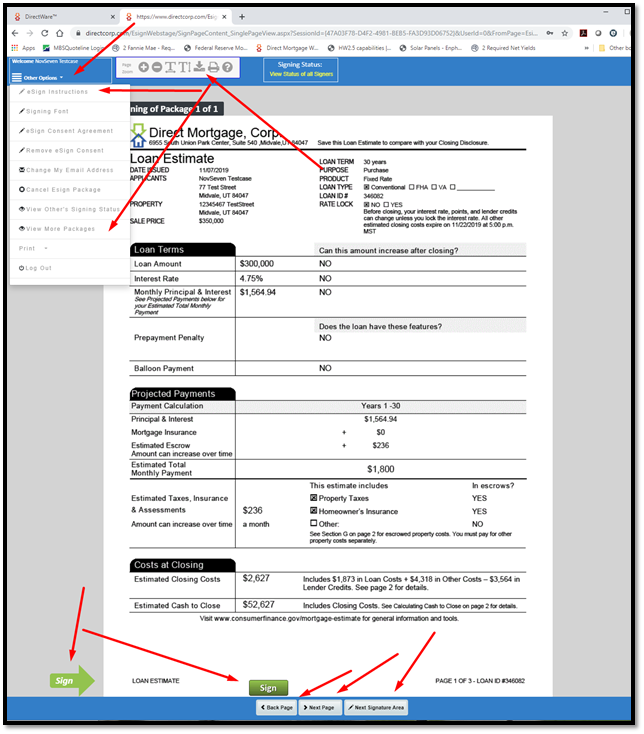
- Start signing. Either “Click with your mouse” the “Sign” tag, or use the “Space Bar on your keyboard” to eSign all of the documents. When you sign one page, the program will automatically skip to the next signing area. Or you can scroll upward or downward to any page.
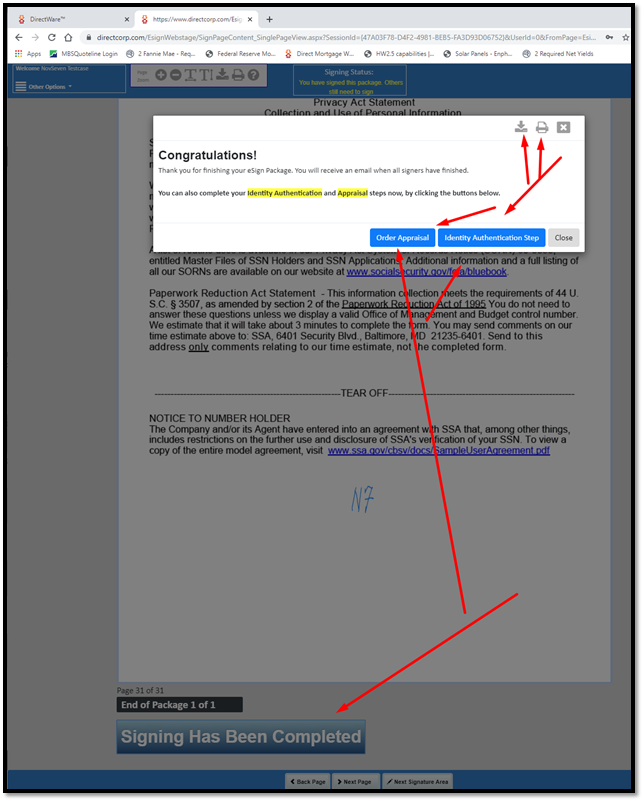
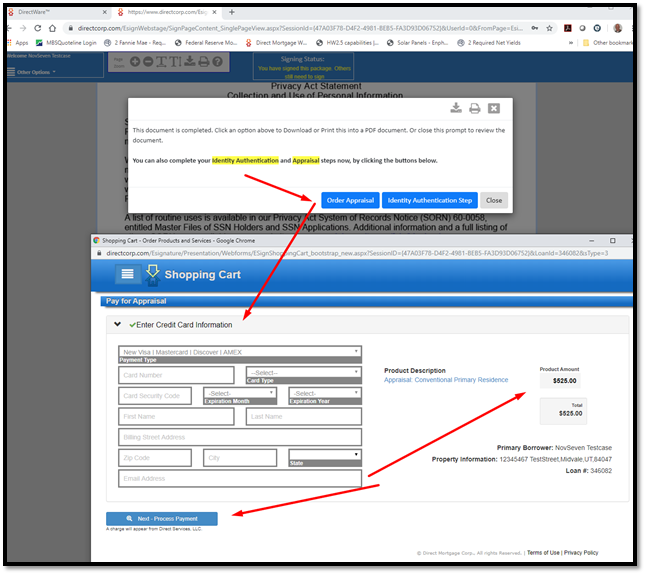
- Complete Signing. After signing the last required signature, you will be given an option to order the appraisal and to upload a Photo ID. These are optional (not required) at this stage, but will expedite your loan process if you complete them at this same time.
- Receive Signed Documents. To review your signed documents at any time, simply log back in to eSignNow.com and select the page you want to review. You can then download a PDF from there.
- Additionally, you will receive the following 3 emails for each eSign Package, as follows:
- 1) eSign Request. This is the invitation to eSign.
- 2) eSign Completed. This is the email you receive when you have completed signing. If you are the last person to sign a package then you won’t receive this email, but will receive the “all completed” email in place of this.
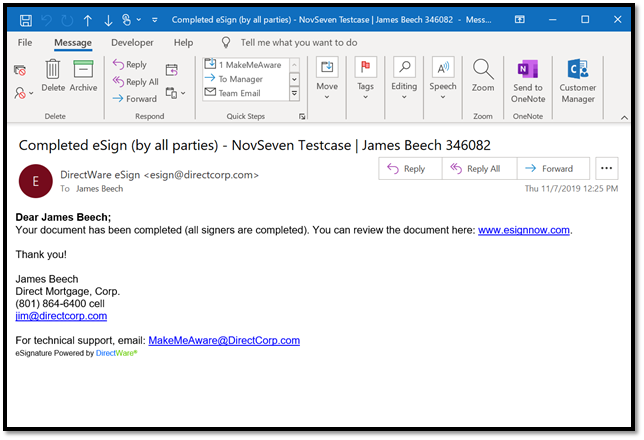
- 3) eSign Completed (all signers). This is the email you receive when all signers have completed signing.
- To download a PDF, you can either download right after completing the eSign, or follow the link and instructions given in the eSign Completed (all signers) completed email. Additionally, you don’t need an email to login to eSignNow.com at any time to review your packages – that are either signed or not signed.
- Underwriting and Automated Sign Off. Because DirectWare is integrated with our entire loan system, the underwriting conditions associated with these eSign documents are automatically signed off as the eSignatures are completed.
Following are the screenshots displaying each step above.
That’s it. Thank you!
Step 1
Approve Closing Fees. Before sending the Initial Disclosures, the Loan Officer must review and approve their closing fees. They do this by reviewing the Closing Disclosure in the DirectWare system. After their review, they click the “Approve Closing Fees” button on the footer (or in the menu) of the Closing Disclosure.
For Initial Disclosure purposes, the Closing Disclosure and the Loan Estimate are treated as being the same thing, i.e. the Loan Estimate is the Closing Disclosure.
Step 2
Generate eSign Disclosures. After approving their fees, the loan officer navigates to the eSignatures page, and simply clicks the button to generate disclosures. eSign emails and disclosures are generated by clicking this button.
Best practices. It is always best for the loan officer to pull a full credit report, and select a loan product in DirectWare before sending disclosures. This is not required, but there underwriting requirements that can be added to the eSign process (i.e. credit explanations), and loan specific product information used in underwriting that can be automated if these steps are completed before disclosing. If the loan officer misses this the first time, they can always revisit the eSignatures page after completing the credit report and loan selection steps) and then click to “Generate Disclosures” option again (found in the menu).
Step 3
Tracking. After disclosures are sent, the loan officer can track the current status of all eSignature Packages right from the eSignatures screen.
Step 4
Safe Sender Screen Shot. eSign Email Sender: esign@directcorp.com.
Make sure the person receiving the eSign request makes us as a “safe sender” to avoid the email going into the Junk Mail folder.
Step 5
Email receipt Screen Shot. The Signer (eSign receiver) will receive an email like the one shown in the screen shot below.
- First Time Signer. Click the link to set your password.
- Returning Signer. Enter your password created previously.
- Forgot Password. Simply click the link to reset the password. Make sure that your loan officer set your cell phone correctly, to add an additional option to email, when resetting your password.
Step 6
www.eSignNow.com. If No Email is Received, simply use this website: www.eSignNow.com.
There is no requirement to receive an email. But if you are a first-time user, you will need to use the forgot password function (use the Set A New Password link) to create a password.
Step 7
Select a Signature Style and Agree to eSign Consent. During your first signing, you must first select a signature style to represent your signature. Then you must provide your eSign Consent. This allows you to eSign.
Step 8
Start signing. Either “Click with your mouse” the “Sign” tag, or use the “Space Bar on your keyboard” to eSign all of the documents. When you sign one page, the program will automatically skip to the next signing area. Or you can scroll upward or downward to any page.
Step 9
Complete Signing. After signing the last required signature, you will be given an option to order the appraisal and to upload a Photo ID. These are optional (not required) at this stage, but will expedite your loan process if you complete them at this same time.
Step 10
Receive Signed Documents. To review your signed documents at any time, simply log back in to www.eSignNow.com and select the page you want to review. You can then download a PDF from there.
Additionally, you will receive the following 3 emails for each eSign Package, as follows:
1) eSign Request. This is the invitation to eSign.
2) eSign Completed. This is the email you receive when you have completed signing. If you are the last person to sign a package then you won’t receive this email, but will receive the “all completed” email in place of this.
3) eSign Completed (all signers). This is the email you receive when all signers have completed signing.
To download a PDF, you can either download right after completing the eSign, or follow the link and instructions given in the eSign Completed (all signers) completed email. You don’t need an email to login to www.eSignNow.com at any time to review your packages – that are either signed or not signed.
The Borrower View screen shot below is for partially completed packages, and showing where the eSign messages can be found – in addition to the borrower’s email inbox. This screen shot was accessed by a borrower login at www.DirectCorp.com.
Step 11
Underwriting and Automated Sign Off. Because DirectWare is integrated with our entire loan system, the underwriting conditions associated with these eSign documents are automatically signed off as the eSignatures are completed.
End of Explanation.
Are we automatically approved to do VA loans when we sign up?
While waiting for sponsorship approval, Direct Mortgage, Corp. (DMC) may allow you to close up to 2 VA loans. Brokers are not automatically approved to do VA loans upon sign-up approval with DMC.
The process to become VA Sponsored by DMC is simple:
1) Send us a $100.00 check, made payable to the Veterans Administration.
2) Mail to: Direct Mortgage, Corp., Attn: VA Sponsorship, 12750 Merit Drive, Ste. 815, Dallas, TX 75251. We will forward the required request form to the VA and notify you when sponsorship is approved.
Annual VA Renewal: The VA requires you to renew the sponsorship each year. This is done by sending us a payment each year. Currently, the renewal amount is $100.00.
End of Explanation.
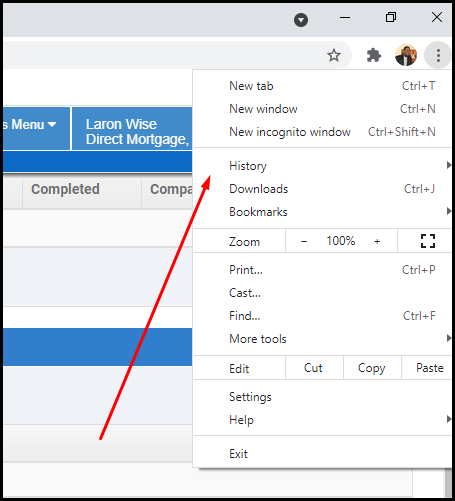
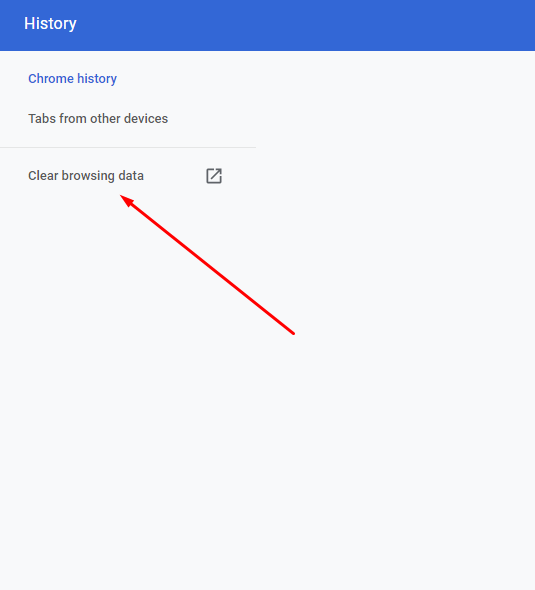
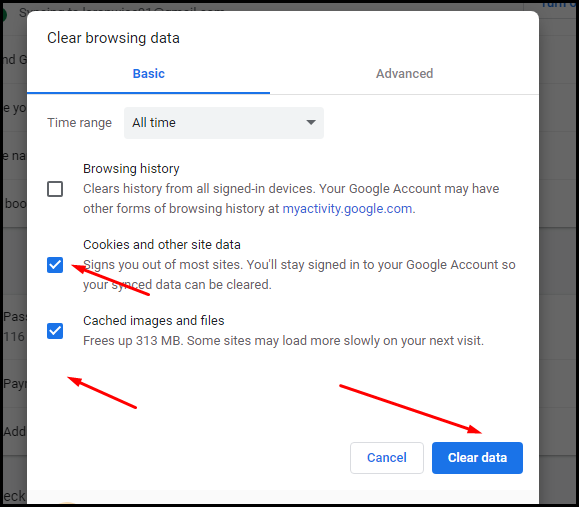
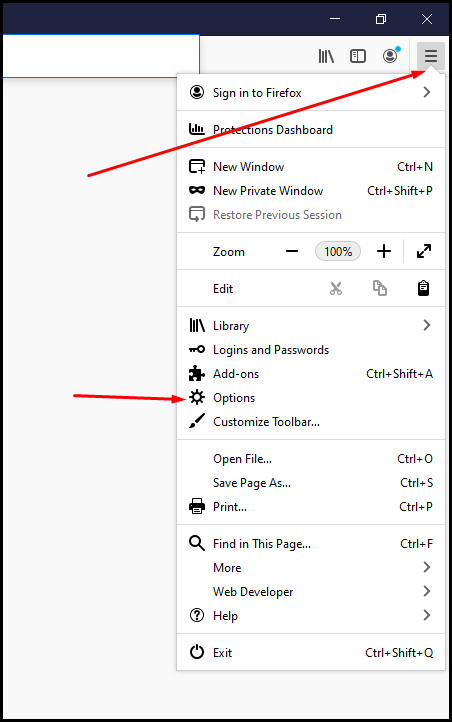
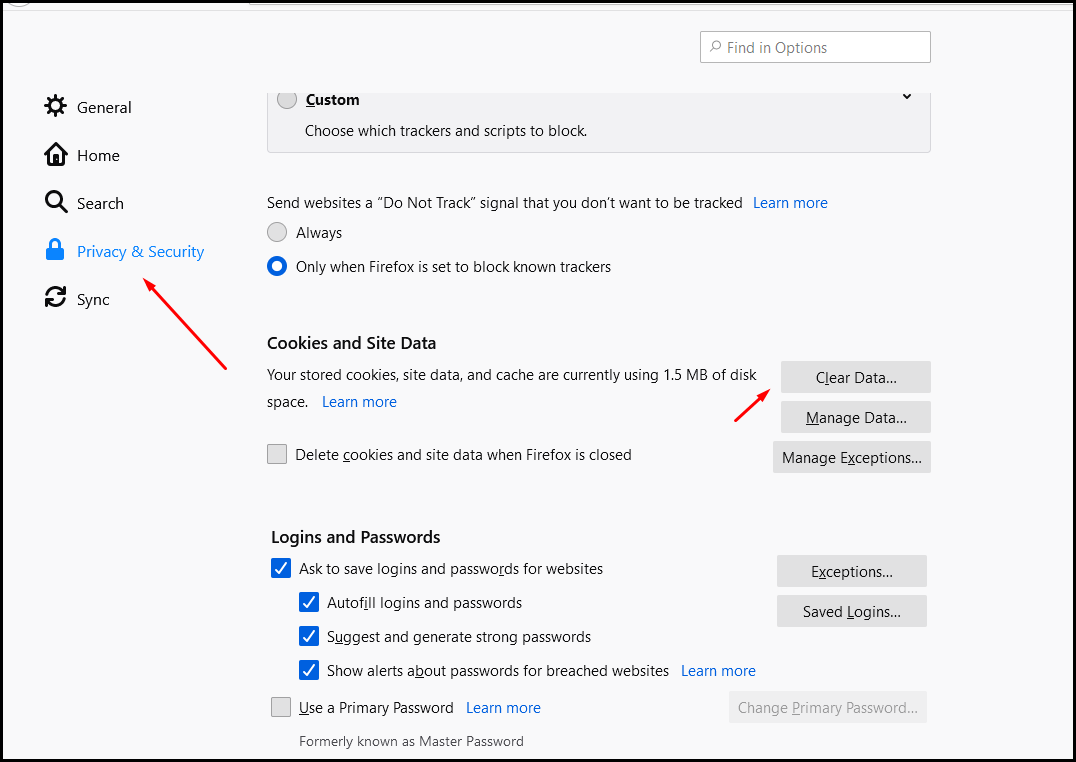
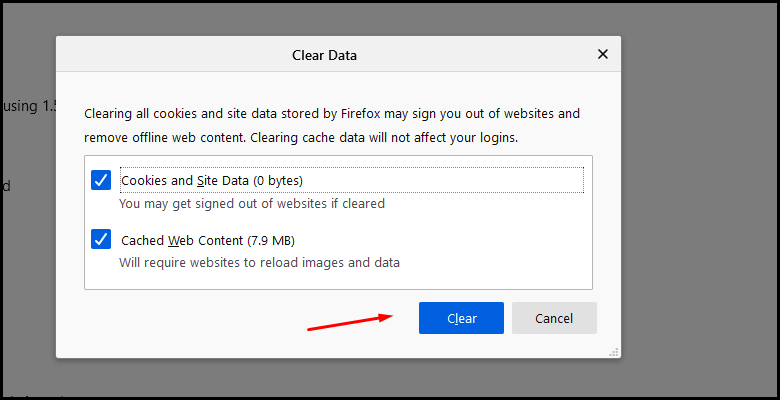
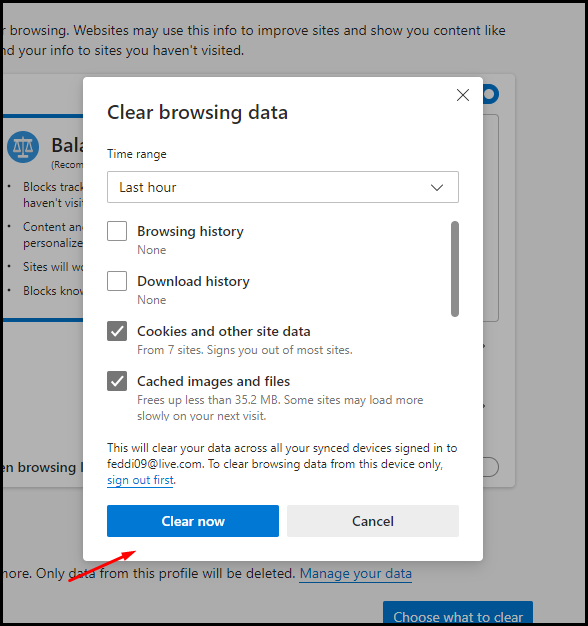
Clearing Temp Files On Browsers (Chrome, FireFox, Internet Explorer & Edge)
Chrome:
Step 1 Click on the vertical dotted lines in the upper right hand corner and then click History.
Step 2: Click on the Clear Browsing Data hyperlink
Step 3: Make sure Cookies and Cache are checked then click the “Clear Data” button.
Firefox:
Step 1: Click on the three stacked horizontal lines in the upper right hand corner then click Options.
Step 2: Click on the Privacy & Security tab and scroll down to the Cookie and Site Data portion. Click on the “Clear Data” button.
Step 3: Click the “Clear” button.
Edge:
Step 1: Click on the three horizontal lines in the upper right hand corner then click History.
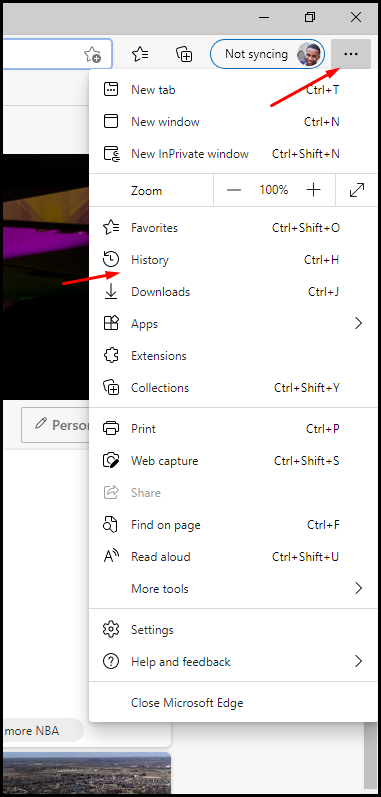
Step 2: Click on the three horizontal lines in the upper right hand corner then click Clear Browsing Data.
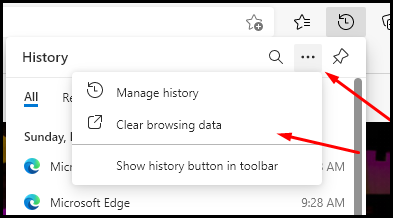
Step 3: Make sure Cookies and Cache are checked then click the “Clear Data” button.
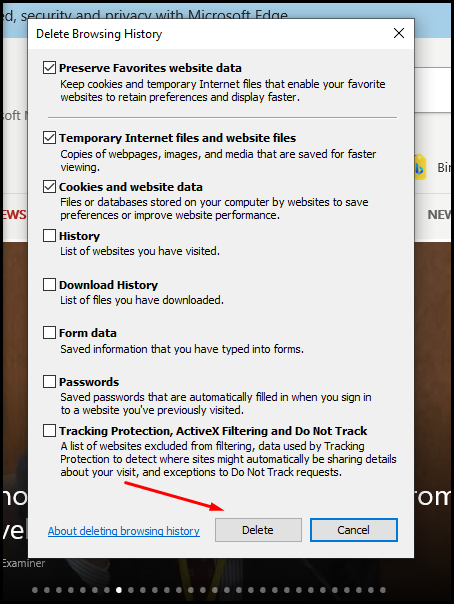
Internet Explorer:
Step 1: Click the gear in the upper right hand corner then click Internet Options
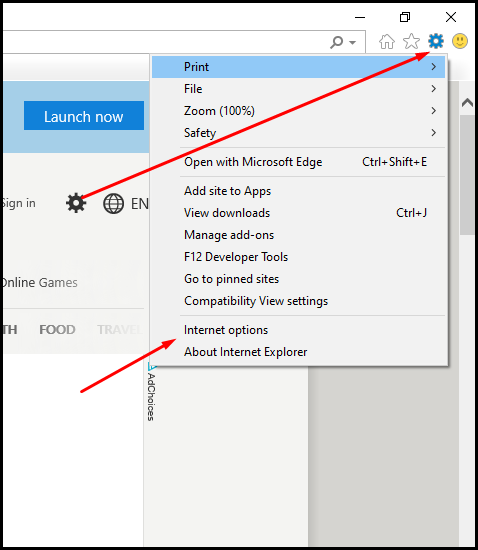
Step 2: On the General Tab click the “”Delete” button.
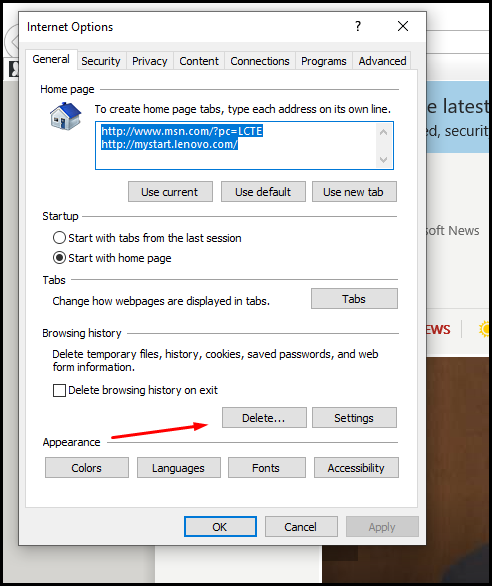
Step 3: Make sure Cookies and Temp Files are checked and then click the “Delete” button.
Which Type of Loan Is Best?
When it comes to life’s most important decision, different situations call for different solutions. To figure out what is the best loan program for you, consult with an expert loan officer to go over your information to figure out what works best for you.
End of Explanation.
This post was last updated on 4/19/2021.
What Is the Interest Rate and Annual Percentage Rate?
The interest rate is the cost you will pay each year to borrow the money, expressed as a percentage rate. It does not reflect fees or any other charges you may have to pay for the loan.
An annual percentage rate (APR) is a broader measure of the cost of borrowing money than the interest rate. The APR reflects the interest rate, any points, mortgage broker fees, and other charges that you pay to get the loan. For that reason, your APR is usually higher than your interest rate.
End of Explanation.
This post was last updated on 4/19/2021.
What Are the Discount Points and Origination Fees?
Discount points, in their simplest form, are fees that give you an opportunity to lower your interest rate, which also lowers your monthly mortgage payment. In this sense, discount points serve as prepaid interest on your mortgage.
Loan origination fees cover the mortgage company’s costs in processing the loans.
End of Explanation.
This post was last updated on 4/19/2021.
When can I lock?
You can lock the loan as soon as you choose your loan program and fill out some preliminary information.
End of Explanation.
This post was last updated on 4/19/2021.
How fast can I refinance?
You will need to wait at least six consecutives on time monthly payments to refinance.
End of Explanation.
This post was last updated on 4/19/2021.
How do I know of servicing changes?
You will be sent a letter from us as well as an email with your new servicer’s information.
End of Explanation.
This post was last updated on 4/19/2021.
Is There a Prepayment Penalty?
Currently the programs we offer do not have a prepayment penalty.
End of Explanation.
This post was last updated on 4/19/2021.
How Much of a Down Payment Is Required?
Down payment needed can vary from loan program to loan program. Below are just a view examples of down payment structure for different types of loan programs.
VA Loans – Require no down payment.
USDA Loans – Require no down payment.
FHA Loans – You can borrow up to 96.5% of the value of a home with an FHA loan. This means you will need to make a down payment of 3.5%. You will need a credit score of at least 580 to qualify. If your credit score falls between 500 and 579, you can still get an FHA loan as long as you can make a 10% down payment.
Conventional Loans – It’s possible for first-time home buyers to get a conventional mortgage with a down payment as low as 3%; however, the down payment requirement can vary based on your personal situation and the type of loan or property you are getting:
If you are not a first-time home buyer or making not more than 80% of the median income in your area, the down payment requirement is 5%.
If the home you are buying is not a single-family home (i.e., it has more than one unit), you may need to put down 15%.
If you are buying a second home, you will need to put at least 10% down.
If you are getting an adjustable-rate mortgage, the down payment requirement is 5%.
If you are getting a jumbo loan, the down payment requirement ranges from 20% to 40%.
If you are refinancing, you will need more than 3% equity to refinance. In all cases, you will need at least 5% equity. If you are doing a cash-out refinance, you will need to leave at least 20% equity in the home. When refinancing a jumbo loan, you will need 10.01% – 25% equity, depending on the loan amount.
How do I change my lender comp?
View the plan by clicking in the loan contacts area of any Loan Application (click path is shown in screen shot below). If you have never set a plan, then you can do that in the Loan Selection / Price a Loan Scenario page. You can change this Lender Paid Comp plan anytime you want. Each plan created has a 2-week duration period, so you cannot change a loan retroactively… You would need to wait for the new plan beginning date, before creating a loan number that has the new compensation plan.
Lender Comp Plan.
Loan Application -> Loan Contacts area. See all screen shots.
Method 1, from the loan application area.
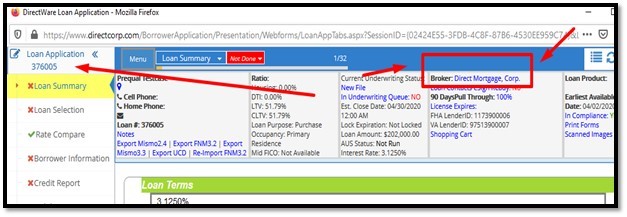
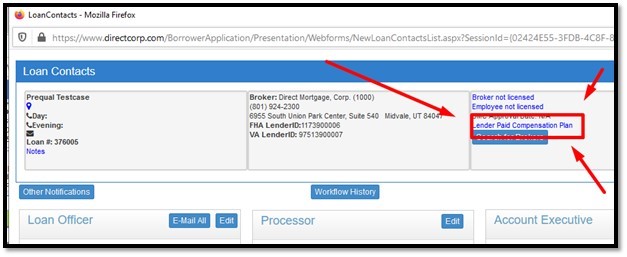
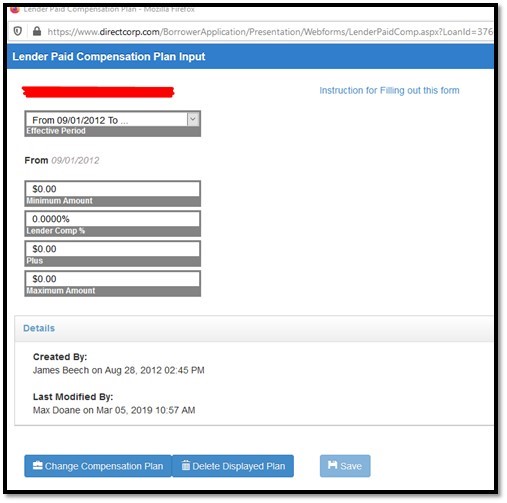
Method 2 – if no Lender Comp Plan has ever been created, then you can do this from the Loan Selection form.
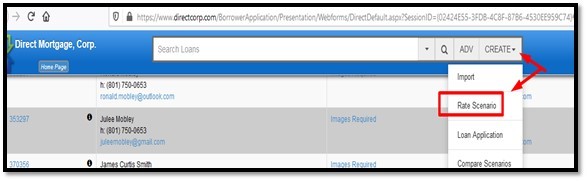
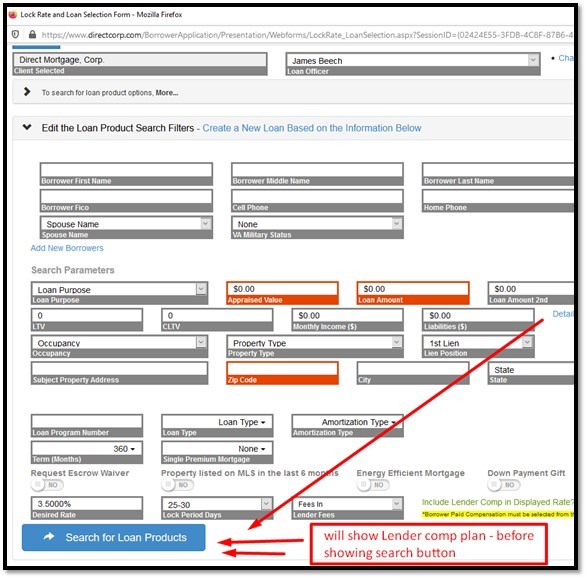
This also answers the questions for:
Where to find my lend paid comp?
Where to find my lender paid comp?
End of Explanation
This post was last updated 5/3/21